This guide is an overview of the embed form option. The process is pretty simple, first, you build and customize a form within Lead Generated. Next, you copy a small piece of code and it onto your website. Wherever you paste the code that is where your form will appear. This creates a direct connection to Lead Generated. As users fill out the form on your website their submissions will be available immediately within our system.
Benefits of the Embed Form Option
- Can work with any type of website
- Quick and easy to set up
- No software conflicts with Google Ads
- Allows country-level IP address filtering
- Form submissions instantly available within Lead Generated
Website Forms
Before we dive into the embed form option, it is necessary to have a good understanding of website forms. We will cover it briefly here but it is recommended that you read through the website forms documentation to gain a solid understanding of the role they play within the lead management module and how they relate to embedded forms.
Every company has an associated website form. When you first created your company you were given a choice of which form to use. You can create, edit, or change the website form at any time. Your website form is composed of fields, these fields align with the fields on your website. For each new field that you create on a website form, it creates a column, similar to a column on a spreadsheet to store values from your website. These columns are able to searched, filtered, sorted, and used in reports throughout the lead management module. It is recommended to reuse the same fields in different forms whenever possible.
The website form associated with your company is the starting point of your embedded form. From the edit form page, you can customize the visibility of the fields as well as the types of fields and their options. The integrations page will allow you to further control the behavior of the embedded form and styling through the use of custom HTML or CSS.
Step by Step Guide
Creating an Embed Code
You will first need to go to the Integrations module in the left-hand navigational menu. Click on Settings, this will expand and provide you further options. Then click on Integrations and you will see a screen similar to the one below.
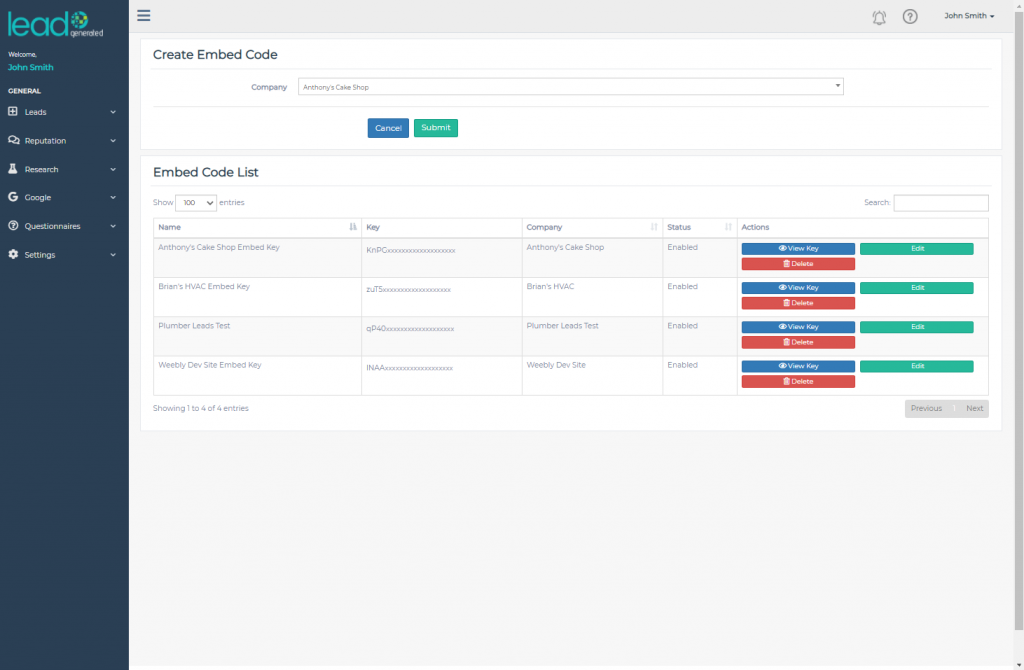
Click on the EMBED FORM button on the Embed box. This will take you to the Create Embed Code screen
You need to first select the Company you wish to create an embed code key for. Click on the dropdown arrow at the far right hand side of the Company field.
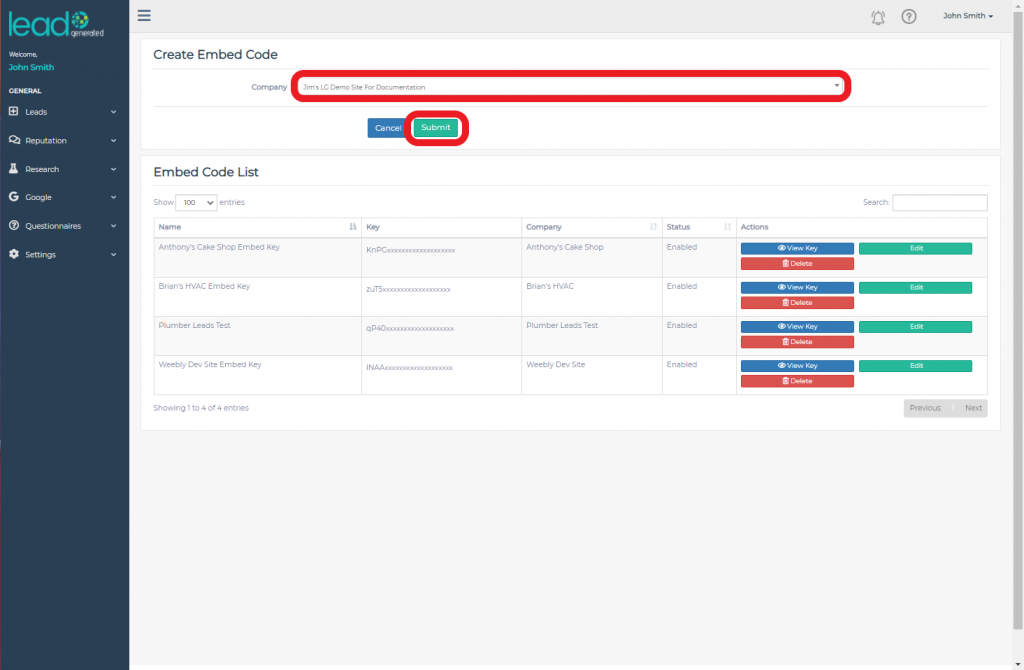
This will present you with a list of all the companies you have setup. Scroll down to the one you want and select it.
With the company selected you will now need to click the Submit button to create a new embed code key.
A dialog box will pop up offering you three options. This is where you choose how the site should respond to the customer once they have completed and submitted your form.
The Redirect URL allows you to the page you would like to send users to have they submit a form, such as a thank you page.
For something more simple, the Success Message will simply display the text you enter here in place of the form when they have submitted it.
You only can add ONE of these options. You must not only complete the field but click on the option you want to use so that you have a blue circle next to it.
If you do not select any of the options, or you skip this part, the system will provide you with a generic "Thank you for Submitting" message.
For the purposes of this support guide, we will use the Success Message.
Finally, for those code gurus out there, you have the option of adding some HTML and CSS to further customize the style of the form.
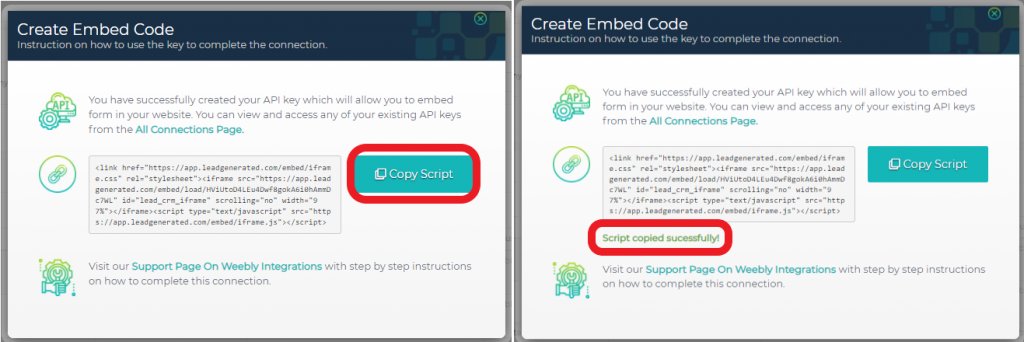
When you click on the Save button you will then be presented with a Create Embed Code pop up screen. This will have your newly created embed code key and instructions on how to use it.
Click on the Copy Script button will put the script into your system clipboard. It will also display a "Script copied Successfully!" message underneath the script window.
Embedding Code in Site
Now you have created the form and the embed script, you need to add it to your site.
Weebly
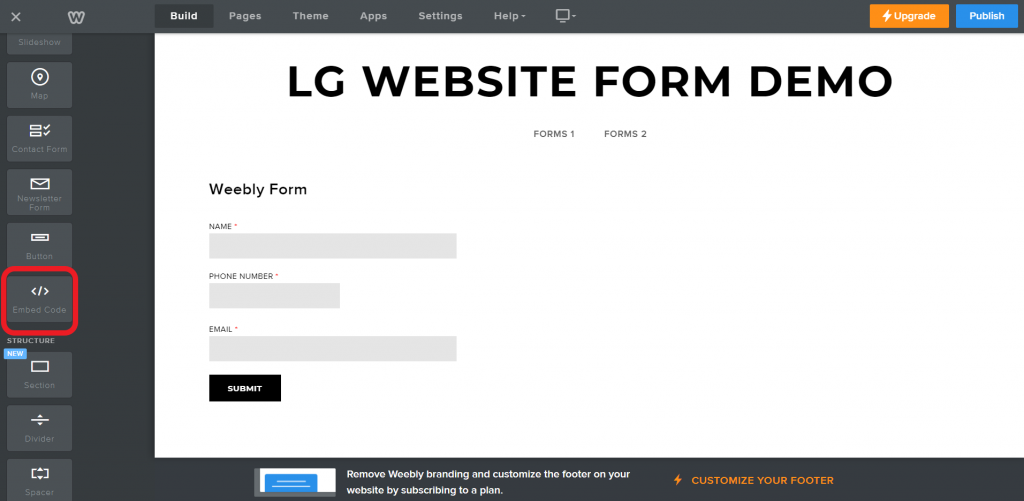
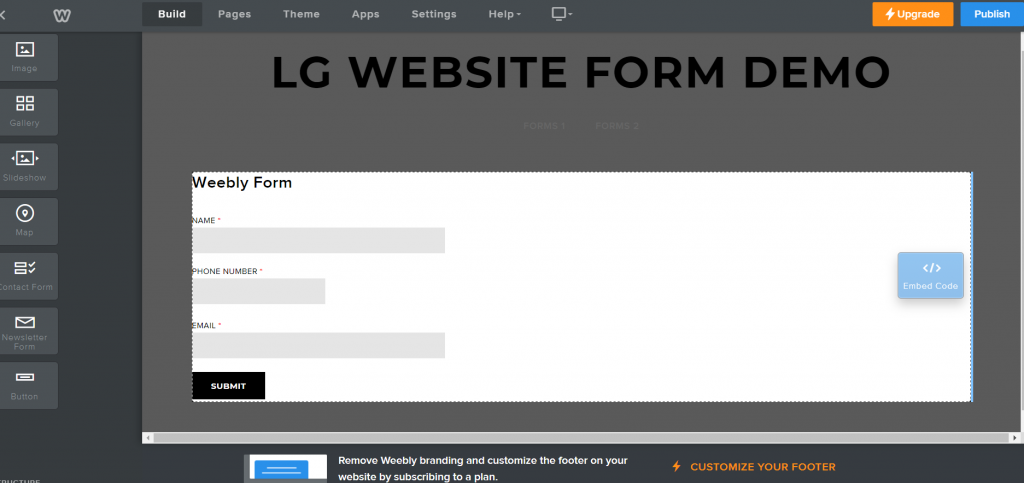
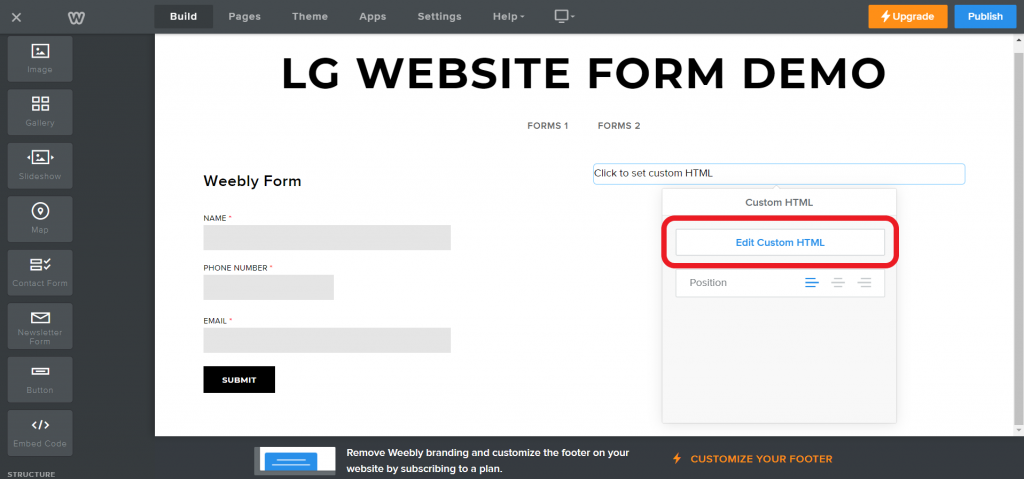
Scroll down the tools in the left hand side until you find the "</> Embed Code" widget. Drag this onto your page. Clicking on it will bring up the Custom HTML options. Select "Edit Custom HTML", this will enable you to add the embed code you created earlier.
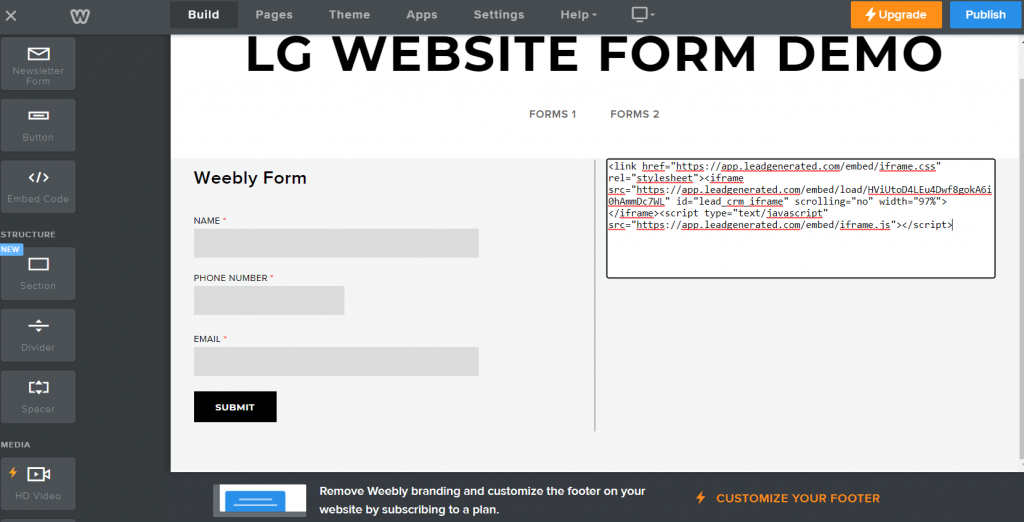
Paste the embed script from your form into the script area and click outside of the box. This will save the editing and connect to the Lead Generated system and fetch the form you created.
Don't forget to Save or Publish your changes so you don't lose them.
Wordpress
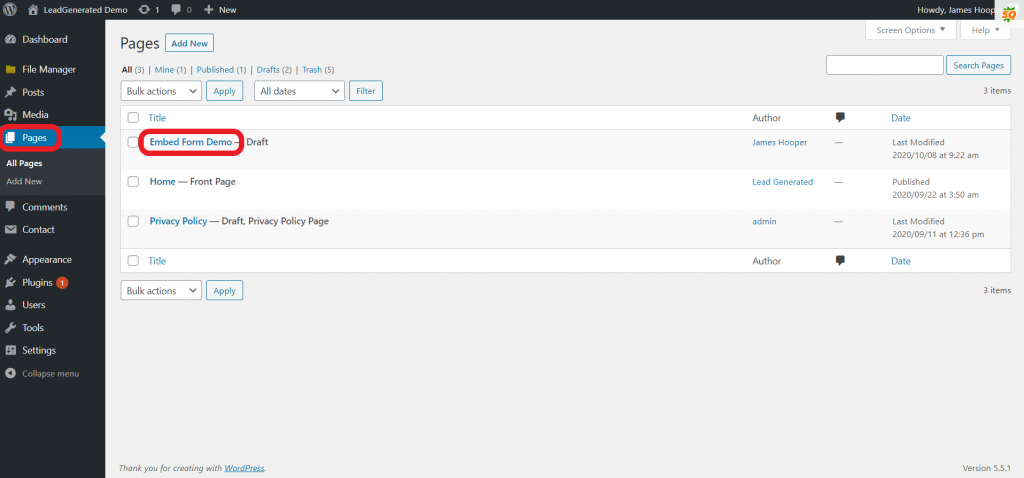
Click on Pages and select the page you want to embed the form on.
Select the "Text" tab and paste the embed form code into the text field.
Finally Click on the "Save Draft", "Save as Pending" or "Update" button, depending what state your current page is in development, to make sure you don't lose the changes.
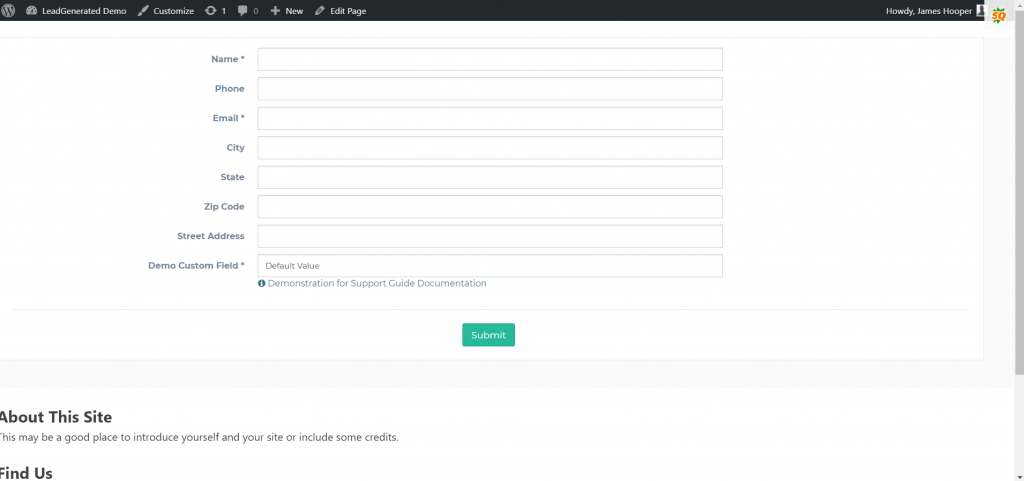
Click on Preview and you will now be presented with your page displaying the new embedded form.
This guide is an overview of the embed form option. The process is pretty simple, first, you build and customize a form within Lead Generated. Next, you copy a small piece of code and it onto your website. Wherever you paste the code that is where your form will appear. This creates a direct connection to Lead Generated. As users fill out the form on your website their submissions will be available immediately within our system.
Video Overview
Benefits of the Embed Form Option
- Can work with any type of website
- Quick and easy to set up
- No software conflicts with Google Ads
- Allows country-level IP address filtering
- Form submissions instantly available within Lead Generated
Website Forms
Before we dive into the embed form option, it is necessary to have a good understanding of website forms. We will cover it briefly here but it is recommended that you read through the website forms documentation to gain a solid understanding of the role they play within the lead management module and how they relate to embedded forms.
Every company has an associated website form. When you first created your company you were given a choice of which form to use. You can create, edit, or change the website form at any time. Your website form is composed of fields, these fields align with the fields on your website. For each new field that you create on a website form, it creates a column, similar to a column on a spreadsheet to store values from your website. These columns are able to searched, filtered, sorted, and used in reports throughout the lead management module. It is recommended to reuse the same fields in different forms whenever possible.
The website form associated with your company is the starting point of your embedded form. From the edit form page, you can customize the visibility of the fields as well as the types of fields and their options. The integrations page will allow you to further control the behavior of the embedded form and styling through the use of custom HTML or CSS.
Step by Step Guide
Creating an Embed Code
You will first need to go to the Integrations module in the left-hand navigational menu. Click on Settings, this will expand and provide you further options. Then click on Integrations and you will see a screen similar to the one below.
Click on the EMBED FORM button on the Embed box. This will take you to the Create Embed Code screen
You need to first select the Company you wish to create an embed code key for. Click on the dropdown arrow at the far right hand side of the Company field.
This will present you with a list of all the companies you have setup. Scroll down to the one you want and select it.
With the company selected you will now need to click the Submit button to create a new embed code key.
A dialog box will pop up offering you three options. This is where you choose how the site should respond to the customer once they have completed and submitted your form.
The Redirect URL allows you to the page you would like to send users to have they submit a form, such as a thank you page.
For something more simple, the Success Message will simply display the text you enter here in place of the form when they have submitted it.
You only can add ONE of these options. You must not only complete the field but click on the option you want to use so that you have a blue circle next to it.
If you do not select any of the options, or you skip this part, the system will provide you with a generic "Thank you for Submitting" message.
For the purposes of this support guide, we will use the Success Message.
Finally, for those code gurus out there, you have the option of adding some HTML and CSS to further customize the style of the form.
When you click on the Save button you will then be presented with a Create Embed Code pop up screen. This will have your newly created embed code key and instructions on how to use it.
Click on the Copy Script button will put the script into your system clipboard. It will also display a "Script copied Successfully!" message underneath the script window.
Embedding Code in Site
Now you have created the form and the embed script, you need to add it to your site.
Weebly
Scroll down the tools in the left hand side until you find the "</> Embed Code" widget. Drag this onto your page. Clicking on it will bring up the Custom HTML options. Select "Edit Custom HTML", this will enable you to add the embed code you created earlier.
Paste the embed script from your form into the script area and click outside of the box. This will save the editing and connect to the Lead Generated system and fetch the form you created.
Don't forget to Save or Publish your changes so you don't lose them.
Wordpress
Click on Pages and select the page you want to embed the form on.
Select the "Text" tab and paste the embed form code into the text field.
Finally Click on the "Save Draft", "Save as Pending" or "Update" button, depending what state your current page is in development, to make sure you don't lose the changes.
Click on Preview and you will now be presented with your page displaying the new embedded form.


