Google Ads Overview

If this is your first time using this tool we highly recommend you watch the video overview below for a comprehensive step by step guide to how to use the tool.

To understand how this tool works you must have some basic knowledge of how Google Ads work.

You may or may not know that your cost per click is in part determined by 1 to 10 ranking system Google created called quality score. As your quality score improves your cost per click decreases. One of the main components of quality is score is ad relevance.

Ad revelevance considers the relationship of your ad copy to the search term inputted by the person searching Google. If the search phrase is closely related to your ad copy you will have a high relevance score, thus improving your quality score and lowering your cost per click.

Our Google Ads SKAGs allows you to build hyper relevant ads and it can be done very quickly. You can build hundreds of ads that have an exact match with the most popular search terms in only a few minutes.

Step By Step Guide

  1. On the left menu, expand Google.
  2. Select Google Ads Tool
  3. Input the name of the Google Ads campaign
  4. Paste in your keywords into the keywords box that you would like to use for your new campaign.
  5. Select the modifiers that will be applied to your keywords.
  6. Choose a prefix and suffix for your keywords. These boxes are optional and are often left blank for your main keyword lists as these will be applied to every keyword in your list.
  7. For headline 1 choose an alternative to be used if your keyword exceeds the allotted character limit.
  8. Choose a headline to be used for headline two for all ads.
  9. Choose a headline to be used for headline three for all ads.
  10. This description is required and will be used for each of your ads that are created.
  11. Just like the primary description the secondary description will be present for all ads although like headslines two and three many times Google does not show this information.
  12. Description two is not required but it is recommended as we want to take up as much real estate as possible when our ad shows.
  13. Path one is not required but is highly recommended as it will improve quality score and click through rates.
  14. Just like path one, path two is not required but is highly recommended for it’s click through rate and quality score improvements.
  15. The landing page URL is the page where users who click on your ads will be redirected to.
  16. Mobile page URL is not required, and is used if you have a separate landing page for mobile users.
  17. Click next to go to step 3.
  18. On the third step you can download all the files which have been created based on your input from the first two steps.
  1. Campaign
  2. Ad Groups
  3. Keywords
  4. Ads

Video Tutorial

Need more details or just want to see how it’s done? Watch the video below.

Mapping Form Fields

What is Field Mapping?

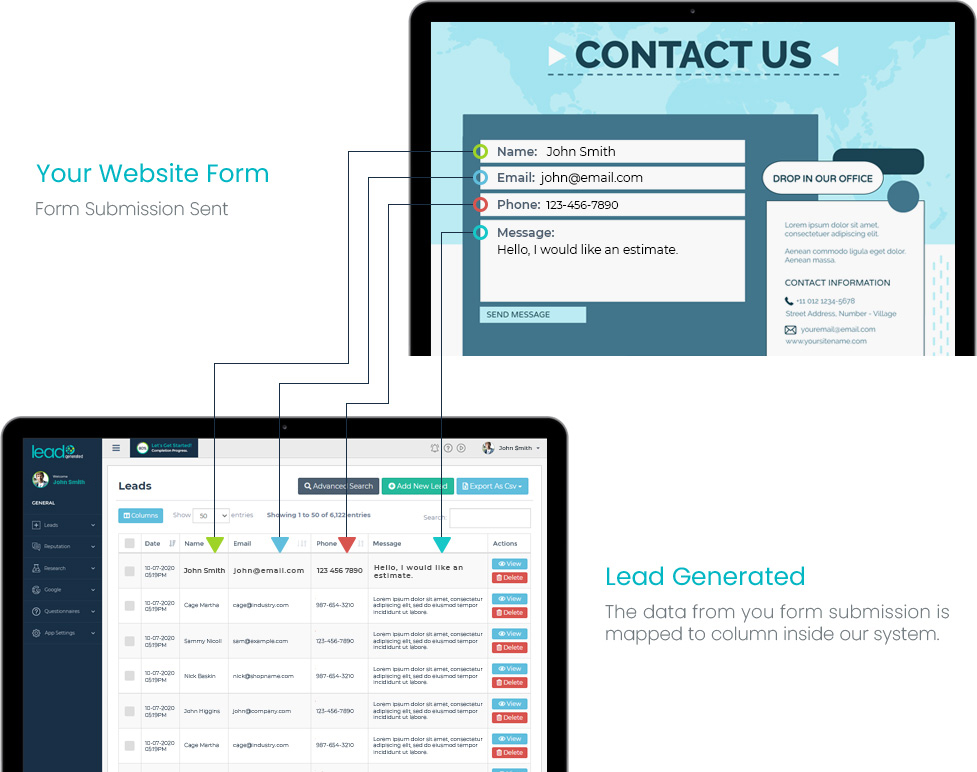
After making the connection between your website and Lead Generated any form submissions will appear in our system immediately. As the leads flow into our system we need to know where to store things. We refer to the process of teaching Lead Generated in what places to store them as field mapping. You can create new places to map things through our website forms.

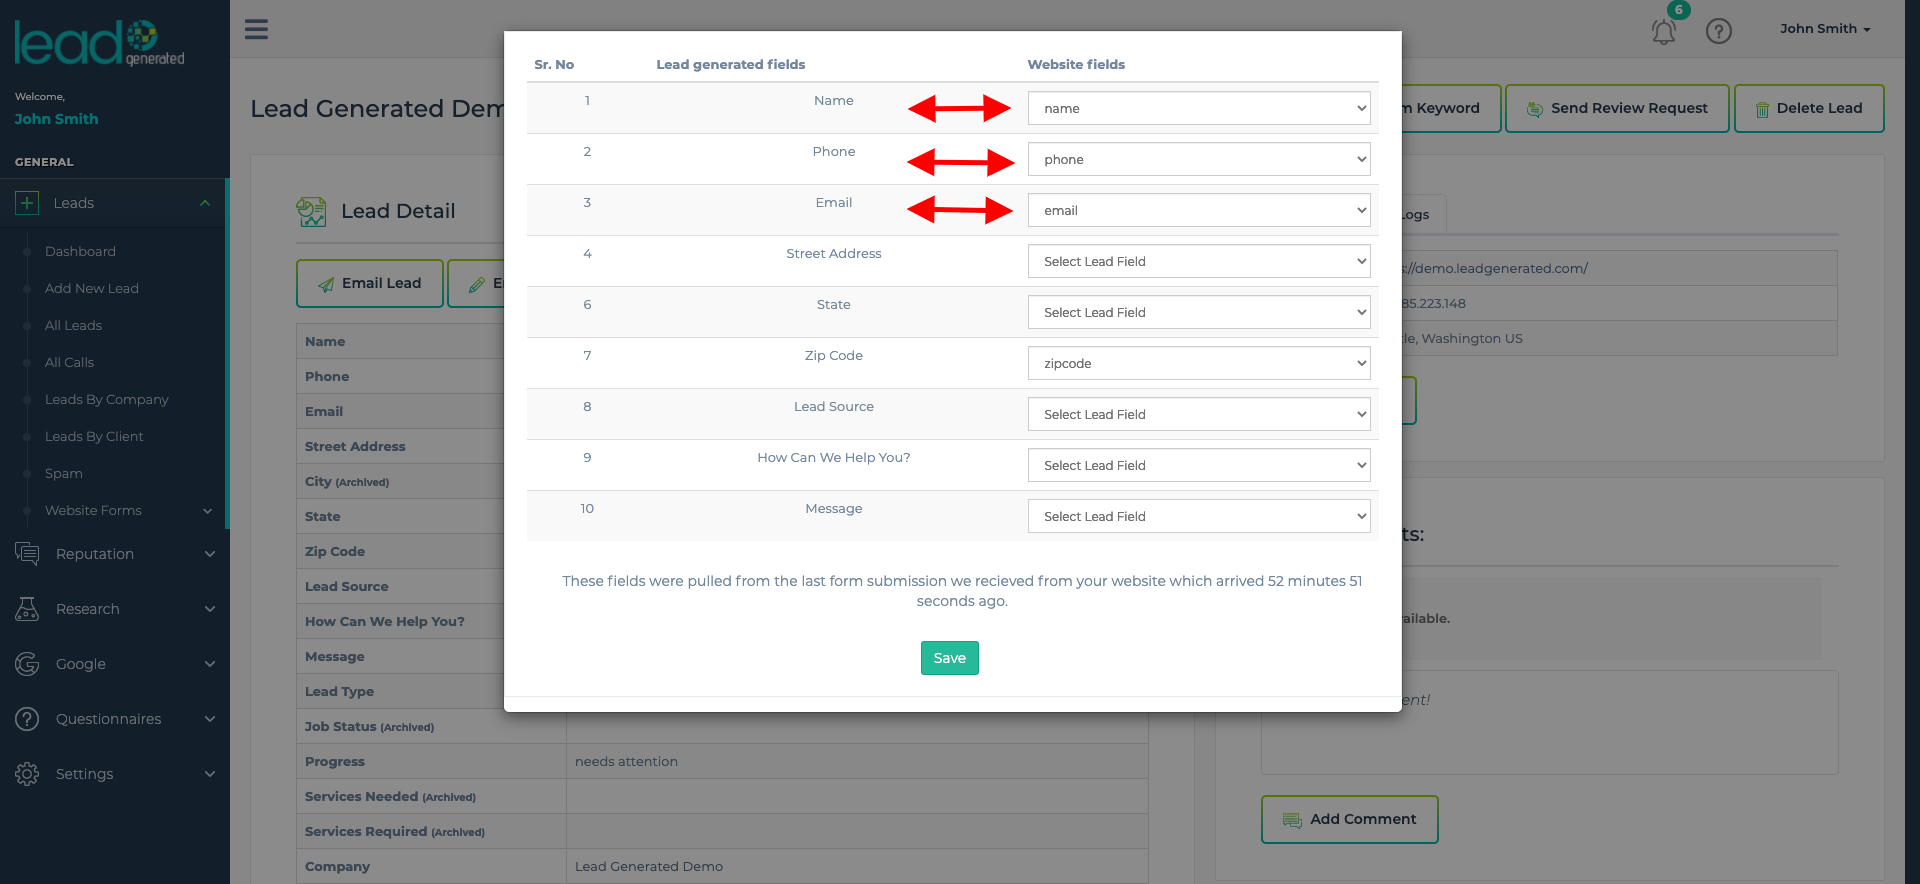
In the picture below, let’s pretend this form is a form on your website that you use to collect new leads for your business. You can see in the graphic, that the form is submitted and then it arrives inside of Lead Generated. As the arrows indicate the fields on your form are aligned with the fields inside of Lead Generated. The mapping process is what makes this possible. During the mapping process, you tell Lead Generated exactly which field you want to store the data from each field within our system.

Benefits of Mapping?

Mapping your form fields allows them to be added to the various screens within the Lead Management module.

  1. Allows the fields to be analyzed and organized throughout the Lead Management module.
  2. All the fields are able to be used in our various filters and sorting.
  3. You can create custom fields with any of the fields.

Create new fields in Lead Generated

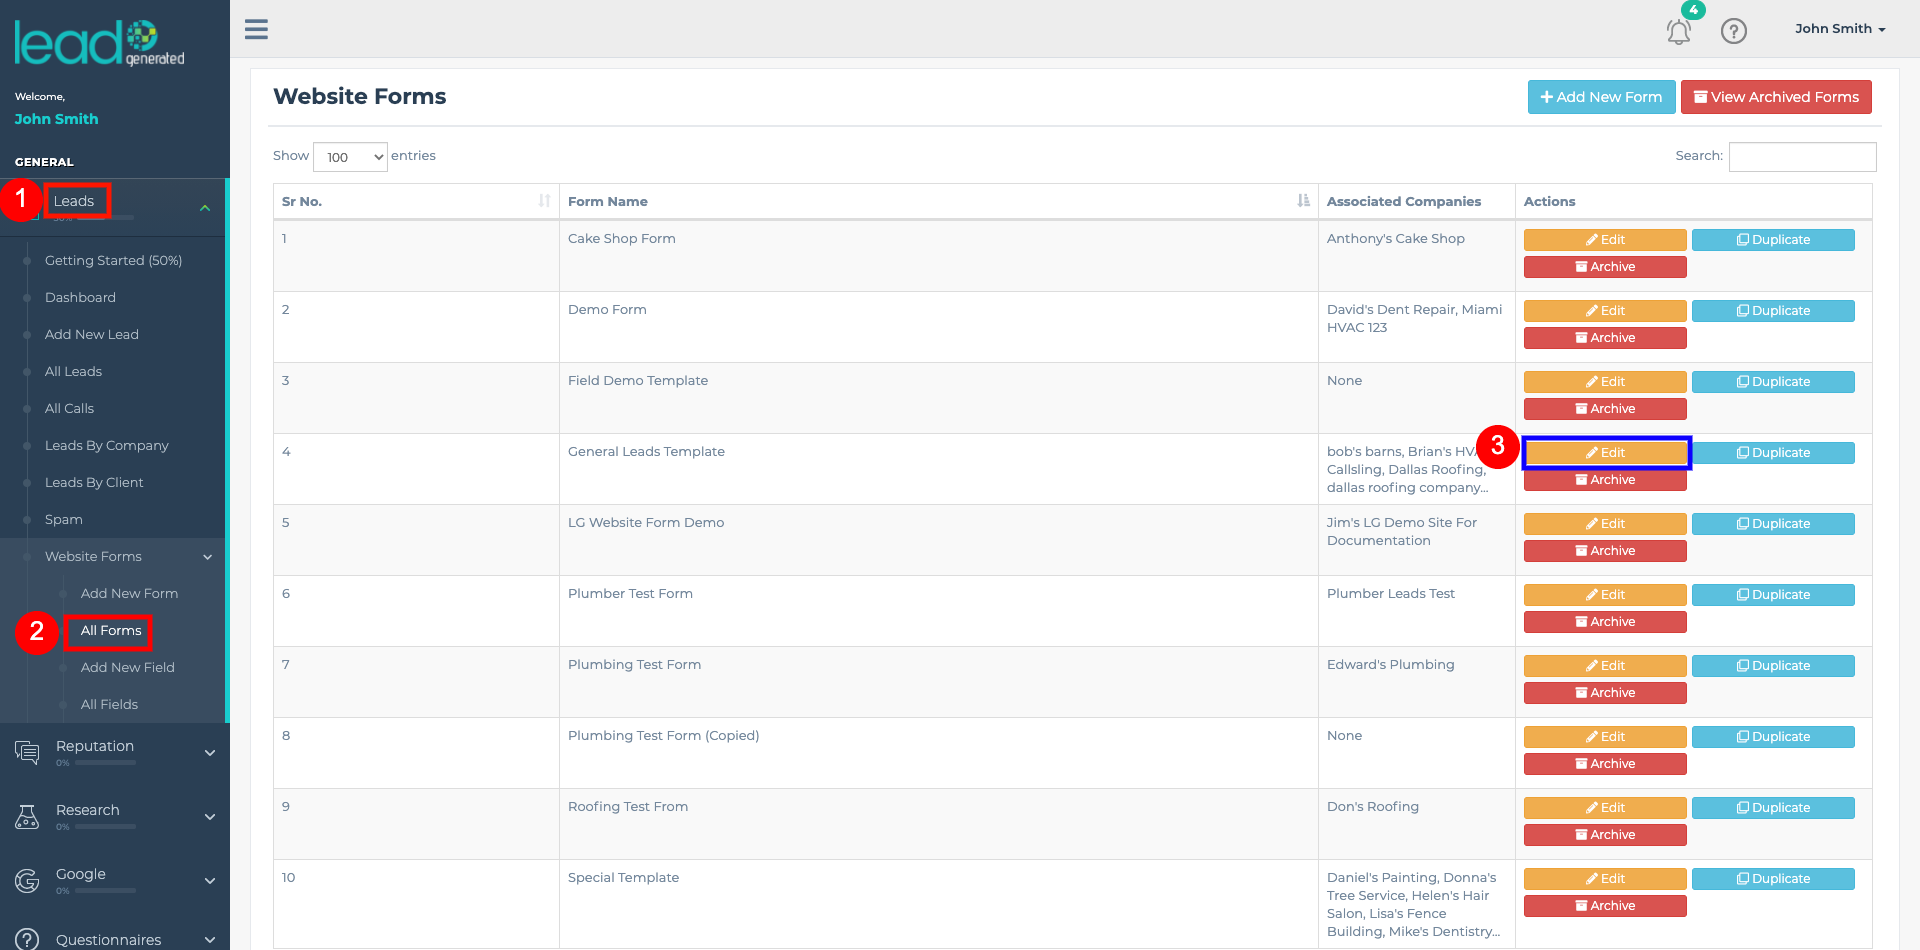
You can create new fields within Lead Generated using our form builder on the website forms sub-item within the Lead Management module. If you are not familiar with website forms within Lead Generated then it is a good idea to read through the associated help article.

Every company in Lead Generated has a website form. You can use the same form for as many companies as you like or create a unique one for each company. These forms serve as a connector between the fields on your website and the fields within Lead Generated. Using our form builder you can design a form that aligns with the fields on your website. Each field on this form creates a place to store information within our system.

Do this Before Field Mapping

The process of mapping the fields is very simple.  There are some requirements that must be completed before you can map the fields.

  1. Company created.
  2. Website connected using one of our various connection methods.Connect your website
    1. WordPress
    2. Embed Form (embedded forms do need to be mapped)
    3. Zapier
  3. Form submission received – The mapping process works with your real form data. So we need an example form submission from your website to map the fields to correct places within Lead Generated. If you have not received a real lead through your site, then please send a test lead from your site to Lead Generated so we can perform the mapping process.

*If you have used our embed form option as your website connection method then you do not need to map the field as this is done automatically.

Step-By-Step Guide

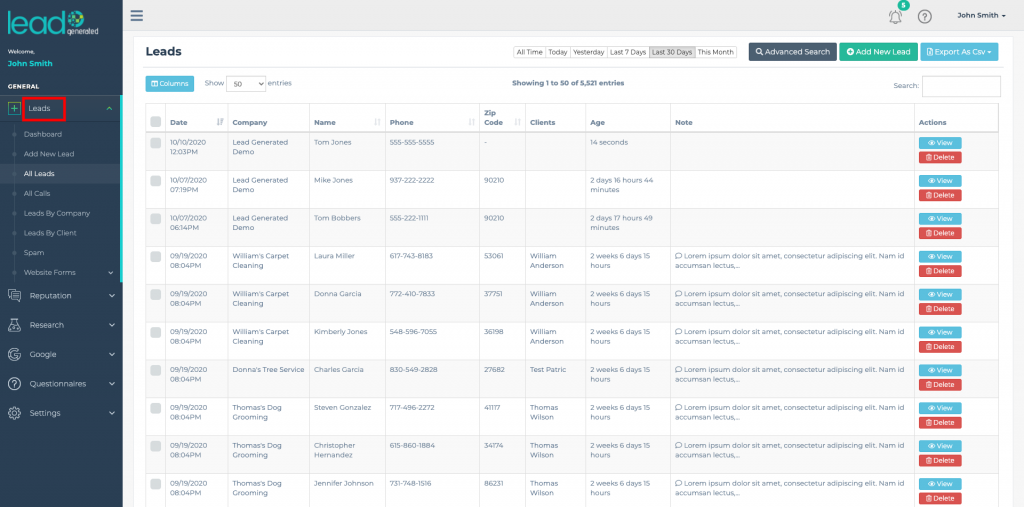
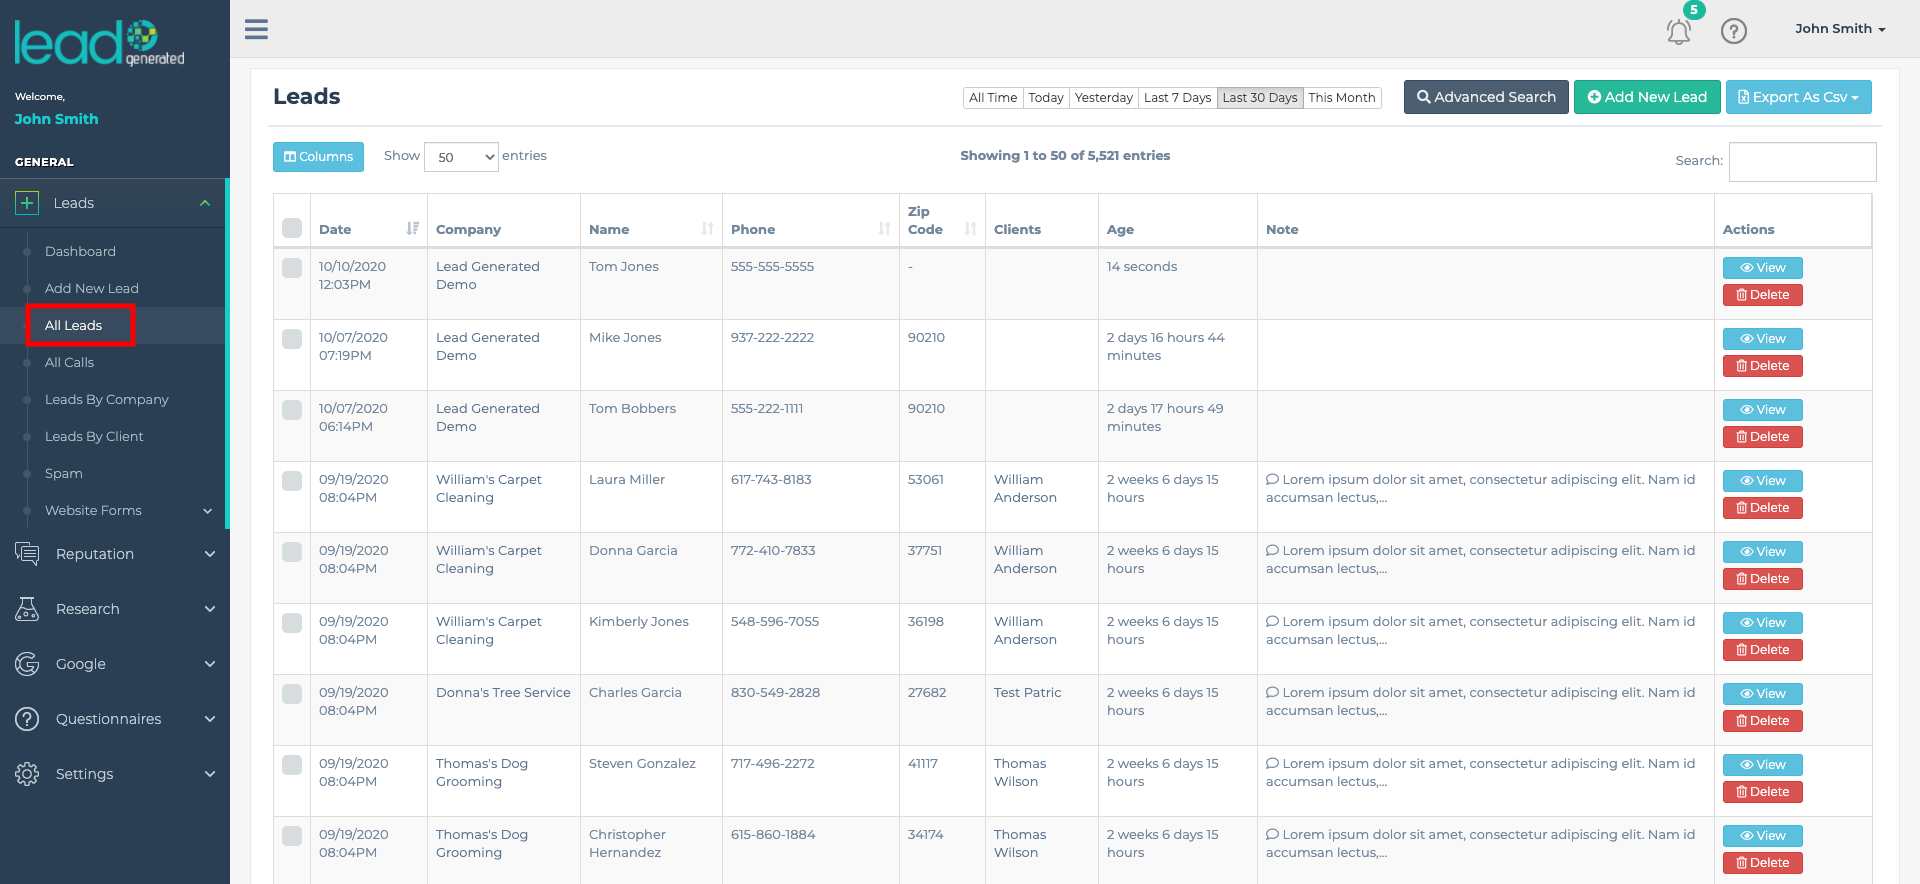
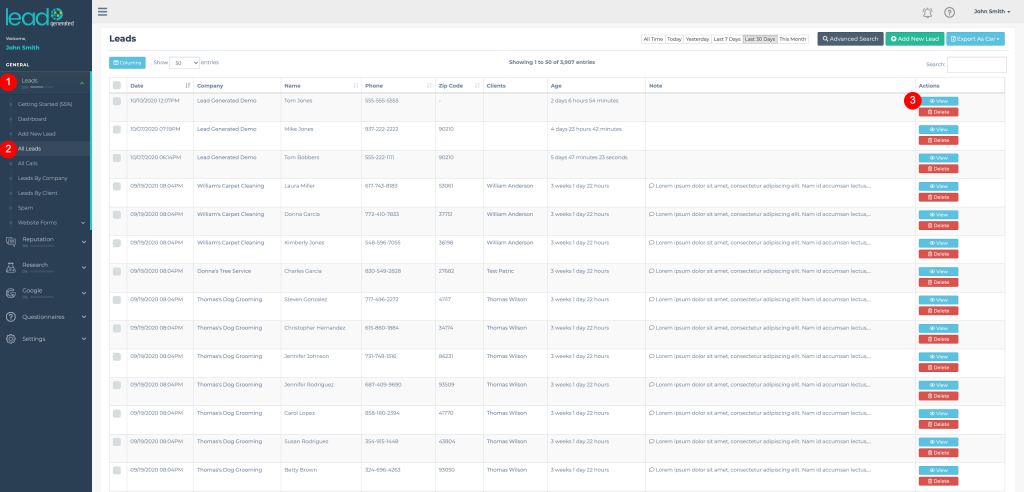
1. Expand Leads from the left navigation

2. Click All Leads from the left navigation

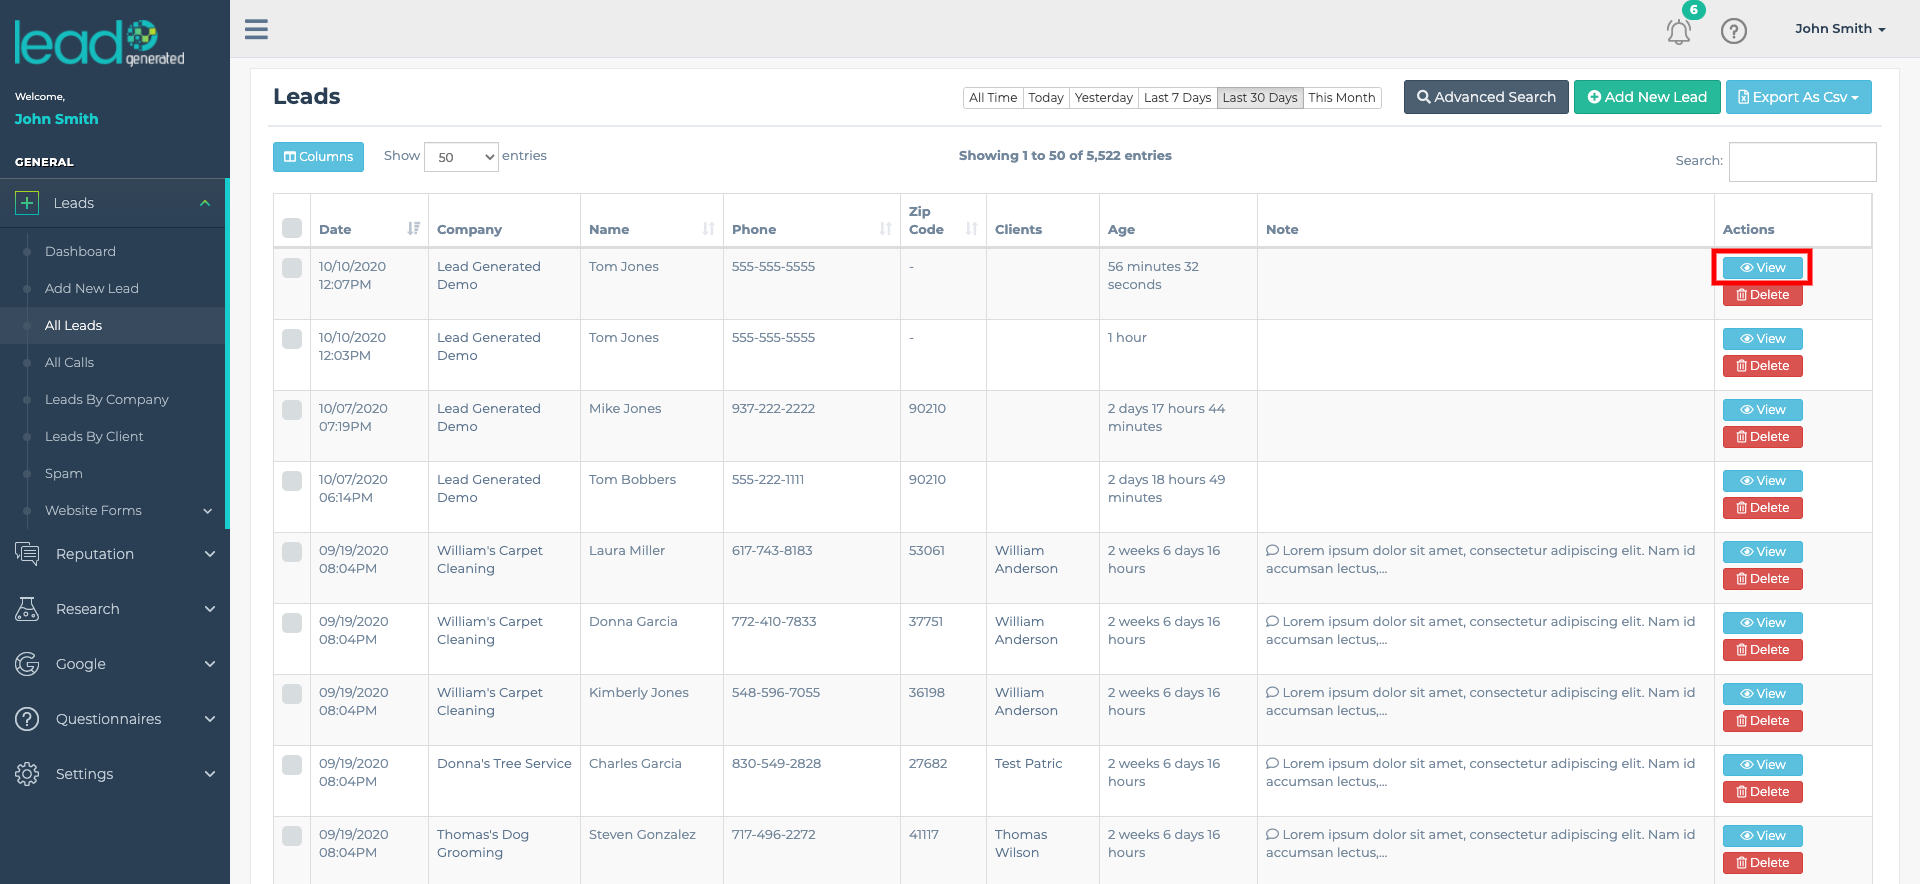
3. Click View next to the test lead for the company which you would like to map the fields.

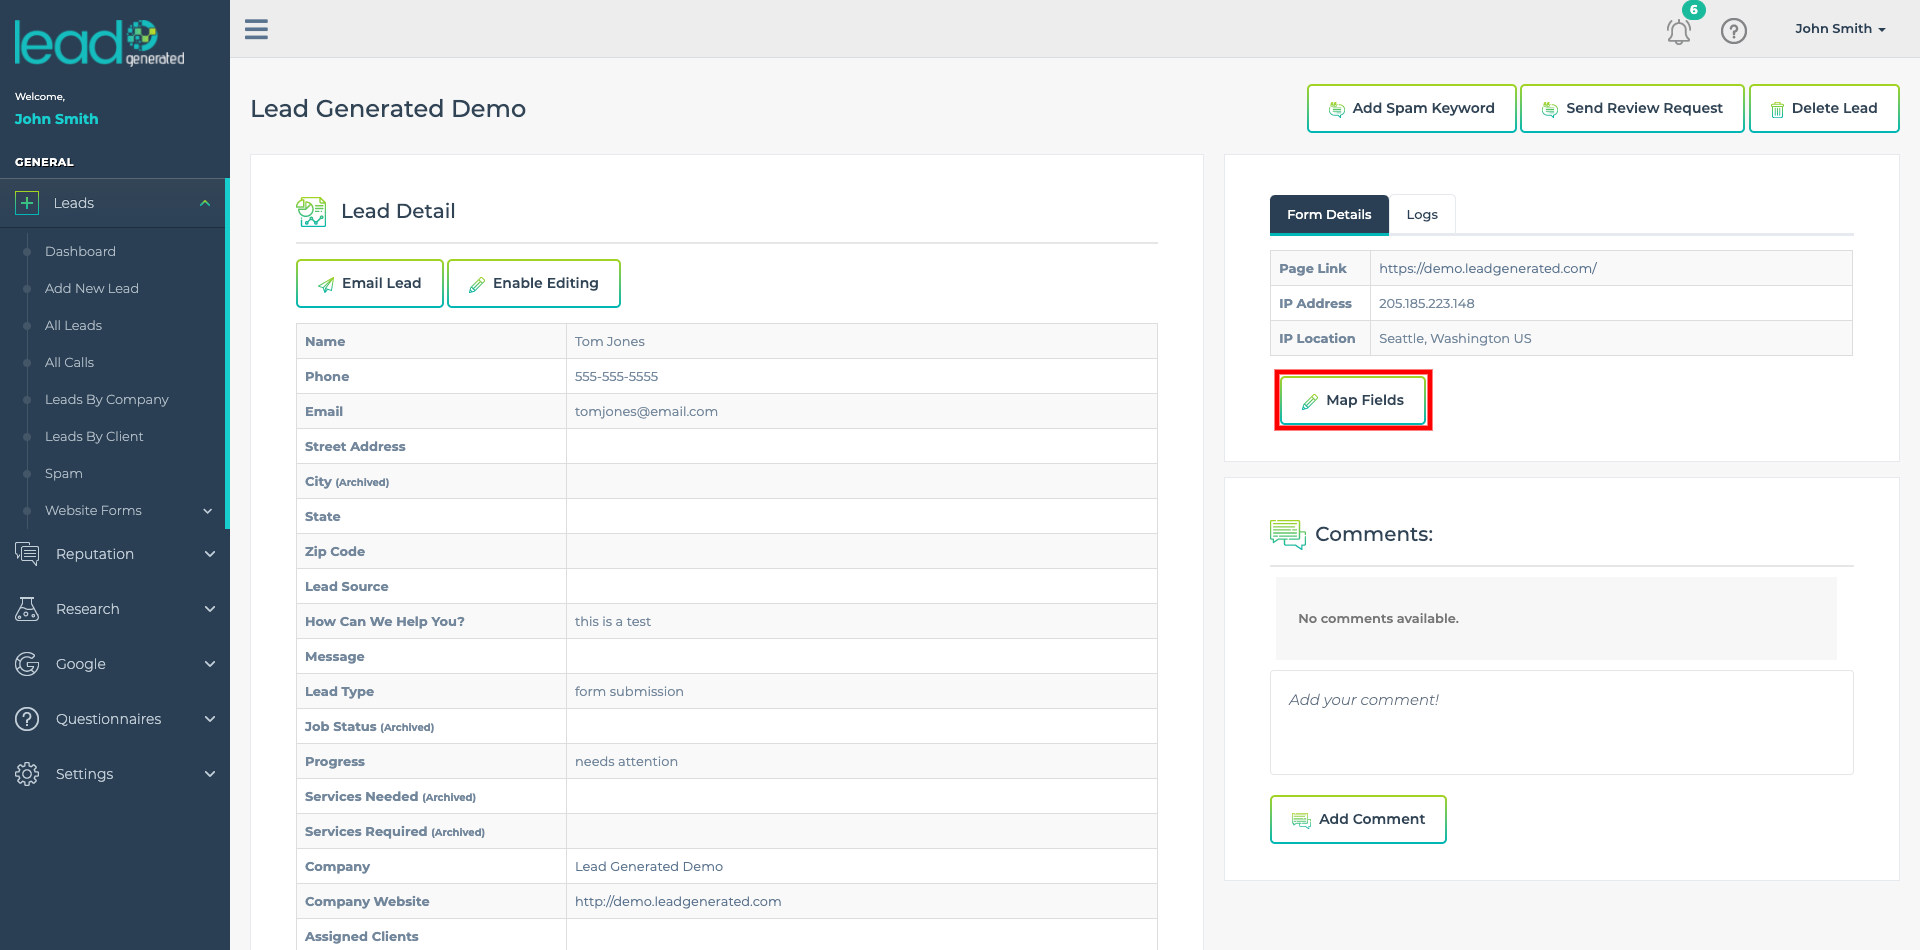
4. On the right side, click the Map Fields button.

5. Match the fields on the left side (Lead Generated fields) with the fields on the right side (from your website).

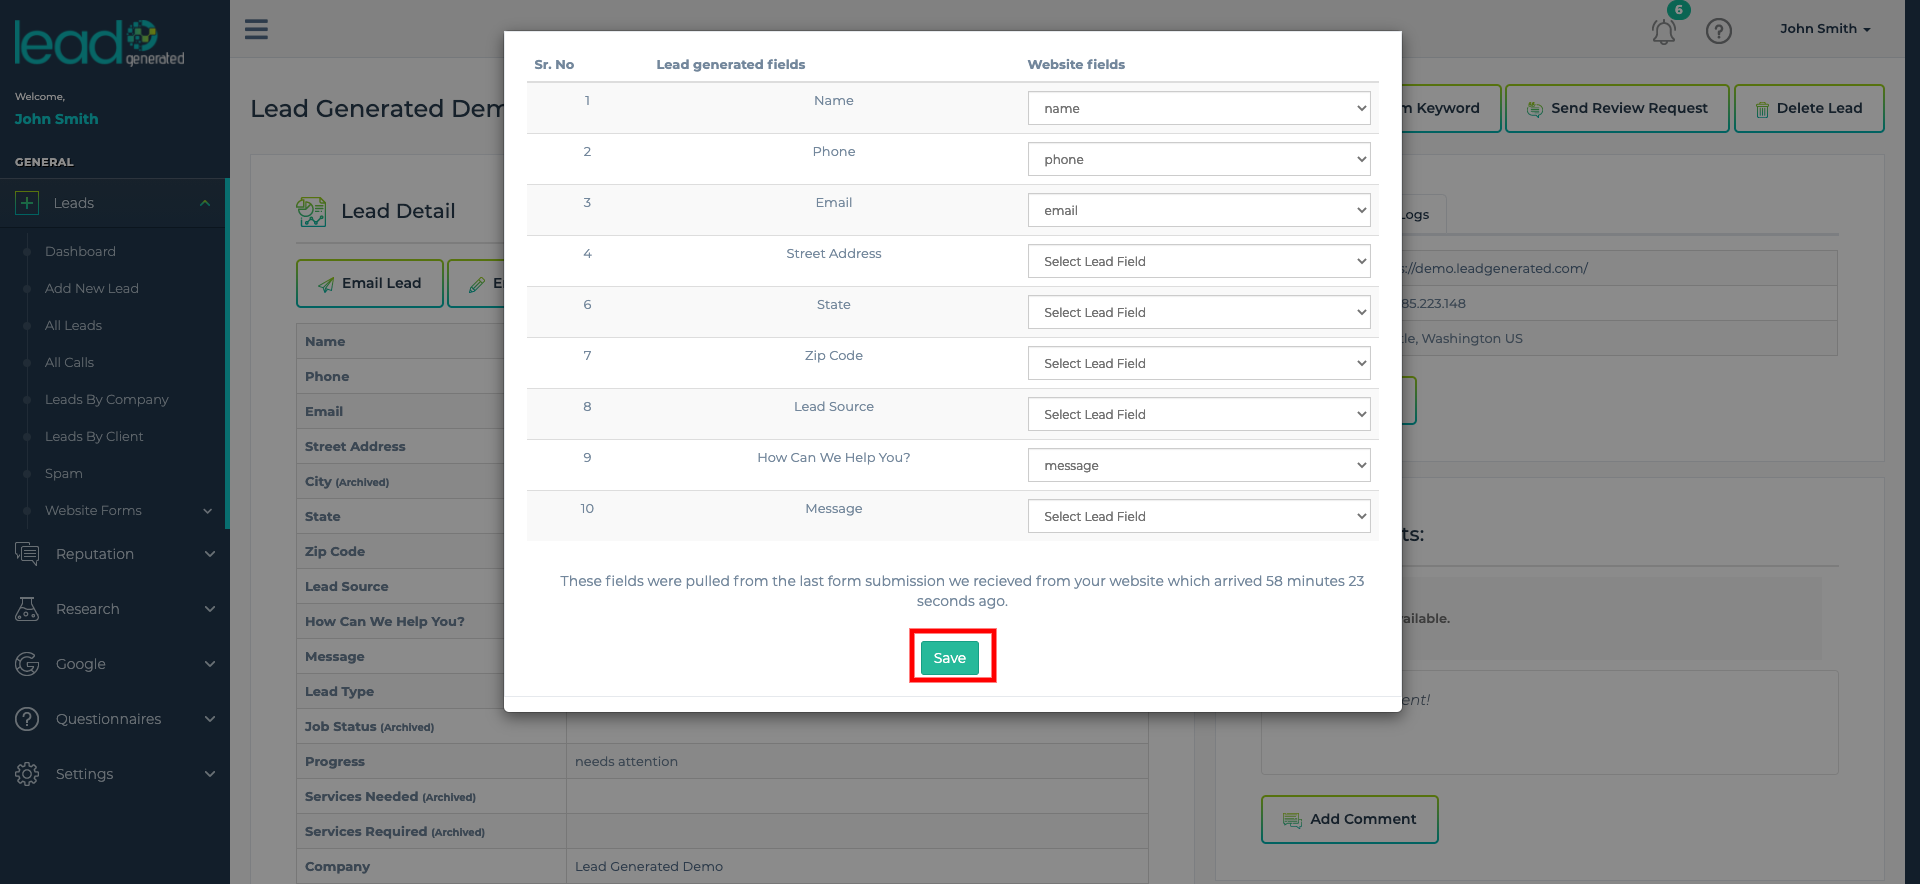
6. Click the Save button to save your field mapping.

Are My Fields Mapped?

To confirm that your fields are mapped send another test lead. Your fields are mapped when all the responses from your form submission appear on the left side of the form instead of on the right side of the form.

Field Mapping FAQs

Is it ok if I do not have a field on my website for every field in Lead Generated? 

Yes, there is no problem with leaving a field blank within Lead Generated.

On the field mapping popup window, I have a field on my website that does not have a field in Lead Generated? 

You have a few options:

  • You can create a new field on the form that is associated with this company so you have a place for this field. The website forms tutorial has more about this process.
  • If you have an existing field that works well, you can map it to that field.

Do I need to remap my fields if I add a new field to my website? 

You will need to add the mapping for the new field from your website with a field in Lead Generated.  Sometimes Lead Generated can automatically map the field but many times it will need a little help from you. Adding a new field will not erase the previous mapping. It is always a good idea to check the mapping between your website and Lead Generated after making changes by sending a test lead.

Auto Lead Forwarding

As leads flow from your website to you or your client they pass through Lead Generated. This lead flow allows you to leverage the tracking, reporting, and analysis tools built into this powerful system. You have two choices when deciding on the delivery of leads, auto-forwarding, and manual forwarding.

Auto-forwarding allows you to automate the lead delivery process. When this setting is activated leads will be sent to the client associated with the company (or website) as soon as they arrive in our system. If auto-forwarding is turned off (manual forwarding), the leads will not be delivered until someone takes action on them.

By default, when a new client or company is created auto-forwarding is turned off. This means as you create new clients you need to turn on auto-forwarding or manually send the leads to clients. In either event, the status of the lead delivery is tracked through the progress field. This is a required field for every lead within Lead Generated. Among the available options for this field are “Needs Attention” and “Forwarded”.  The needs attention status alerts you that a lead has not been delivered while the forward status confirms the delivery of a lead.  With both the manual and auto-forwarding delivery options, this status is updated automatically.

Manually Forward

To send a lead manually follow the steps below.

  1. Expand leads from the left navigation.
  2. Select all leads.
  3. Click view next to the lead you would like to forward.
  4. In the top left corner select email lead.

Auto-Forward

Like many things in Lead Generated, there are multiple ways to accomplish the same thing. Auto-forwarding can be turned on from either the Edit Client or Edit Company pages.

Client Forwarding Settings

  1. Expand Settings from the left navigation, then expand users and select all users.
  2. Select the view button next to the user for which you would like to adjust the auto-forwarding settings.
  3. Click the Edit User button from the top right corner.
  4. Select the Lead Delivery Settings tab from horizontal navigation.
  5. Adjust the auto-forward toggle switch to the turn the setting on or off for the associated companies.
  6. Click update to save your settings.

Company Forwarding Settings

  1. Expand Settings from the left navigation, then expand companies and select all companies.
  2. Select the Edit button next to the company for which you would like to adjust the auto-forwarding settings.
  3. Turn on or off auto-forwarding for the associated clients using the toggle switch.
  4. Click update to save your settings.

Manual Lead Forwarding

To send leads to a client you can choose to have them auto-forwarded on a client or company level or you can manually send them to your clients. To manually forward a lead to client go to the lead detail page by clicking all leads then view lead. Choose email lead in the top left corner and then pick send. For a more detailed explanation of the settings and options please check out the video below.


Lead Delivery Settings

The lead delivery settings for a lead is managed on a client level and on a company level. These settings give you more control over how leads are sent to your clients.

To access the client level lead delivery settings screen:

  • Expand “Users” from the left navigation
  • Choose “All Users”
  • Select a user and click the “View” button
  • Choose the “Profile” tab and select the “Edit User” button
  • On the Edit User screen choose the “Lead Delivery Settings” tab

To access the company level lead delivery settings screen:

  • Expand “Companies” from the left navigation
  • Choose “All Companies”
  • Select a company and click “View”
  • Select the “Edit Company” button from the top right corner

The video below will give you a step by step guide with more information on each setting for both the client level and company level lead delivery settings.


Reply To Email Address

When you send or forward a lead to a client through Lead Generated they receive your lead by email. If they were to reply to the email it would go to the email account you used when you created your Lead Generated account. If you would like to have these replies to go to another email address you can adjust that by updating the reply to email address. You can access this setting by choosing account setting from the top right corner and then entering the desired email address.

For a walkthrough and more information about the reply to email address check out the video below.

Spam Filters

The spam filters help you manage the form submissions that are sent to your various lead generation properties. They are turned on by default so it is important to check your spam area to make sure no real leads are accidentally being categorized as spam. To access the filtered leads or spam filters expand the leads item from the left navigation and choose spam. To edit the spam filters choose the edit spam filters button from the top right corner.

Watch this video for a more in-depth overview of spam filters.

How do I find the Google reviews link for a business?

Once you have CallSling integrated, the companies you have set up with the phone tracking system will bring their associated leads into Lead Generated automatically.

Leads coming in as website form submissions will come in automatically as well once you have your Weebly or WordPress sites connected to Lead Generated.

Additionally, you can manually add leads, forward them to clients, set automatic reminders for leads that need attention, and take notes among other cool things. In this article, you will learn how to manually add a new lead.

Steps

  1. On the left menu, click on “Leads”, then “Add New Lead”.
  2. Select which company you want this lead to be associated with. Note that you will need to have the company you wish to link to this lead already in the system. Click here to learn how to add a new company.
  3. Fill out the general lead information, select lead type, source, progress and job status.
  4. Click on the Submit button.

Video Tutorial

Need more details or just want to see how it’s done? Watch the video below.
Company Settings

The company settings or edit company page will allow you to fine-tune many of the settings that are specific to an individual company. From this screen you can adjust the following settings:

  • Company Name
  • Website Address
  • Assigned Clients
  • Company Lead Intake Form
  • Timezone
  • Auto-forward Settings
  • CallSling Company Mapping
  • Qualified Call Filters

How do I get there?

There are many different ways you can get to this page.

  1. Expand “Companies” from the left navigation menu
  2. Select “All Companies”
  3. Choose “Edit next” to the company you wish to edit.

If you will notice in almost every place a company is listed through Lead Generated it is a link to the company details screen. From any company details screen, you can access the edit company screen by clicking the “Edit Company” button located in the top right corner of the company dashboard.

This is an example of the Company Setting or Edit Company Page

Company Name

The company name can be adjusted at any time and it is just used internally to refer to your company. We recommend using a name that will let you know exactly which of your websites it refers to.

Website Address

This is the website URL of the website associated with your company. This used for reference to help identify the website associated with the company throughout our system.

Assign Clients

Every company can have clients assigned to it. You can remove a client by clicking the “X” next to their name or add a new client by clicking in the open space within this field. If you are trying to add a client that you have not created yet, you must create a client and then return to this screen.

As leads arrive in our system whether, through a phone call, form submission, Zapier, or manually created lead the company and client will be assigned at the time a lead arrives. If you add a client after the lead arrives they will not be able to see the leads that arrived before you assigned them to a company. You can always manually assign leads to a client after they are created if you would like them to be associated with the lead.

You have the option to provide your clients with access to Lead Generated when you create their account. These clients will have access to all the leads that are assigned to them. So if you decide to assign multiple clients it is important to understand that they both can see these leads if they log in to our system. If you remove the assignment of lead to a client they will no longer be able to see the lead.

Timezone

This is the timezone of the location where your website is located. We use this in combination with the timezone setting in your account settings to adjust the time of leads.

Auto-Forward Clients

This setting controls if leads are automatically sent to a client as they are created in our system. This applies to both form submissions and manually created leads. You can turn the switch on or off on a client level for each company.  There are two different lead flows for delivering leads to your client within Lead Generated. You can manually forward leads or you can auto-forward leads. In either case, we recommend setting the lead progress field of the lead to “forwarded” after it has been sent to your client. This helps keep track of the progress of the lead from the time it arrives until the time it is delivered to your client.

Progress For Auto-Forwarded Leads

This field sets the progress field which is a required field in our system for every lead. We recommend leaving this as forwarded to ensure your system runs correctly.

Map CallSling Company

In order fo map your company to a CallSlling account you must have an active Callsling connection. If you need help making this connection check out the connect CallSling area of the documentation. This field allows you to map the company you have created in CallSling with the company you have created within Lead Generated. Whatever company you select here will populate the phone calls area throughout the related company pages such as the company details page.

Qualified Call Filters

As phone calls are pulled into Lead Generated from your CallSling account they are not added as leads to the “All Leads” page (and other leads pages) by default. Instead, they are held in the “All Calls” area until they are manually added as leads. The qualified calls filter allow you to change that behavior.

For newly created companies the default setting is to have the qualified calls filters turned off. If you prefer to have them all added as leads as they come in then you can enable the qualified calls filter but do not turn on any of the call restriction filters. For greater control, you can use the filters so that only calls that meet certain criteria are added as leads. These filters work in combination with each other, for instance, if you were to set the call duration to 90 seconds and the answer status to answered only calls who had a duration of at least 90 seconds and had a status of answered would be added as leads automatically.