CallRail Integration

What is CallRail?

CallRail is a third party voice over IP phone system that allows you to purchase local phone numbers from around the world and create dynamic workflows for how the calls are handled. While we support the integration with CallRail we highly recommend considering the internal LeadGenerated phone system which offers more competitive pricing and additional features throughout the LeadGenerated platform that are not available within the CallRail integration.

What Does The Integration Provide?

The integration to CallRail allows phone calls to be brought into LeadGenerated in real time for analysis and reporting. You can playback phone calls and have them sorted according to the company mapping.

Before You Start

Before you get started there a few things you should have in place.

  • Active CallRail account with access to said account.
  • You must have the companies created within LeadGenerated from your CallRail account in order to map the CallRail companies to LeadGenerated. For more information on how to create a company please check out this support article: create company.
  • Your companies within LeadGenerated must be activated with the CRM system.

Get the CallRail API Key

Login to your CallRail account.

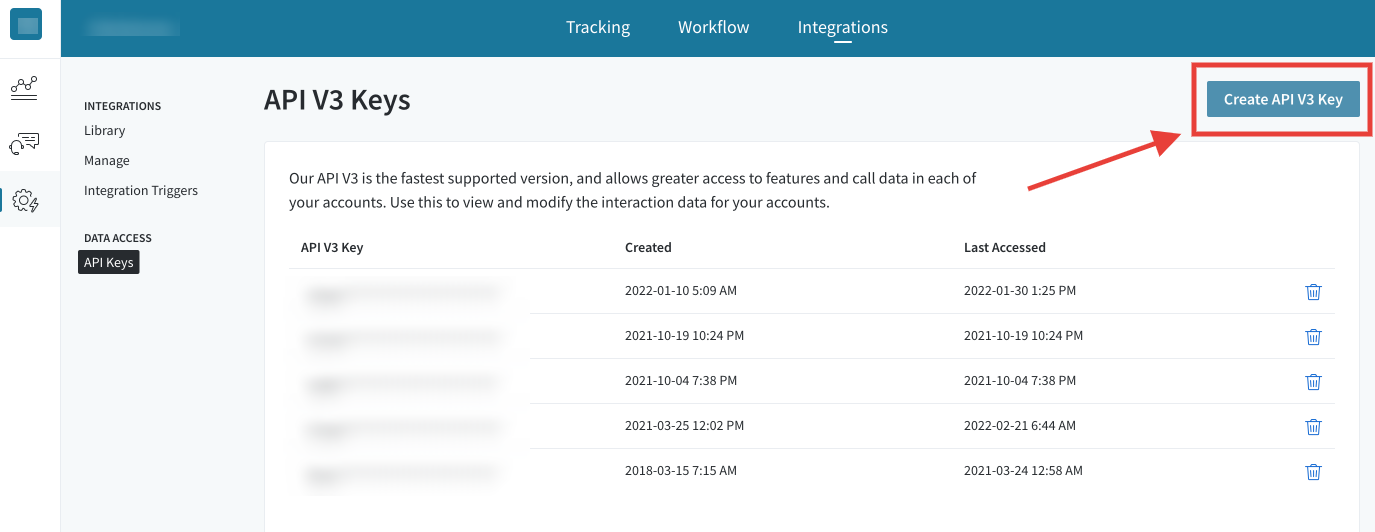
Select the Settings icon from the left side navigation.

Select Integrations from the top navigation.

Select API Keys from the center menu option.

Click the button in the top right that says “Create API V3 Key”.

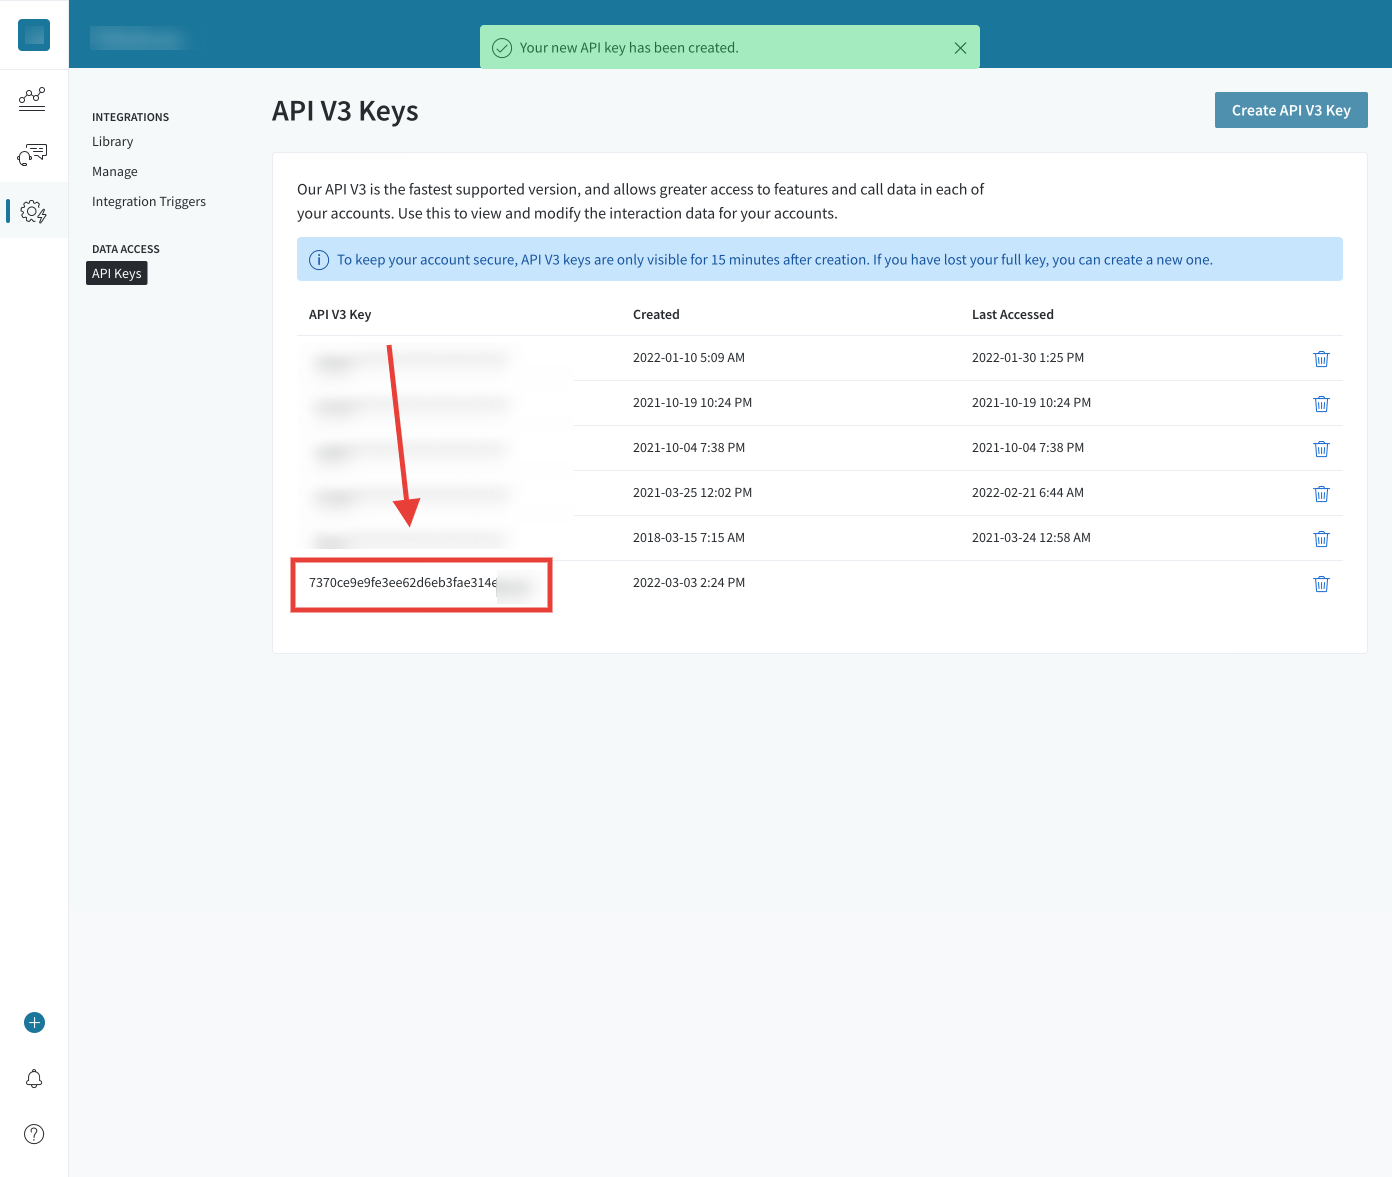
Copy the new API key which should be visible within the API V3 Key Column.

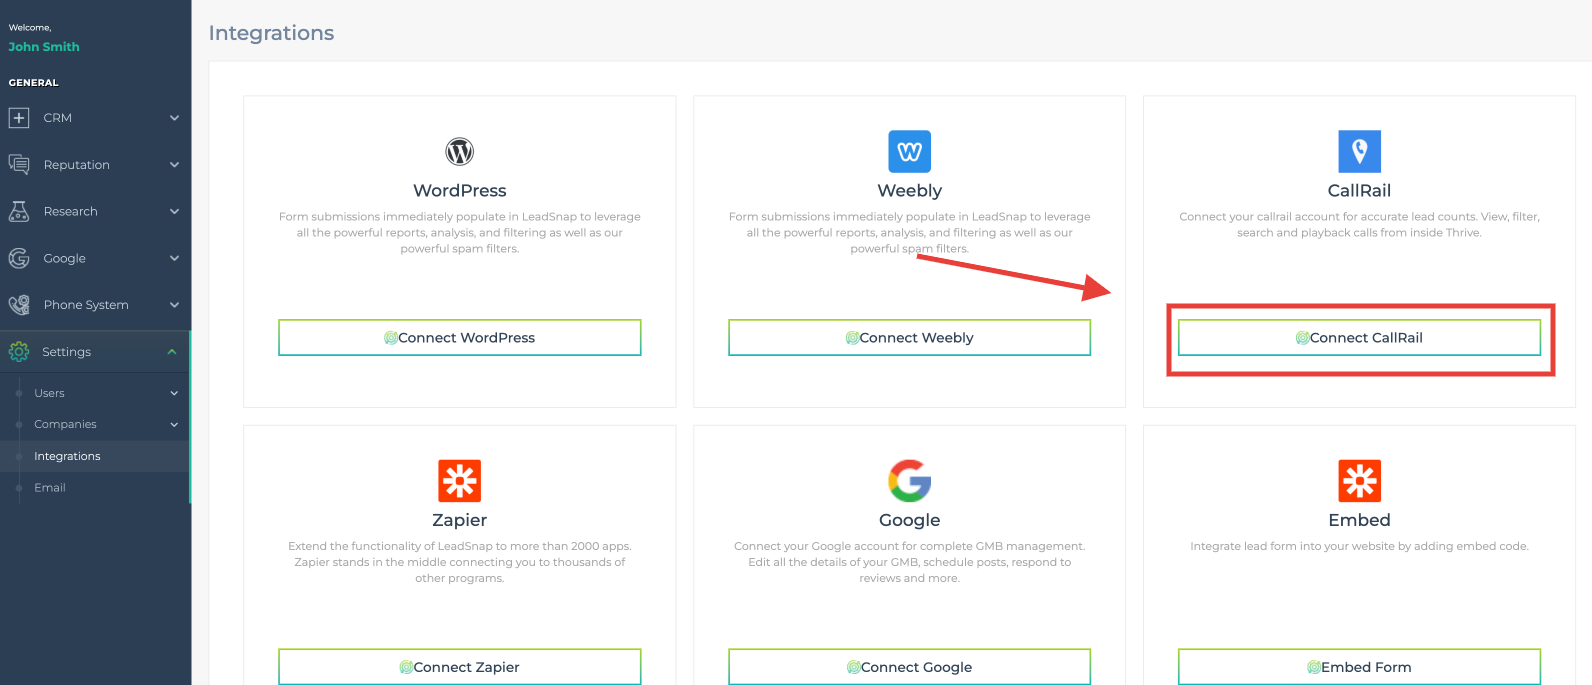
Connect CallRail To LeadGenerated

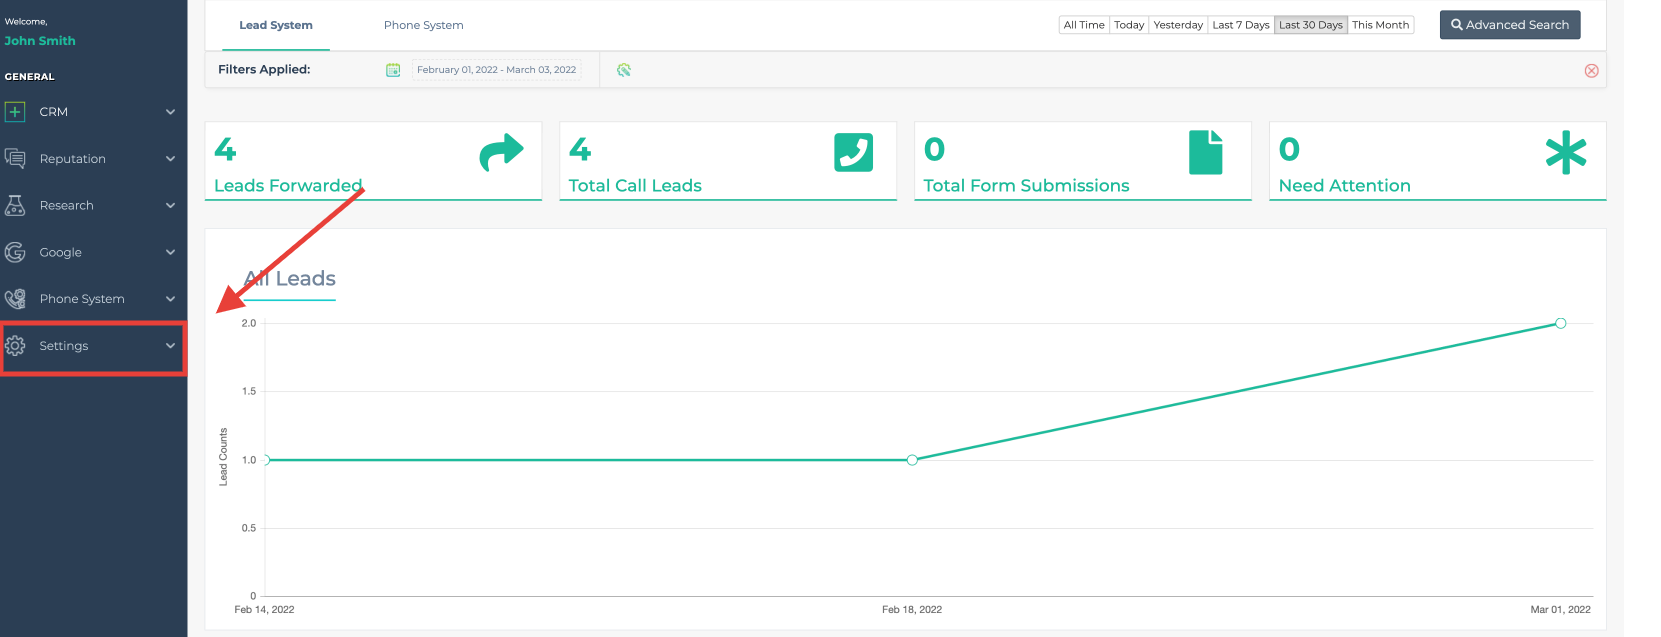
Login to LeadGenerated

Expand Settings from the left navigation.

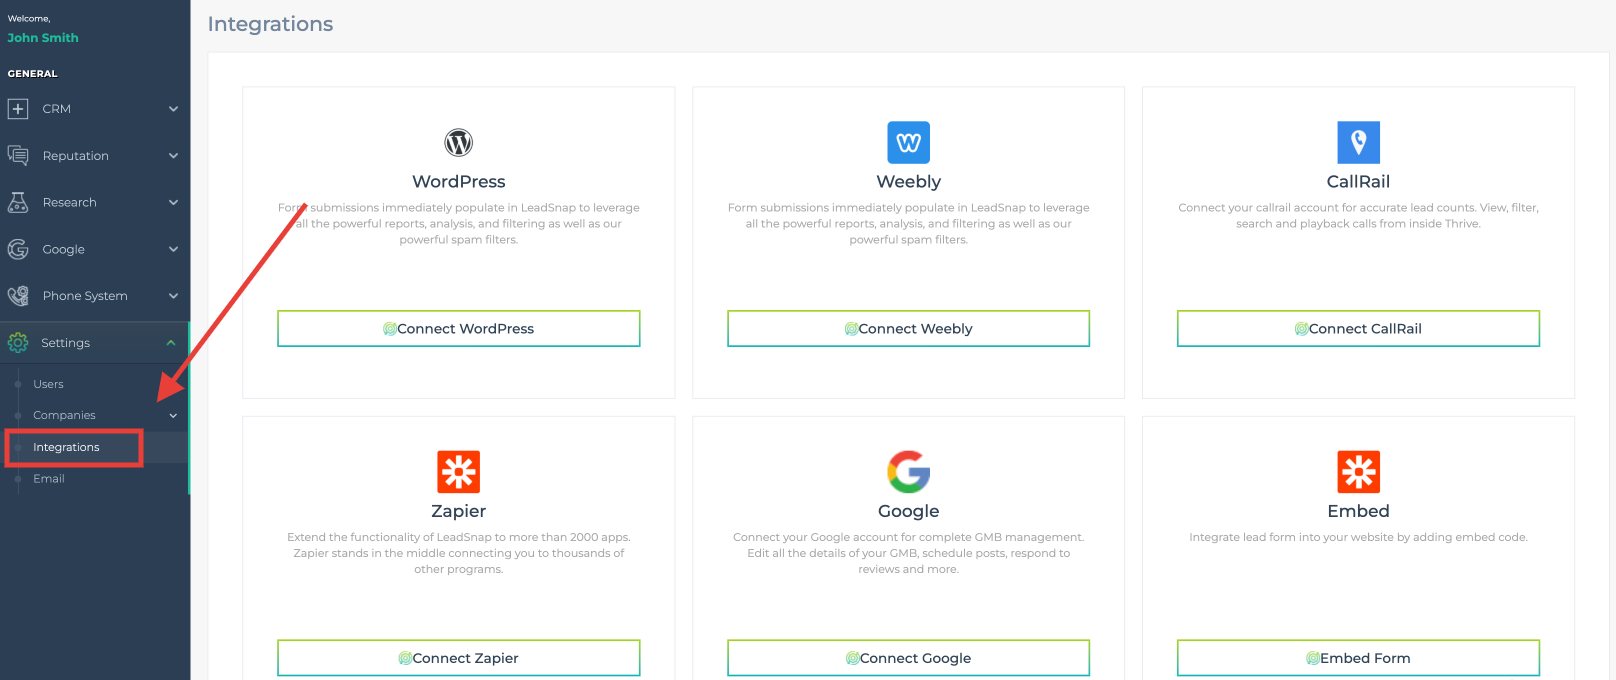
Select Integrations.

Select CallRail.

Select Connect CallRail.

Paste In the API key copied from CallRail.

Click the Submit button.

Map CallRail to LeadGenerated

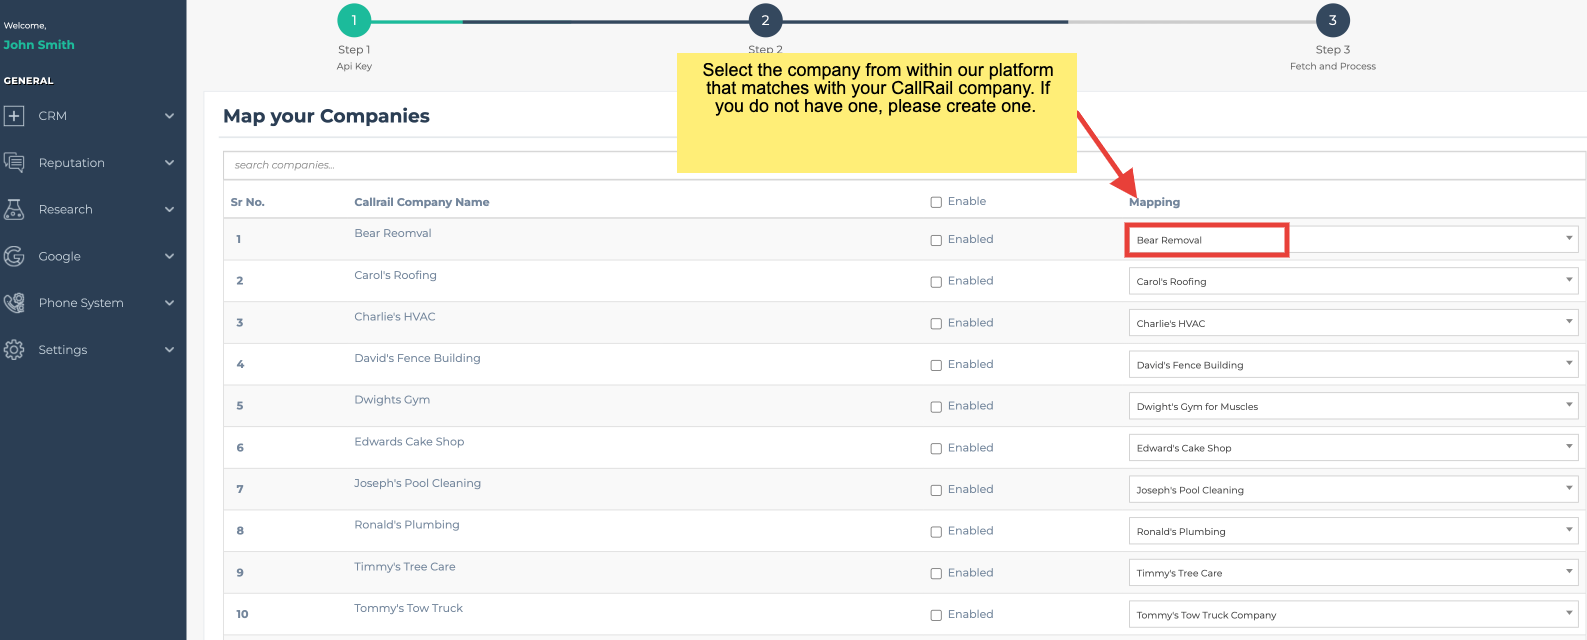
This screen will allow you to map the companies from CallRail (left side) with the companies that you have within LeadGenerated (right side). If you do not have a company created within LeadGenerated you will need to create your company before continuing. Select the LeadGenerated company from the dropdown on the right side that you would like to associate with your CallRail company on the left side.

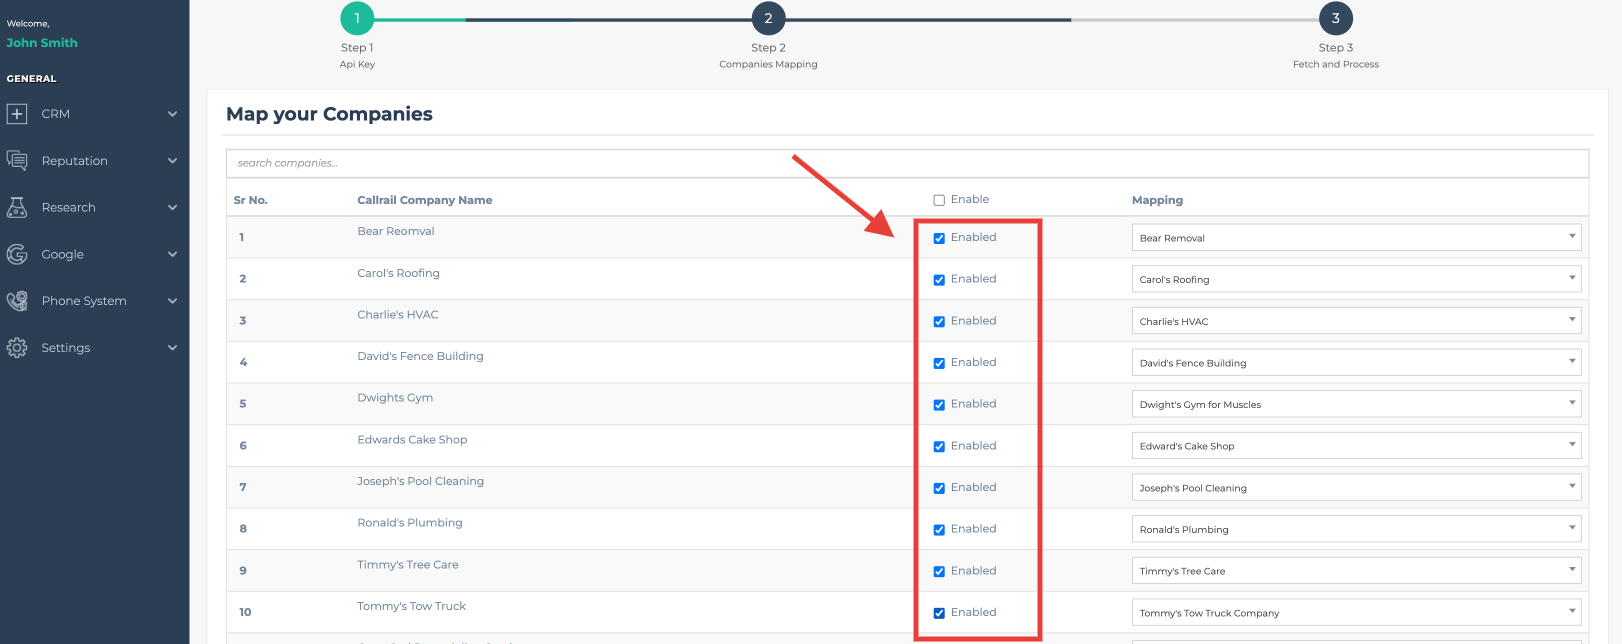
After making all of the mappings it is time to enable the companies. Our integration will grab all of the companies in your CallRail account, it is not required that you use all of them. If for whatever reason you would not like to sync the data for a company you can simply leave it disabled. To enable syncing the calls from CallRail for each company click the enable box.

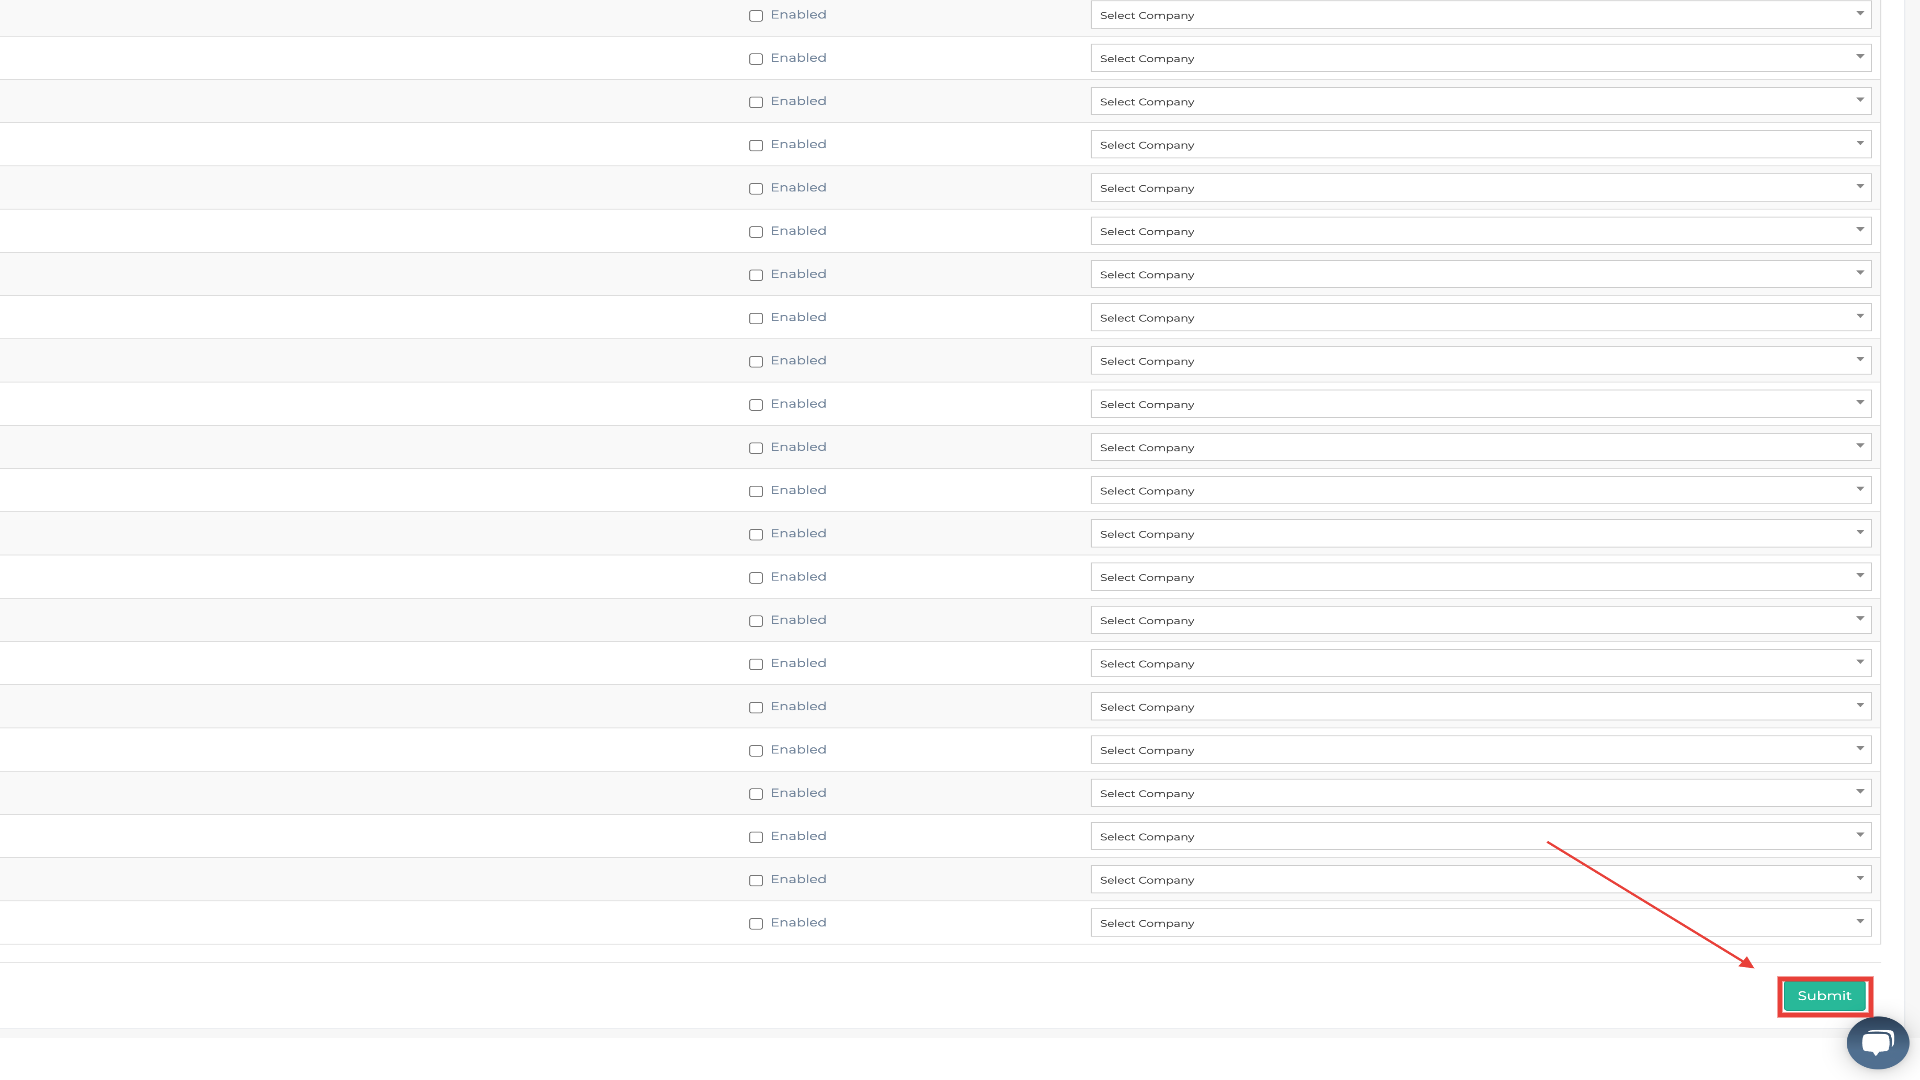
Now that you have mapped your CallRail companies and enabled the selected companies to sync you can click the submit button in the bottom right corner. If you have many companies you may need to scroll down a little bit so the button is visible.

The final step is to the fetch the latest call data from CallRail. Our system will fetch the last 200 phone calls from CallRail. It is important that you do not leave this page during the fetch process. This make take several minutes while we transfer the data from CallRail to your LeadGenerated account.

Congrats you have completed the CallRail integration

Automations

Automations are a powerful part of the CRM module that allow for things to happen without your interaction based on predefined sequences. If you would like to set up logic that says, “if X happens then do Y,” then automations are your solution.


Key Automation Components

Automations are composed of three main pieces: Triggers, Actions and Filters.

Triggers – When these events occur, they can initiate an automation sequence. Below are some examples of triggers:

  • New Form Submission
  • New Phone Call
  • New Text Message
  • Field Status Update
  • New Contact Created
  • New Deal in the Pipeline
  • Deal Moved to Pipeline Stage

Automation Trigger
Actions – Actions can be strung together into a list of automated processes that can be performed. You can add as many actions as you would like in an automation. Below is an example of a list of actions that can be used to perform automated tasks within the system.

  • Condition
  • Send Email
  • Send SMS Text
  • Create Contact
  • Wait (the sequence will wait for a specified amount of time before continuing)
  • Update Field Status
  • End If (will end if something becomes true)
  • End If Review Submitted will end if a review is submitted)
  • Send Questionnaire

Choose your Actions


Filters – These are used with triggers, allowing you to limit a trigger being fired. For example, let’s say you have a trigger that you would like to be fired when a new form submission is submitted, but only if it is for a certain company or from a certain value in the zip code field.Filters make this possible. Depending on the trigger, you will have different options for the filters. You can combine as many filters as you like. When using more than one filter, it is necessary for all the filters to be true for the automation to continue.
Trigger Filter

There are different field types within LeadGenerated. . The default zip code field is a “text field,” meaning that you have the ability to type in the filter value. If the field type is a text field, you can use a comma separated list to include multiple values. In these cases, the automation will continue if only one of these values matches an item on your list. If the field type is a dropdown menu, then you will have a selection box for the field value.

Variables

Variables allow you to reference dynamic information during your automation. Let’s make an example to be sure this is clear. Perhaps you have a client named Bob and he owns a company called Bob’s roofing. When you create the client user for Bob and assign to the company Bob’s roofing, this information can be available when an automation runs through the use of variables.

Add Variable to Message

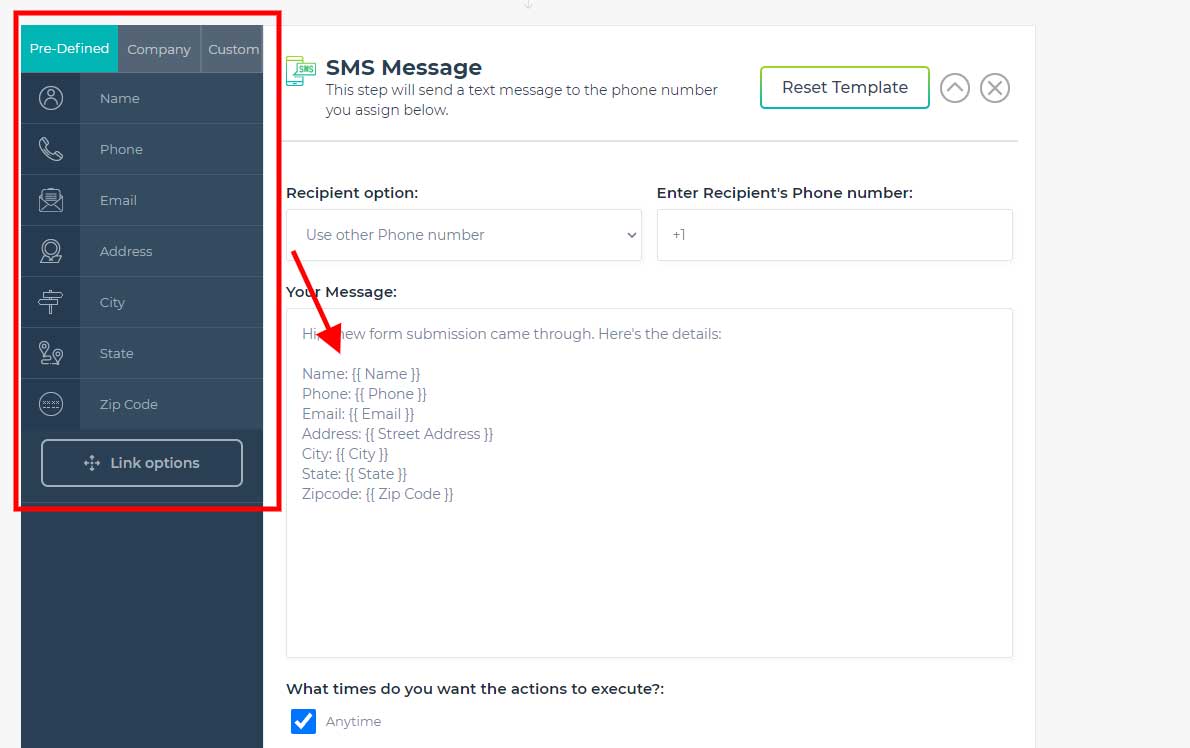
To add a variable to a message, you can drag and drop the variable into the message box. Wherever your cursor is in the message box field at the time you drop the variable inside, that’s where the variable will be located.

Variable Types

These variables are available when sending a text message or an email. Notice in the image below the three columns for Pre-defined, Company and Custom.

Pre-Defined – These variables come with LeadGenerated right out of the box and are composed of common form or lead intake information we feel will be present for most lead opportunities.

Company – This information comes from the company information that you create. When you create the association of a client with a company we can use some of this information.
Variables


Button/Link Options

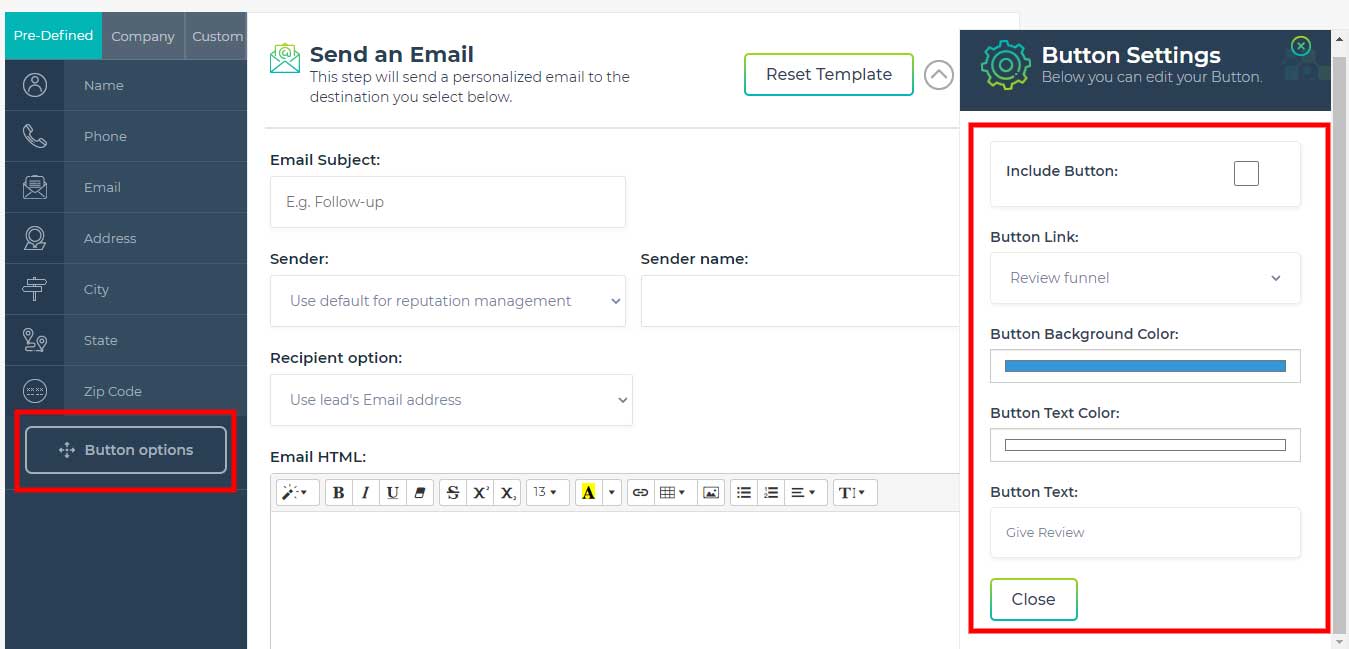
For emails and text messages, you have the ability to send a link with your message. For emails, these links can be included by using a button. Since text messages can’t contain buttons, you are limited to a normal website URL link. If your message is an email, then you will see the “button options” shown in the image below.

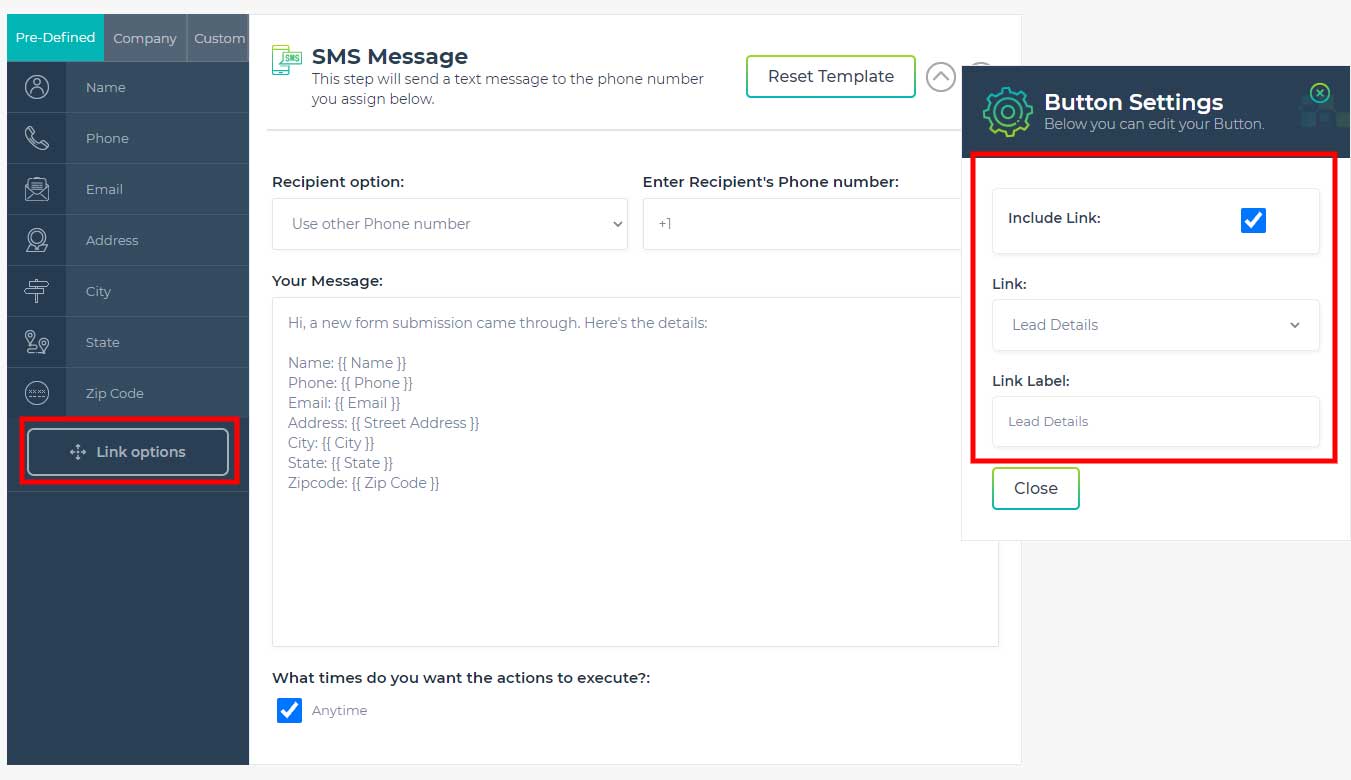
For text messages, the functionality is nearly identical but as you can see in the image below, this one says “link options.”

In either case, you can manage the behavior of the button or link through the menu that slides out from the right side. This window will be visible by clicking either the button options (email) or link option text messages.

Text Link Options

With the text message option, you can include a link by checking the checkbox. Next, you can choose between three options.

Review Funnel – Sends a link to the review funnel that is associated with the lead or contact.
Lead Details – Sends a link to the lead that is associated with the automation.
Other – Sends a link to another URL that you can specify here.
Text Link Options


Email Button Options

We have all the same options for links as we do for texting, but we have a little more control since we are able to create buttons in emails that we are not able to create in text messages.

Review Funnel – Sends a link to the review funnel that is associated with the lead or contact.
Lead Details – Sends a link to the lead that is associated with the automation.
Other – Allows you to send a link to another URL that you can specify here.
Button Background Color – Allows you to select the background color of the button to be used with the link.
Button Text Color – Allows you to select the color of the text to be used within the button.
Button Text – Allows you to select the actual words or text to be used within the button.
Button Link Options


Create New Automation

To start a new automation, expand the CRM item in the left navigation menu, then select “Automations”
This is the “All Automations” page. Here you will be able to create new automations as well as manage existing ones.

Starting an Automation

Automations can be started in two different ways: with a trigger or by being manually added to an automation.
Create Automation


Lead Detail Page

To start an automation from the “Lead Detail” page, expand the CRM item in the left navigation menu, expand ”Leads,” then select “All Leads”. Select the lead you would like to create an automation for, and click “View.”
You are now in the “Lead Detail” page. To start an automation click the “Add to Automation” button in the top right hand corner to the left of the “Delete Lead” button.

Add Lead to Automation


Contact Details Page

To start an automation from the “Contact Details” page, expand the CRM item in the left navigation menu and select contacts. From here, search for the contact you would like to create an automation for and open it up.
You are now in the “Contact Details” page. To start an automation, select the “Add to Automation” button in the top left hand corner of the page to the right of the “Edit” button.
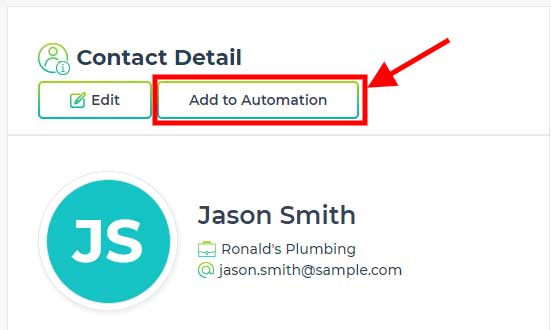
Add Contact to Automation


All Automations Page

To start an automation from the “All Automations Page” expand the CRM item in the left navigation menu then select automations.
You are now in the “All Automations” Page. From here you can create a new automation by clicking the “New Automation” button at the top right hand corner to the right of the “Add to Automation” button.

Naming an Automation

To name your automation, you must first create one. From the “All Automations” page select the “New Automation” button. Then select which type of automation you would like to create from the selections provided.
After selecting what type of automation you will be creating, you will now be able to name it. The custom name field will be located at the top right hand corner of the page and labeled “Sequence Name”.

Naming Automations


In Progress Automations

Automation History

You can view the entire history for a specific automation. To do this, start from the “All Automations” page, find the automation you would like to view the history of, then click the “History Logs” button located in the actions tab. This button is the second from the left, right next to the “In Progress” button.
Automation History


Duplicate Automation

Duplicating an existing automation is very easy. Starting from the “All Automations” page, click the “Duplicate” button which is located in the actions tab. This button is the second from the right, next to the “Delete” button. Once you click duplicate, you will be prompted to name the new automation. After naming your copied automation, click “Duplicate”, then you will be directed to where you can edit your new duplicated automation.
Duplicate Automation


Delete Automation

If you would like to delete an automation, start from the “All Automations” page, and click the “Delete” button that is located in the actions tab. This button is on the far right. After clicking the “Delete” button, you will be prompted to confirm you would like to delete that automation.
Delete Automation


Government Compliance

Various governing bodies around the world have restrictions on automation related to phone calls, emails, text messages and unsolicited faxes. By using LeadGenerated you assume responsibility for being in compliance with these rules and regulations. Failure to do so can result in legal ramifications that are your responsibility to resolve.

Google Analytics Integration

The Google Analytics Integration to LeadGenerated was designed so that you are able to view all of your analytics data in one place directly associated with the company’s in the system. The reports produced by Google Analytics data contain valuable information and insight into user behavior so you can address business marketing concerns

You are able to see real-time data such as how many visitors are on your site and whether they are browsing from a computer or mobile device, traffic sources, site speed, and page indexing all in a single convenient dashboard. Connect any number of Google Analytics Accounts to LeadGenerated for added flexibility.

How to Connect A Google Account

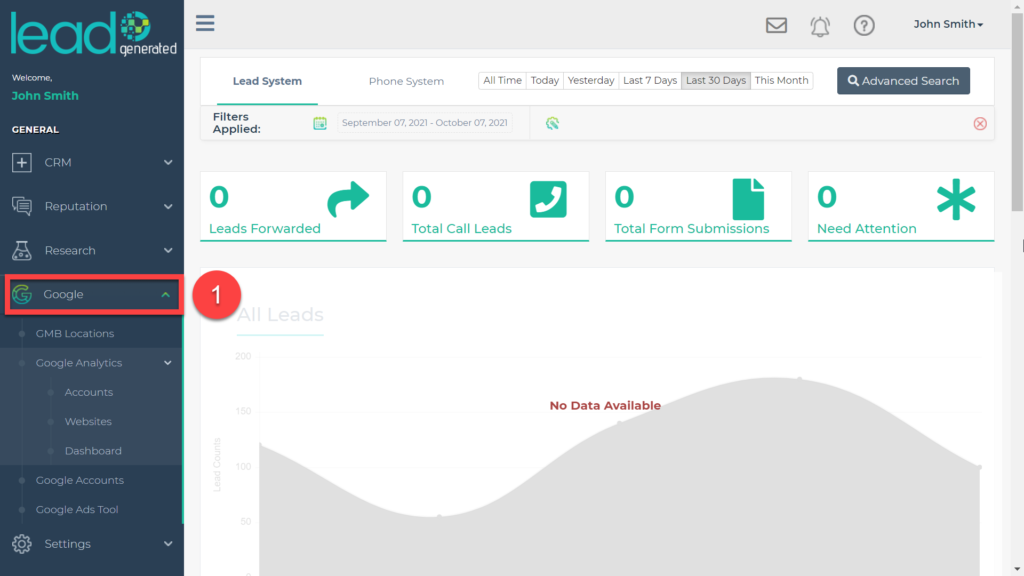
1. Expand the “Google” item from the left side navigation.

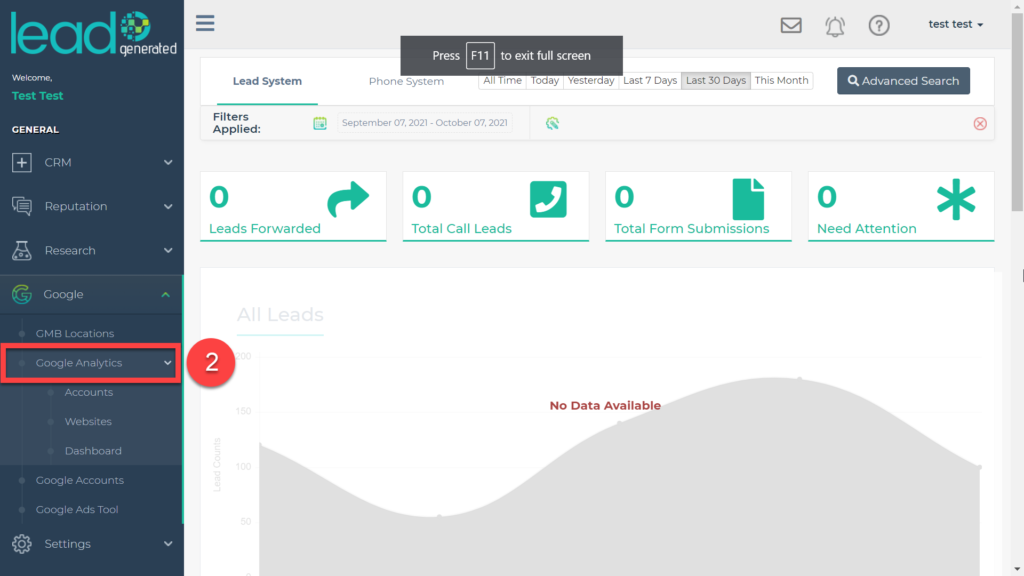
2. Expand the “Google Analytics” item from the left side navigation.

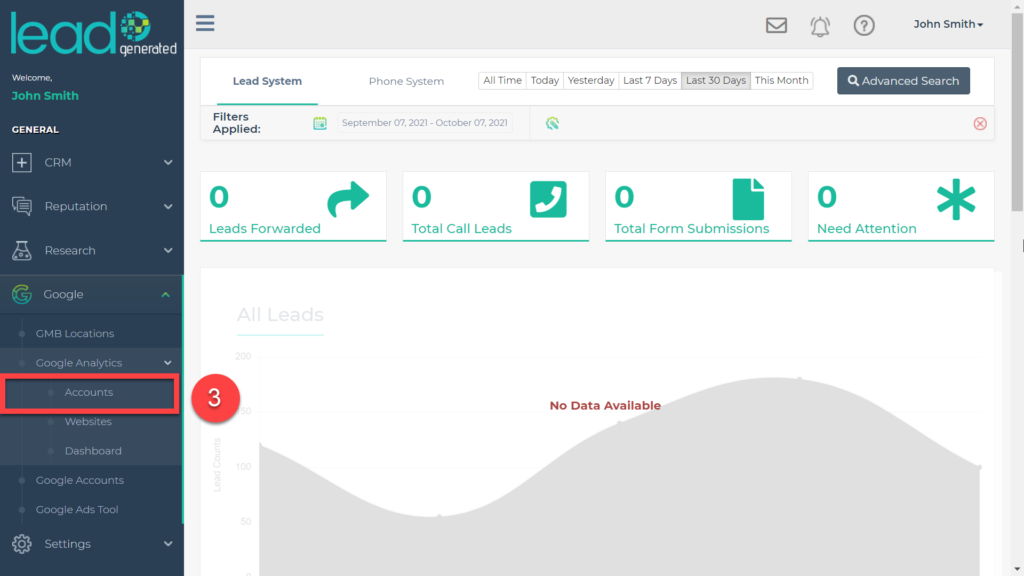
3. Select “Accounts”

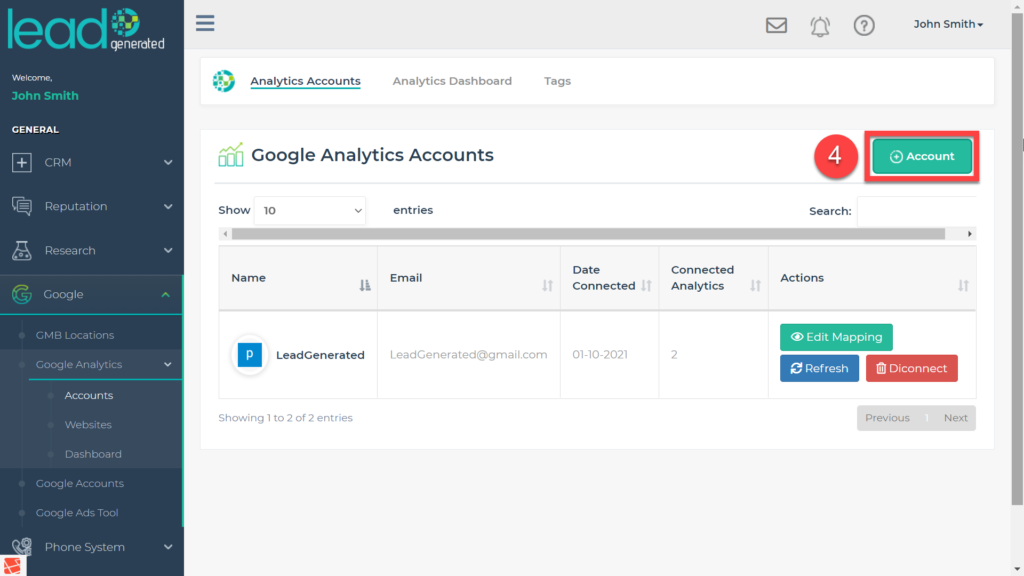
4. Click the add account button on the main screen

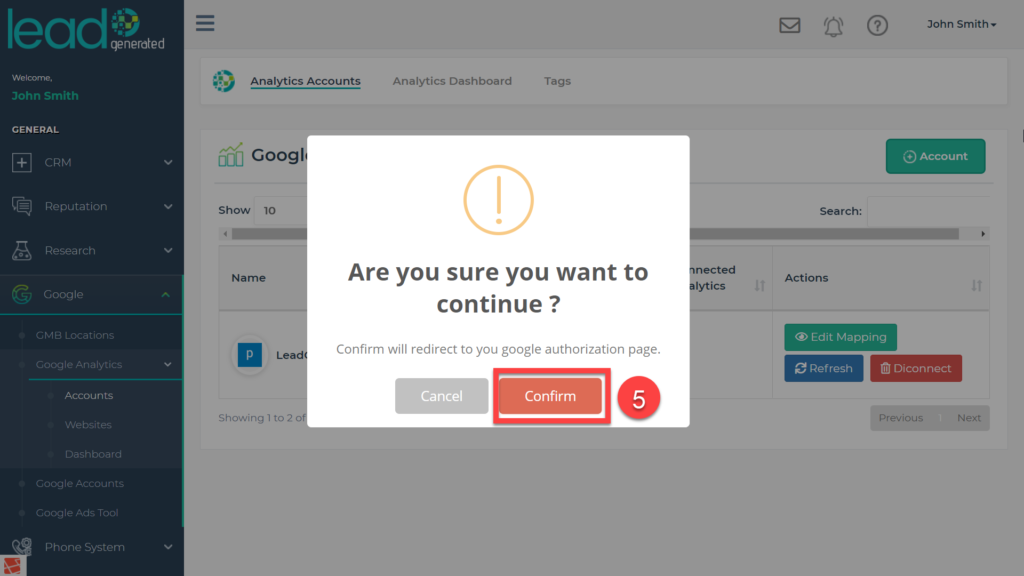
5. Select Confirm on the “Are you sure you want to continue” Screen

6. Sign-into the google account that is connected to analytics.

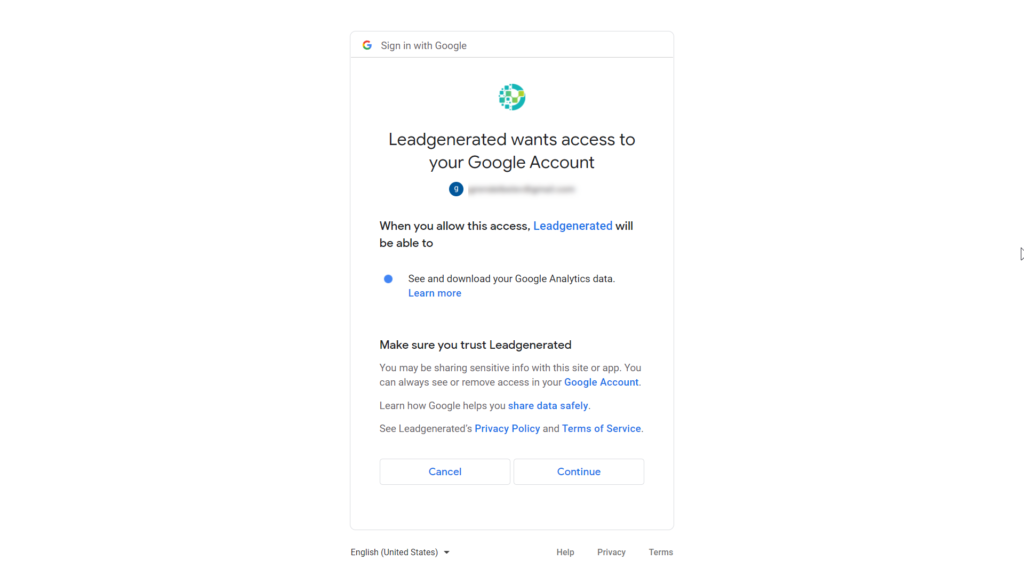
7. After sign in select continue on “LeadGenerated wants access to your google Account”

8. To add more accounts repeat steps 1-7.

How to Get to Google Account Mapping

1. Return to the google item on the left side navigation

2. Expand the “Google Analytics” item for the left side navigation

3. Select accounts

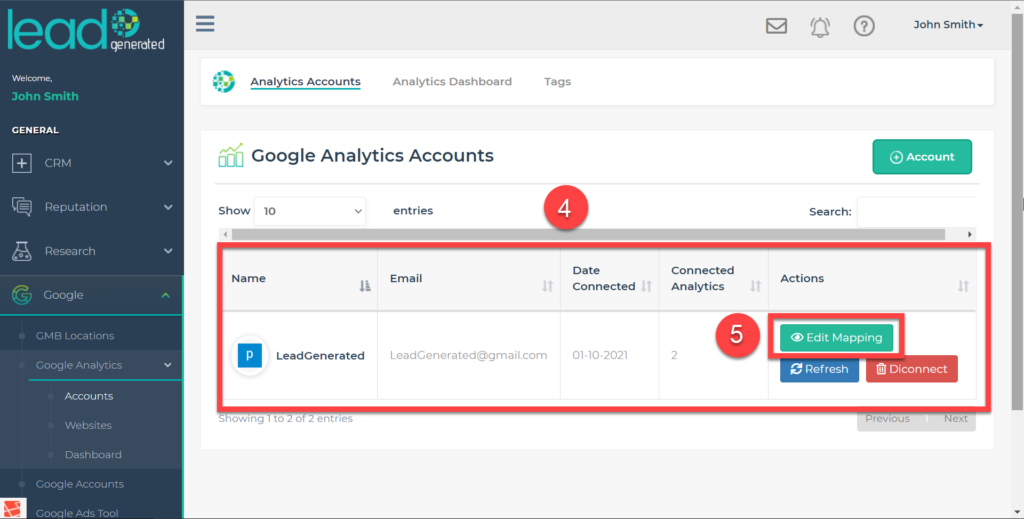
4. Locate your account on the main screen

5. Navigate to actions right of the account name and select edit mapping.

How to View Google Analytics Account Data

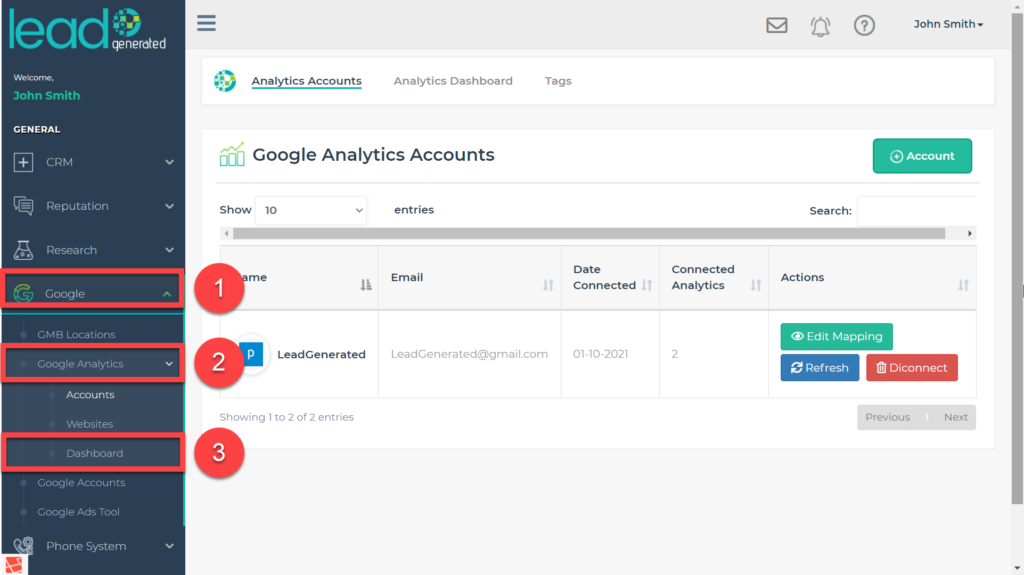
1. Expand the “Google” item from the left side navigation

2. Expand Google Analytics

3. Select Dashboard.

To view company specific Google analytics results:

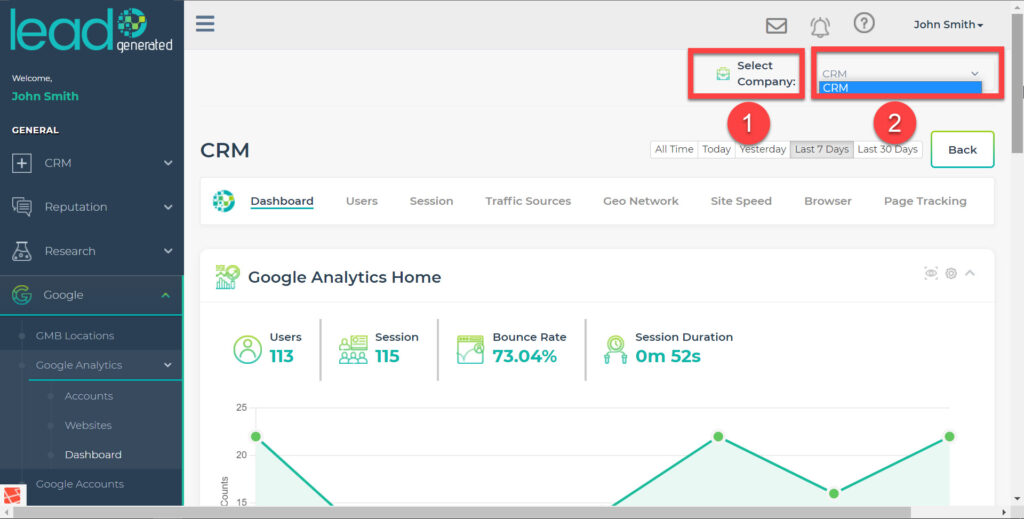
1. Navigate to “Select Company” in the upper right hand corner of the dashboard screen

2. Select from the drop down the company you want to see analytics results for.

How to Disconnect a Google Account From LeadGenerated’s Google Analytics Integration:

1. Expand the “Google” item from the left side navigation.

2. Expand the “Google Analytics” item from the left side navigation.

3. Select “Accounts”

4. Locate the Google Account you would like to remove

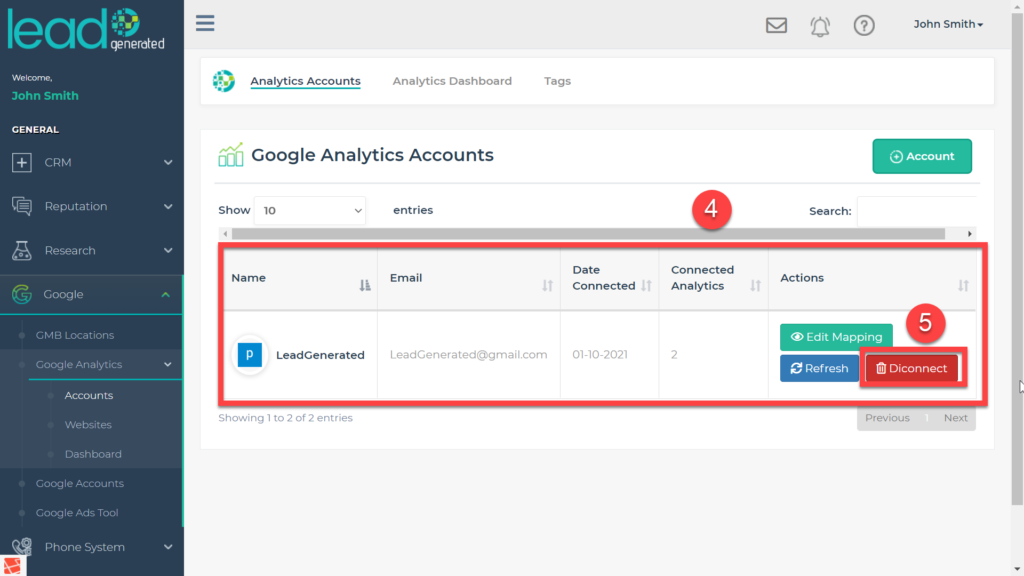
5. Navigate to the “Actions” Column for the google account and select “Disconnect”

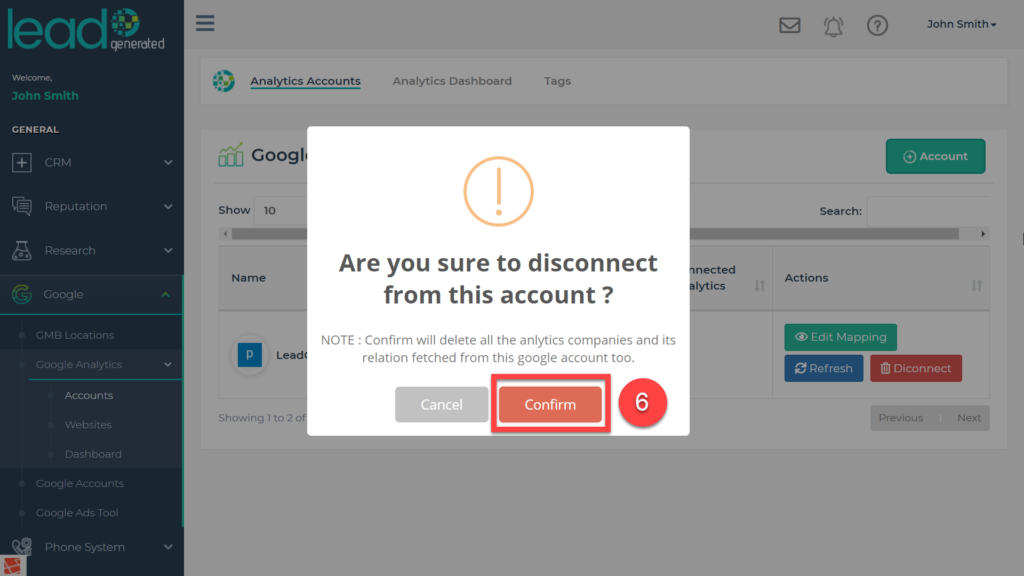
6. Select “Confirm” from the “are you sure you want to disconnect from this account” prompt.

Saving Custom Filters

In this article, I’ll show you how to save filters in Lead Generated, so that you can save time and also export custom tables.

Step 1: Open the Columns Window via the blue “columns” button.

Step 2: Check the boxes next to the columns you’d like to save in that filtered table view.

Step 3: Click “Save” when all desired columns have been checked.

Step 4: Click the “Advanced Search” button

Step 5: In the upper right corner, in the “Filters” section, click the “Save” icon

Step 6: Name Your Custom Filter

Step 7: Reference Your Saved Custom Filter via the Gear Icon

Step 8: Select the “Saved Filters” Tab

Step 9: Select Your Custom Filter from the List

Compare Heat Maps

Looking to compare heat maps side by side, maybe to show a client how you’ve improved their Google My Business Listing’s rankings over time?

In this video, I show just that.

To view your previously run heat maps side by side, there’s 4 main steps:

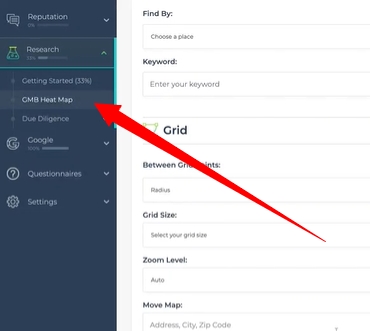
Step 1: Go to the “GMB Heat Map” Module

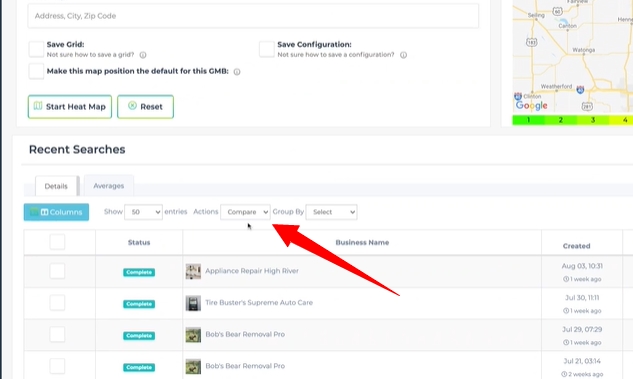
Step 2: Scroll Down to “Recent Searches”

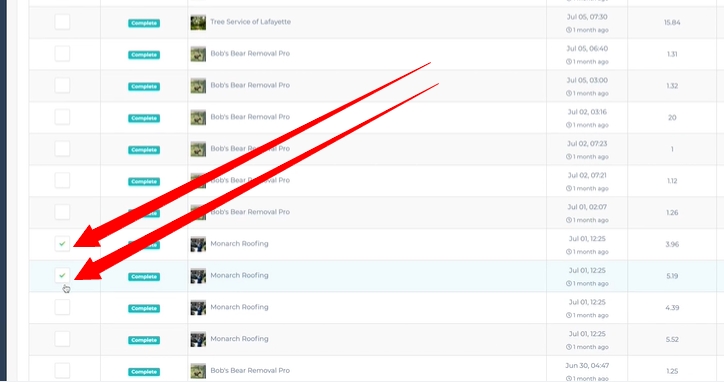
Step 3: Select the Heat Maps that You’d Like to Compare

Step 4: Under “Recent Searches”, Select “Compare” using the “Actions” Dropdown

Add Email Account

Lead Generated sends emails for a variety events throughout our system. By default the emails come from [email protected]. We understand that this probably not desirable in many cases so we have provided you the ability to add your own email accounts to our system. Some of the common cases where you may want to send emails from your email instead of the Lead Generated default email are:

  • Delivering leads to you or your clients
  • Review requests
  • Questionnaire emails

Adding an Email Account

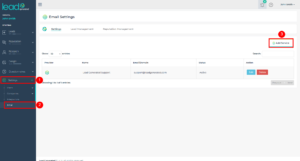
To add an email account expand settings from the left side navigation.

Select Email

From the top right corner click the “Add Email Account” button.

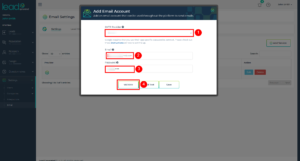
Select your email provider from the drop down list. If you do not see your email provider on the drop down list, select “Other”. When using the “Other” option you may need to contact your host to get the SMTP settings associated with your email account. Check out our SMTP settings article for the SMTP settings for some of the most popular website hosts. When using Gmail there are some additional steps required. This guide will walk you through the settings necessary for Gmail.

After completing the email settings click the “Validate” button to ensure we are able to access the email account with your settings.

Assuming your connection is successful you should see a message like this:

After a successful validation message it is a good idea to send a test email by clicking the “Send Test” button.

In the popup menu enter an email address where you can receive our test email message. If you did not receive the email test, please check your spam email. The test email should be from the email address you just added to our system.
After receiving the test email message you can now save the email address to our system.

Once the email address is saved to our system you can start send emails from our system for Lead Emails, Review requests and Questionnaires.

Check out these articles for more information about sending emails for the associated modules.

Email Settings Lead Management Module

Email Settings Reputation Management Module

Email Settings Questionnaire Module

Connect Gmail Account

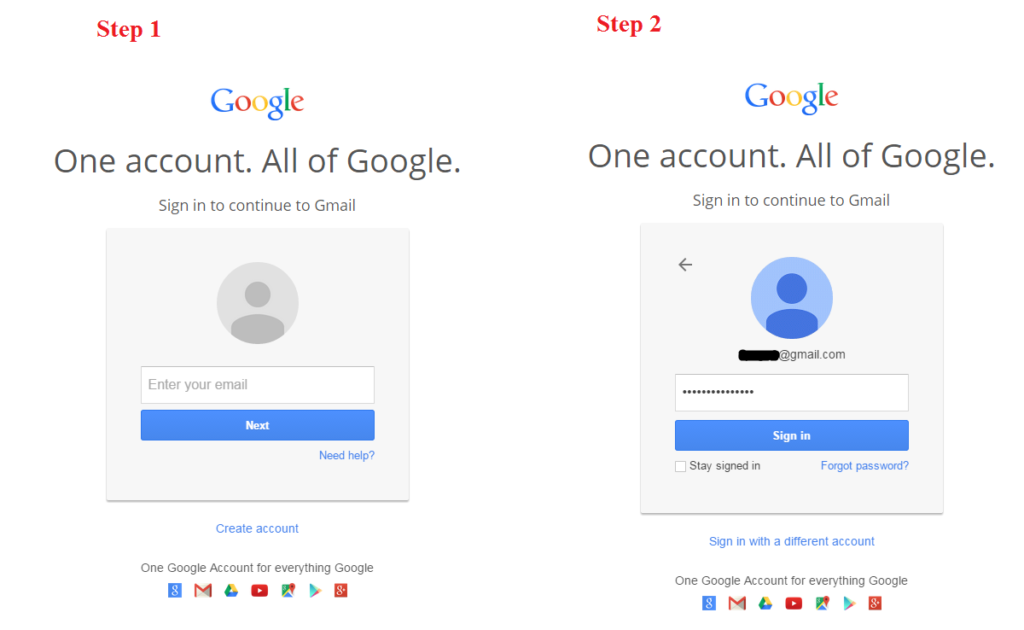
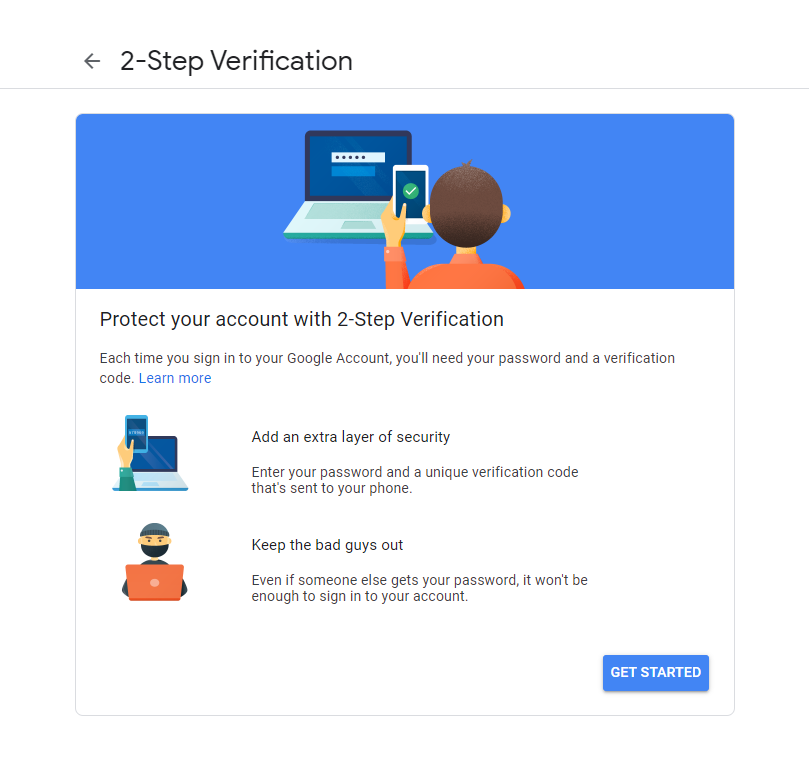
In order to be able to send emails from Gmail, you must set up an App Password. An App Password is a 16-digit passcode that gives an app or device permission to access your Google Account. App Passwords can only be used with accounts that have 2-Step Verification turned on.

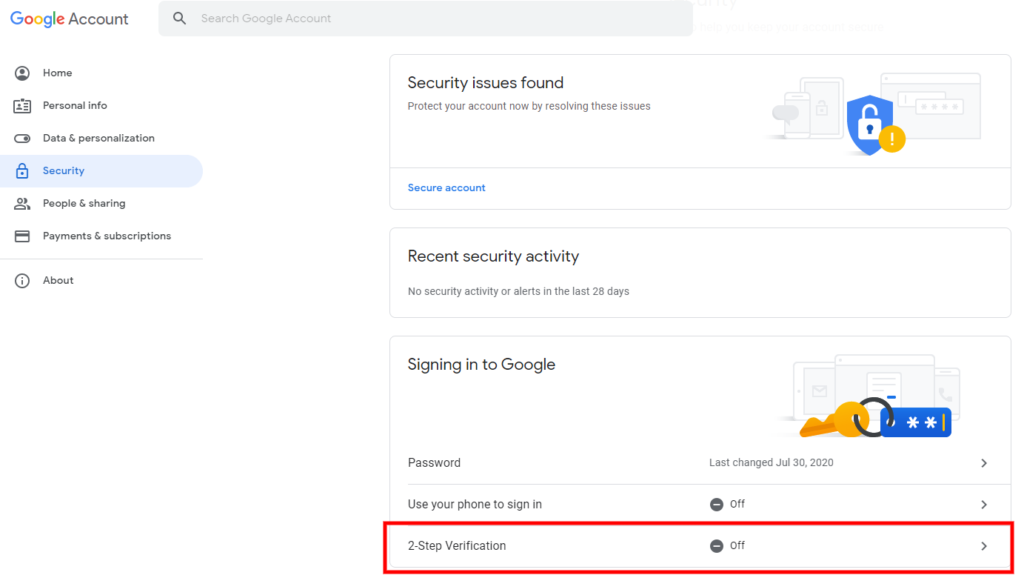
To turn on 2-step Verification: 

1. Open your Google Account.

2. In the navigation panel, select Security.

3. Under “Signing in to Google,” select 2-Step Verification and then Get started.

Follow the on-screen steps.

Create App Password

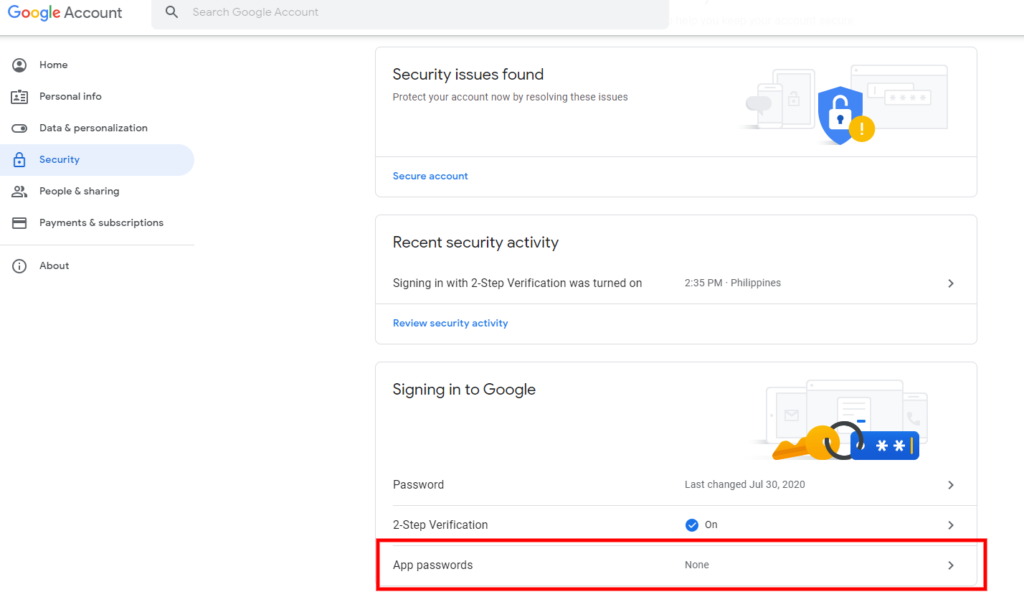
1. Go to your Google Account.

2. Select Security.

3. Under “Signing in to Google,” select App Passwords. You may need to sign in. If you don’t have this option, it might be because:

  1. 2-Step Verification is not set up for your account.
  2. 2-Step Verification is only set up for security keys.
  3. Your account is through work, school, or another organization.
  4. You turned on Advanced Protection.

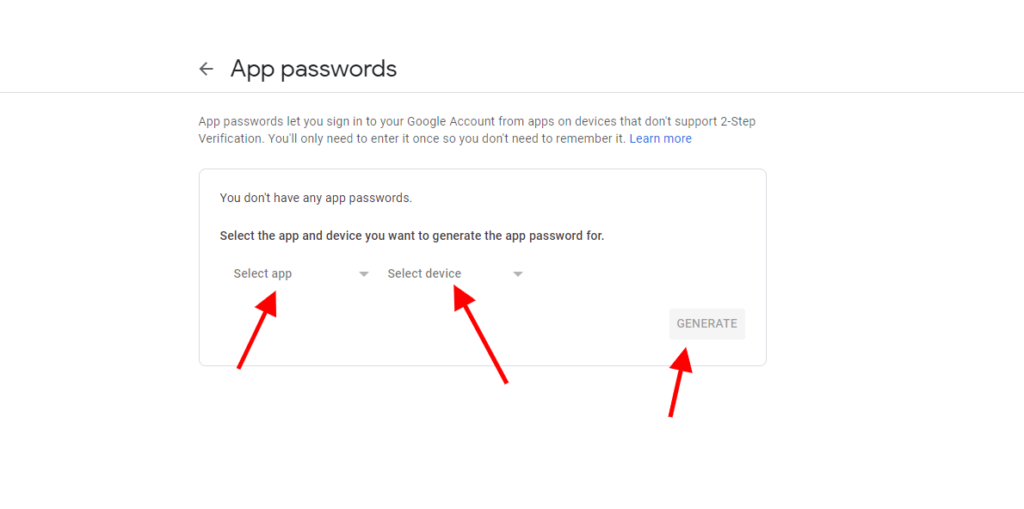
4. At the bottom, choose Select app and choose the app you using and then Select device and choose the device you’re using and then Generate.

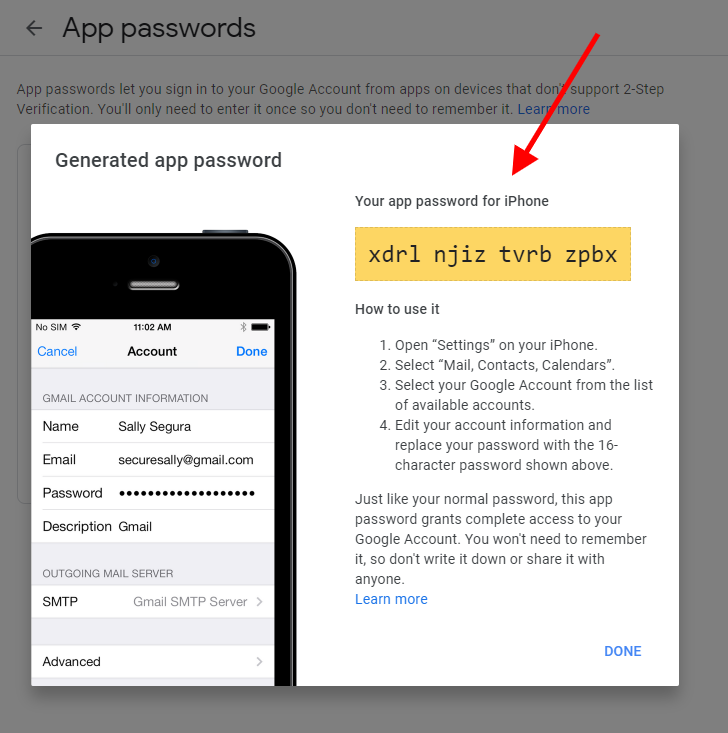
5. Follow the instructions to enter the App Password. The App Password is the 16-character code in the yellow bar on your device.

6. Tap Done

Create App Password

  1. Go to your Google Account.
  2. Select Security.
  3. Under “Signing in to Google,” select App Passwords. You may need to sign in. If you don’t have this option, it might be because:
    1. 2-Step Verification is not set up for your account.
    2. 2-Step Verification is only set up for security keys.
    3. Your account is through work, school, or another organization.
    4. You turned on Advanced Protection.
  4. At the bottom, choose Select app and choose the app you using and then Select device and choose the device you’re using and then Generate.
  5. Follow the instructions to enter the App Password. The App Password is the 16-character code in the yellow bar on your device.
  6. Tap Done.

Lead Management Email Settings

Among the many important functions of the lead management module is delivery leads from any incoming source to its assigned user. One of the ways this delivery can happen is by email.  In this article we are going to discuss how to adjust the email address used in the delivery of these lead emails. We are assuming that you have are familiar with how to add an email account to Lead Generated. If that is not the case please see the support article.

After successfully adding an email account to Lead Generated you can assign the email account to be used for lead delivery on a company level. This assignment can happen from two different locations. The lead management tab of the email settings page as well as the email settings tab of the edit company page.

Method 1: Email Settings

Using the email settings page you can map more than one company at a time to an email account. To map an email account to a company using the email settings page follow these steps:

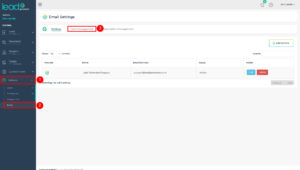
  1. Add an email account to Lead Generated.
  2. Expand settings from the left navigation.
  3. Select Email.
  4. Select the Lead Management tab from the top horizontal navigation.
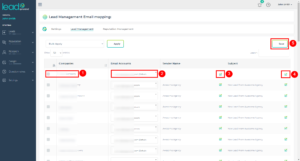
  5. Find the company or by scrolling through the list of companies or using the search bar in the top right corner.
  6. Select the new email address from the drop down list associated with the company.
  7. Add the sender name by clicking the pencil icon and typing in the name to be used for future lead emails for this company.
  8. Type the subject of the email to be used for future lead emails for the company.
  9. Click the save button in the top right corner.

Using the Bulk Apply

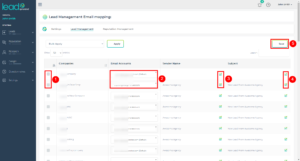
The bulk apply allows assigning an email address to more than one company at a time.

  1. Select the checkboxes next to more than one company.
  2. Select the email account you wish to assign to the selected companies from the bulk apply dropdown box.
  3. Click save to apply your changes to the selected companies.

Method 2: Edit Company

The second method for assigning an email account to a company can be done from the edit company screen.

  1. Add an email account to Lead Generated.
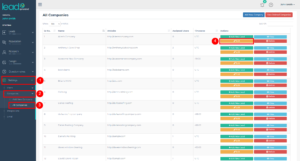
  2. Expand settings from the left navigation menu.
  3. Expand the companies sub-menu item.
  4. Select all companies.
  5. Select edit next to the company for which you would like to update the email account.
  6. Select the email settings tab.
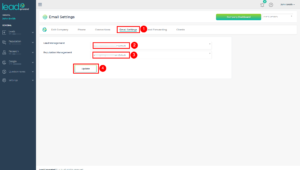
  7. Choose the email account from the dropdown list next to lead management.
  8. Click the update button.

Questionnaire Email Settings

The questionnaire module makes it easy to gather information from our clients or prospective clients. First, we build our questionnaire using the Lead Generated form builder. Next, we send an email that contains a link to our questionnaire. When the user clicks on the link they are taken to the questionnaire that gathers the requested information and saves it safely in our system. By default, this questionnaire comes from [email protected], which we realize may not be ideal in all situations. You are free to customize this to your own email account and have those requests come from an email address that your client will recognize. The first step is to add an email account to Lead Generated.

After successfully adding an email account to Lead Generated you can assign the email account to be used for the questionnaire delivery on a questionnaire level. This assignment can happen from the edit questionnaire page.

Assign Email Account

There are two prerequisites before assigning an email account to a questionnaire. First, you must have already added the email account to Lead Generated. Second, you must have an existing questionnaire. To map an email account to a questionnaire follow these steps:

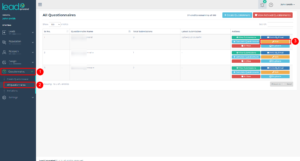
  1. Expand Questionnaires from the left navigation.
  2. Select All Questionnaires.
  3. Select Edit next to the questionnaire for which you would like to update the sending email account.
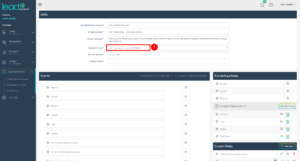
  4. Select the new email account from the “Sender Email” drop-down box.
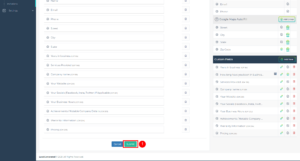
  5. Click the submit button to save the new email settings for the questionnaire.

Reputation Management Email Settings

The reputation management module provides a system to simplify and automate the review request process. One of the main ways those review requests can be delivered is through an email. Using an email address that is consistent with the company that provided the service will increase the conversion rate of the review requests.  We are assuming that you have are familiar with how to add an email account to Lead Generated. If that is not the case please see the support article.

After successfully adding an email account to Lead Generated you can assign the email account to be used for the review requests on a company level. This assignment can happen from two different locations. The reputation management tab of the email settings page as well as the email settings tab of the edit company page.

Method 1: Email Settings

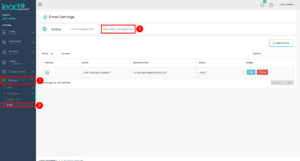
Using the email settings page you can map more than one company at a time to an email account. To map an email account to a company using the email settings page follow these steps:

  1. Add an email account to Lead Generated.
  2. Expand settings from the left navigation.
  3. Select Email.
  4. Select the Reputation Management tab from the top horizontal navigation.
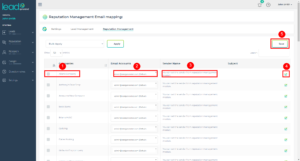
  5. Find the company or by scrolling through the list of companies or using the search bar in the top right corner.
  6. Select the new email address from the drop-down list associated with the company.
  7. Add the sender name by clicking the pencil icon and typing in the name to be used for future review request emails for this company.
  8. Type the subject of the email to be used for future review request emails for the company.
  9. Click the save button in the top right corner.

Using the Bulk Apply

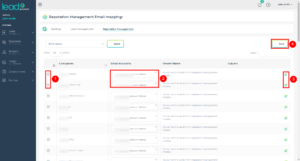
The bulk apply allows assigning an email address to more than one company at a time.

  1. Select the checkboxes next to more than one company.
  2. Select the email account you wish to assign to the selected companies from the bulk apply dropdown box.
  3. Click save to apply your changes to the selected companies.

Method 2: Edit Company

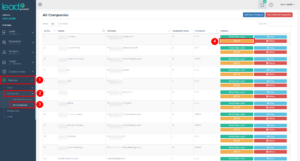
The second method for assigning an email account to a company can be done from the edit company screen.

  1. Add an email account to Lead Generated.
  2. Expand settings from the left navigation menu.
  3. Expand the companies sub-menu item.
  4. Select all companies.
  5. Select edit next to the company for which you would like to update the email account.
  6. Select the email settings tab.
  7. Choose the email account from the dropdown list next to reputation management.
  8. Click the Update button.