Auto Lead Forwarding

As leads flow from your website to you or your client they pass through Lead Generated. This lead flow allows you to leverage the tracking, reporting, and analysis tools built into this powerful system. You have two choices when deciding on the delivery of leads, auto-forwarding, and manual forwarding.

Auto-forwarding allows you to automate the lead delivery process. When this setting is activated leads will be sent to the client associated with the company (or website) as soon as they arrive in our system. If auto-forwarding is turned off (manual forwarding), the leads will not be delivered until someone takes action on them.

By default, when a new client or company is created auto-forwarding is turned off. This means as you create new clients you need to turn on auto-forwarding or manually send the leads to clients. In either event, the status of the lead delivery is tracked through the progress field. This is a required field for every lead within Lead Generated. Among the available options for this field are “Needs Attention” and “Forwarded”.  The needs attention status alerts you that a lead has not been delivered while the forward status confirms the delivery of a lead.  With both the manual and auto-forwarding delivery options, this status is updated automatically.

Manually Forward

To send a lead manually follow the steps below.

  1. Expand leads from the left navigation.
  2. Select all leads.
  3. Click view next to the lead you would like to forward.
  4. In the top left corner select email lead.

Auto-Forward

Like many things in Lead Generated, there are multiple ways to accomplish the same thing. Auto-forwarding can be turned on from either the Edit Client or Edit Company pages.

Client Forwarding Settings

  1. Expand Settings from the left navigation, then expand users and select all users.
  2. Select the view button next to the user for which you would like to adjust the auto-forwarding settings.
  3. Click the Edit User button from the top right corner.
  4. Select the Lead Delivery Settings tab from horizontal navigation.
  5. Adjust the auto-forward toggle switch to the turn the setting on or off for the associated companies.
  6. Click update to save your settings.

Company Forwarding Settings

  1. Expand Settings from the left navigation, then expand companies and select all companies.
  2. Select the Edit button next to the company for which you would like to adjust the auto-forwarding settings.
  3. Turn on or off auto-forwarding for the associated clients using the toggle switch.
  4. Click update to save your settings.

Qualified Call Filters

The default behavior for phone calls arriving in Lead Generated is to hold them in the all calls area and not add them as leads. This allows you to preserve an accurate lead count within the leads section of Lead Generated and not have your leads be watered down by telemarketers. In a sense, your calls are held in a quarantine area until they are moved to the leads area. This process can be done manually or automated.

Manually Add Call

Click “add as lead” from the calls page. This converts the call to a lead and moves it to the various lead pages throughout the application.

  1. Expand Leads from the left navigation.
  2. Select “All Calls”.
  3. Click the “Add as Lead” button.

Qualified Call Filters

The qualified call filters automate the process of moving calls to leads based on the rules that you set. This is done on a company level from the edit company screen.

  1. Expand settings from the left navigation.
  2. From within the settings menu expand companies and then select all companies.
  3. Click edit next to the company for which you would like to adjust the qualified call filters.
  4. Navigate to the Qualified Call Filters area.
  5. Select and adjust your filters.
  6. Click update to save your updated call filters.

For calls to be added as a lead they must meet all the selected qualified call filters. To add all calls as leads enable the call filters without any of the call filter selections.

  • Qualified Call Filters Enable – This enables or disables the qualified call filters.
  • First Time Callers – When this is enabled calls from first-time callers only will be added as a lead.
  • Call Duration – Only calls with a duration greater than the specified time will be added as leads.
  • Answer Status – Only calls that have a status matching the selected calls will be added.
  • Phone Number Area Code – Only calls that match one of the selected phone number area codes will be added as leads.

Deactivate Company

Lead Generated works on a credit basis for the lead management, reputation management, and GMB management modules. As you activate a credit in one of these modules the credit is deducted from the credit balance in your subscription. If at some point you would like reclaim the credit and release the connection between the module and the selected company you can do this through the company info tab of the company dashboard.


Step By Step Guide

1. Expand the Settings option from the left navigation menu.

2. Expand the companies sub-menu from within the settings menu item.

3. Select “All Companies”.

4. Click the view button next to company you wish to adjust.

5. Select the “Company Info” tab.

6. Chose Deactivate next to the selected module.

7. Confirm by entering your account password. This process is irreversible.

Connect Gmail Account

In order to be able to send emails from Gmail, you must set up an App Password. An App Password is a 16-digit passcode that gives an app or device permission to access your Google Account. App Passwords can only be used with accounts that have 2-Step Verification turned on.

To turn on 2-step Verification: 

1. Open your Google Account.

2. In the navigation panel, select Security.

3. Under “Signing in to Google,” select 2-Step Verification and then Get started.

Follow the on-screen steps.

Create App Password

1. Go to your Google Account.

2. Select Security.

3. Under “Signing in to Google,” select App Passwords. You may need to sign in. If you don’t have this option, it might be because:

  1. 2-Step Verification is not set up for your account.
  2. 2-Step Verification is only set up for security keys.
  3. Your account is through work, school, or another organization.
  4. You turned on Advanced Protection.

4. At the bottom, choose Select app and choose the app you using and then Select device and choose the device you’re using and then Generate.

5. Follow the instructions to enter the App Password. The App Password is the 16-character code in the yellow bar on your device.

6. Tap Done

Create App Password

  1. Go to your Google Account.
  2. Select Security.
  3. Under “Signing in to Google,” select App Passwords. You may need to sign in. If you don’t have this option, it might be because:
    1. 2-Step Verification is not set up for your account.
    2. 2-Step Verification is only set up for security keys.
    3. Your account is through work, school, or another organization.
    4. You turned on Advanced Protection.
  4. At the bottom, choose Select app and choose the app you using and then Select device and choose the device you’re using and then Generate.
  5. Follow the instructions to enter the App Password. The App Password is the 16-character code in the yellow bar on your device.
  6. Tap Done.

Add Email Account

Lead Generated sends emails for a variety events throughout our system. By default the emails come from [email protected]. We understand that this probably not desirable in many cases so we have provided you the ability to add your own email accounts to our system. Some of the common cases where you may want to send emails from your email instead of the Lead Generated default email are:

  • Delivering leads to you or your clients
  • Review requests
  • Questionnaire emails

Adding an Email Account

To add an email account expand settings from the left side navigation.

Select Email

From the top right corner click the “Add Email Account” button.

Select your email provider from the drop down list. If you do not see your email provider on the drop down list, select “Other”. When using the “Other” option you may need to contact your host to get the SMTP settings associated with your email account. Check out our SMTP settings article for the SMTP settings for some of the most popular website hosts. When using Gmail there are some additional steps required. This guide will walk you through the settings necessary for Gmail.

After completing the email settings click the “Validate” button to ensure we are able to access the email account with your settings.

Assuming your connection is successful you should see a message like this:

After a successful validation message it is a good idea to send a test email by clicking the “Send Test” button.

In the popup menu enter an email address where you can receive our test email message. If you did not receive the email test, please check your spam email. The test email should be from the email address you just added to our system.

After receiving the test email message you can now save the email address to our system.

Once the email address is saved to our system you can start send emails from our system for Lead Emails, Review requests and Questionnaires.

Check out these articles for more information about sending emails for the associated modules.

Email Settings Lead Management Module

Email Settings Reputation Management Module

Email Settings Questionnaire Module

Lead Management Email Settings

Among the many important functions of the lead management module is delivery leads from any incoming source to its assigned user. One of the ways this delivery can happen is by email.  In this article we are going to discuss how to adjust the email address used in the delivery of these lead emails. We are assuming that you have are familiar with how to add an email account to Lead Generated. If that is not the case please see the support article.

After successfully adding an email account to Lead Generated you can assign the email account to be used for lead delivery on a company level. This assignment can happen from two different locations. The lead management tab of the email settings page as well as the email settings tab of the edit company page.

Method 1: Email Settings

Using the email settings page you can map more than one company at a time to an email account. To map an email account to a company using the email settings page follow these steps:

  1. Add an email account to Lead Generated.
  2. Expand settings from the left navigation.
  3. Select Email.
  4. Select the Lead Management tab from the top horizontal navigation.
  5. Find the company or by scrolling through the list of companies or using the search bar in the top right corner.
  6. Select the new email address from the drop down list associated with the company.
  7. Add the sender name by clicking the pencil icon and typing in the name to be used for future lead emails for this company.
  8. Type the subject of the email to be used for future lead emails for the company.
  9. Click the save button in the top right corner.

Using the Bulk Apply

The bulk apply allows assigning an email address to more than one company at a time.

  1. Select the checkboxes next to more than one company.
  2. Select the email account you wish to assign to the selected companies from the bulk apply dropdown box.
  3. Click save to apply your changes to the selected companies.

Method 2: Edit Company

The second method for assigning an email account to a company can be done from the edit company screen.

  1. Add an email account to Lead Generated.
  2. Expand settings from the left navigation menu.
  3. Expand the companies sub-menu item.
  4. Select all companies.
  5. Select edit next to the company for which you would like to update the email account.
  6. Select the email settings tab.
  7. Choose the email account from the dropdown list next to lead management.
  8. Click the update button.

Automations

Automations are a powerful part of the CRM module that allow for things to happen without your interaction based on predefined sequences. If you would like to set up logic that says, “if X happens then do Y,” then automations are your solution.


Key Automation Components

Automations are composed of three main pieces: Triggers, Actions and Filters.

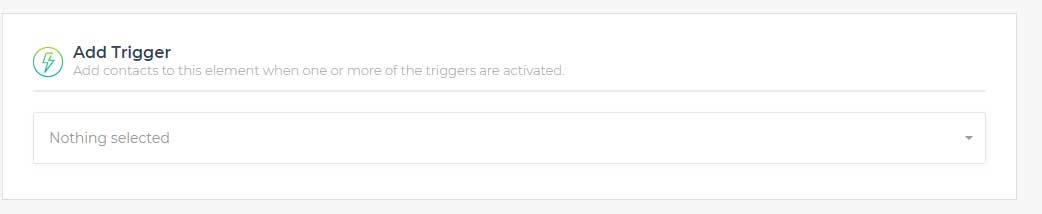
Triggers – When these events occur, they can initiate an automation sequence. Below are some examples of triggers:

  • New Form Submission
  • New Phone Call
  • New Text Message
  • Field Status Update
  • New Contact Created
  • New Deal in the Pipeline
  • Deal Moved to Pipeline Stage

Automation Trigger
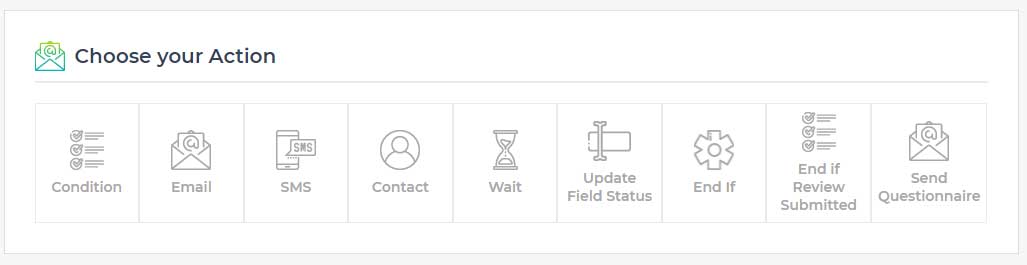
Actions – Actions can be strung together into a list of automated processes that can be performed. You can add as many actions as you would like in an automation. Below is an example of a list of actions that can be used to perform automated tasks within the system.

  • Condition
  • Send Email
  • Send SMS Text
  • Create Contact
  • Wait (the sequence will wait for a specified amount of time before continuing)
  • Update Field Status
  • End If (will end if something becomes true)
  • End If Review Submitted will end if a review is submitted)
  • Send Questionnaire

Choose your Actions


Filters – These are used with triggers, allowing you to limit a trigger being fired. For example, let’s say you have a trigger that you would like to be fired when a new form submission is submitted, but only if it is for a certain company or from a certain value in the zip code field.Filters make this possible. Depending on the trigger, you will have different options for the filters. You can combine as many filters as you like. When using more than one filter, it is necessary for all the filters to be true for the automation to continue.
Trigger Filter

There are different field types within LeadGenerated. . The default zip code field is a “text field,” meaning that you have the ability to type in the filter value. If the field type is a text field, you can use a comma separated list to include multiple values. In these cases, the automation will continue if only one of these values matches an item on your list. If the field type is a dropdown menu, then you will have a selection box for the field value.

Variables

Variables allow you to reference dynamic information during your automation. Let’s make an example to be sure this is clear. Perhaps you have a client named Bob and he owns a company called Bob’s roofing. When you create the client user for Bob and assign to the company Bob’s roofing, this information can be available when an automation runs through the use of variables.

Add Variable to Message

To add a variable to a message, you can drag and drop the variable into the message box. Wherever your cursor is in the message box field at the time you drop the variable inside, that’s where the variable will be located.

Variable Types

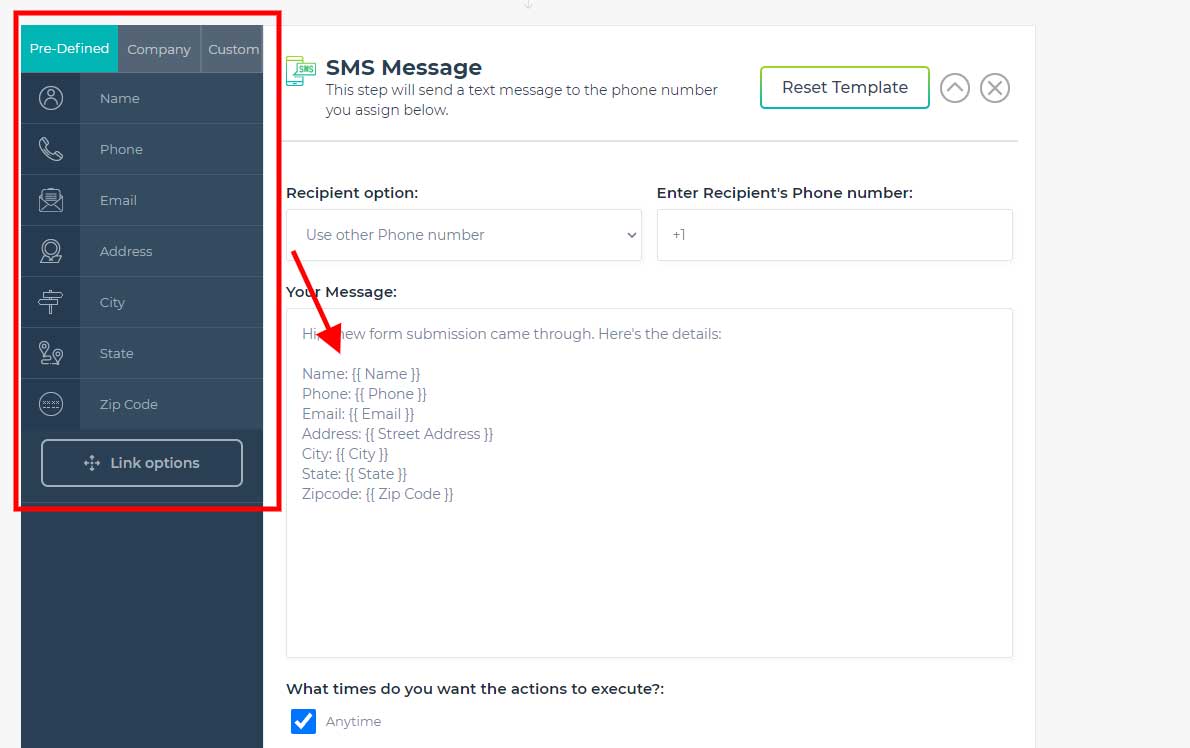
These variables are available when sending a text message or an email. Notice in the image below the three columns for Pre-defined, Company and Custom.

Pre-Defined – These variables come with LeadGenerated right out of the box and are composed of common form or lead intake information we feel will be present for most lead opportunities.

Company – This information comes from the company information that you create. When you create the association of a client with a company we can use some of this information.
Variables


Button/Link Options

For emails and text messages, you have the ability to send a link with your message. For emails, these links can be included by using a button. Since text messages can’t contain buttons, you are limited to a normal website URL link. If your message is an email, then you will see the “button options” shown in the image below.

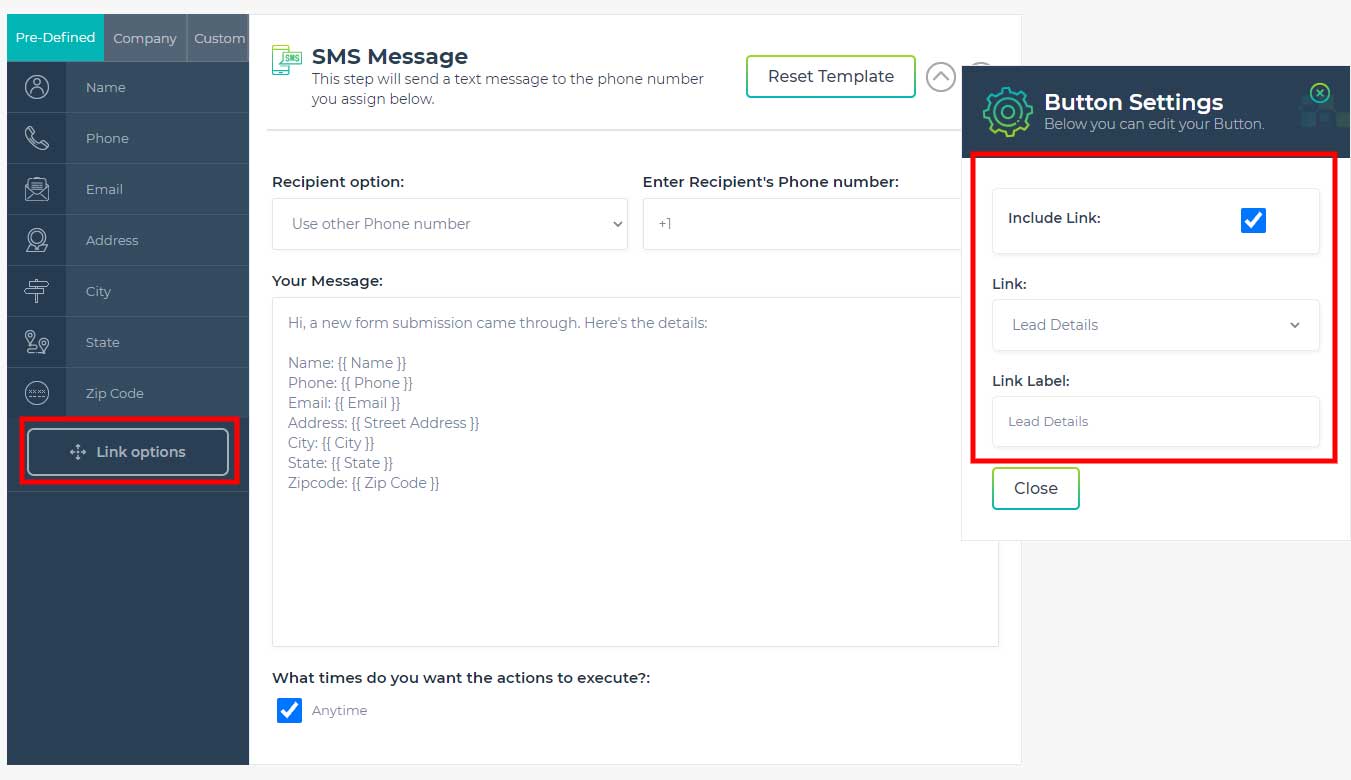
For text messages, the functionality is nearly identical but as you can see in the image below, this one says “link options.”

In either case, you can manage the behavior of the button or link through the menu that slides out from the right side. This window will be visible by clicking either the button options (email) or link option text messages.

Text Link Options

With the text message option, you can include a link by checking the checkbox. Next, you can choose between three options.

Review Funnel – Sends a link to the review funnel that is associated with the lead or contact.
Lead Details – Sends a link to the lead that is associated with the automation.
Other – Sends a link to another URL that you can specify here.
Text Link Options


Email Button Options

We have all the same options for links as we do for texting, but we have a little more control since we are able to create buttons in emails that we are not able to create in text messages.

Review Funnel – Sends a link to the review funnel that is associated with the lead or contact.
Lead Details – Sends a link to the lead that is associated with the automation.
Other – Allows you to send a link to another URL that you can specify here.
Button Background Color – Allows you to select the background color of the button to be used with the link.
Button Text Color – Allows you to select the color of the text to be used within the button.
Button Text – Allows you to select the actual words or text to be used within the button.
Button Link Options


Create New Automation

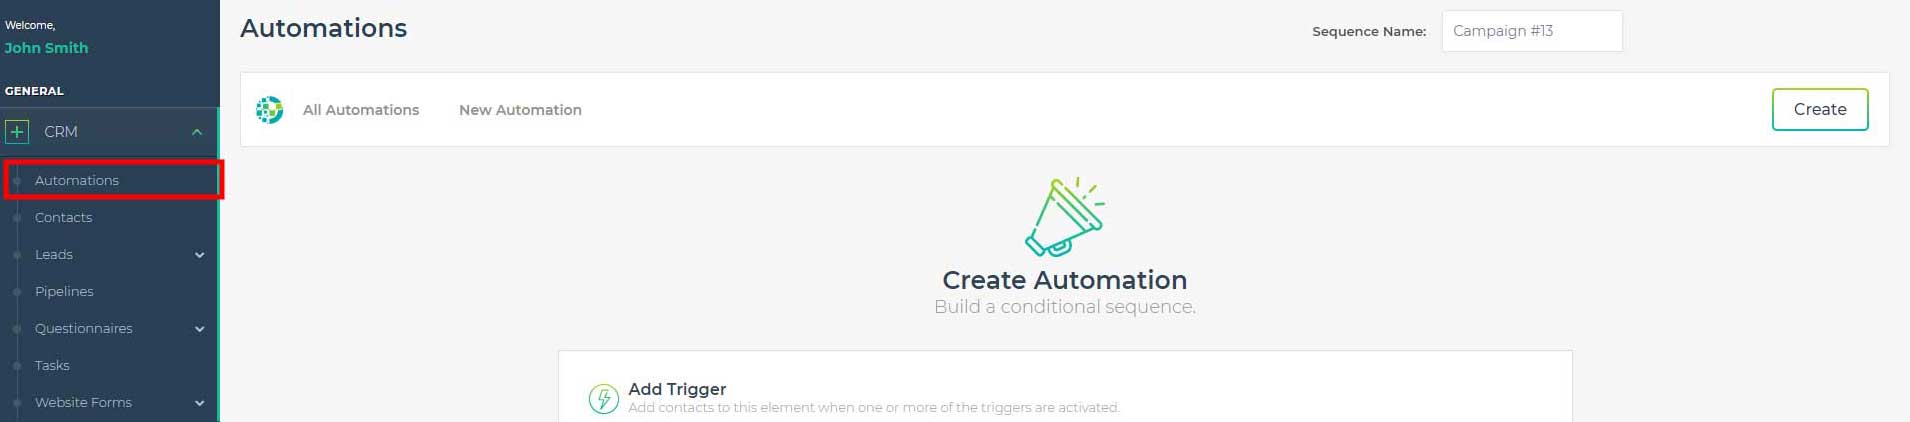
To start a new automation, expand the CRM item in the left navigation menu, then select “Automations”
This is the “All Automations” page. Here you will be able to create new automations as well as manage existing ones.

Starting an Automation

Automations can be started in two different ways: with a trigger or by being manually added to an automation.
Create Automation


Lead Detail Page

To start an automation from the “Lead Detail” page, expand the CRM item in the left navigation menu, expand ”Leads,” then select “All Leads”. Select the lead you would like to create an automation for, and click “View.”
You are now in the “Lead Detail” page. To start an automation click the “Add to Automation” button in the top right hand corner to the left of the “Delete Lead” button.

Add Lead to Automation


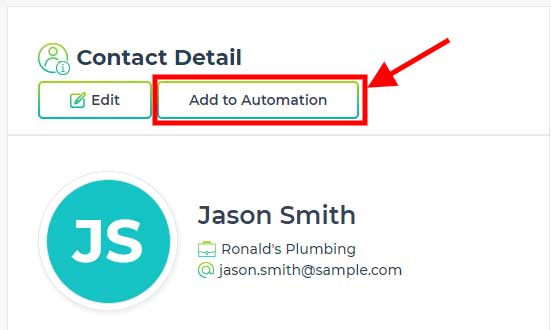
Contact Details Page

To start an automation from the “Contact Details” page, expand the CRM item in the left navigation menu and select contacts. From here, search for the contact you would like to create an automation for and open it up.
You are now in the “Contact Details” page. To start an automation, select the “Add to Automation” button in the top left hand corner of the page to the right of the “Edit” button.
Add Contact to Automation


All Automations Page

To start an automation from the “All Automations Page” expand the CRM item in the left navigation menu then select automations.
You are now in the “All Automations” Page. From here you can create a new automation by clicking the “New Automation” button at the top right hand corner to the right of the “Add to Automation” button.

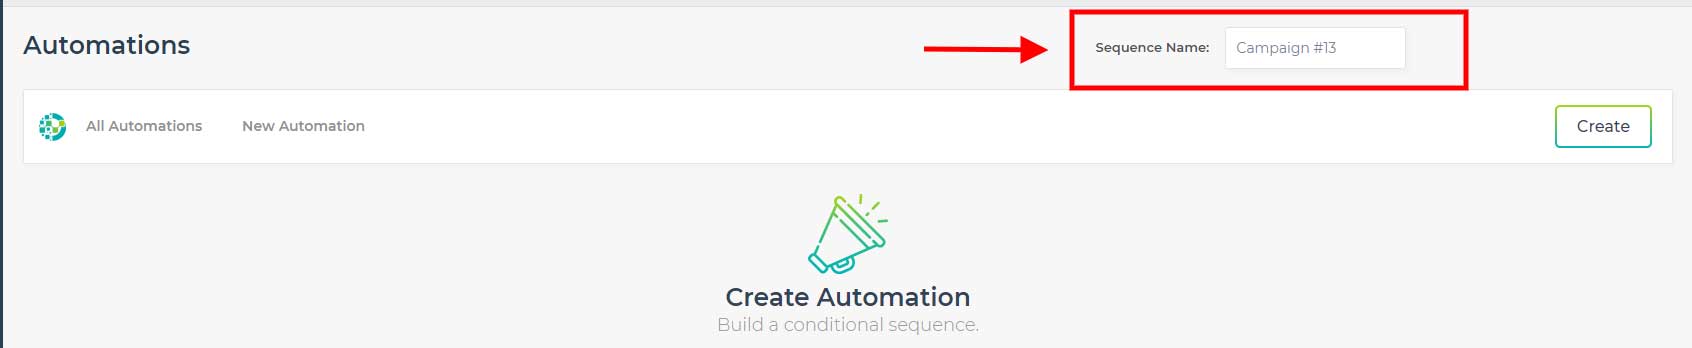
Naming an Automation

To name your automation, you must first create one. From the “All Automations” page select the “New Automation” button. Then select which type of automation you would like to create from the selections provided.
After selecting what type of automation you will be creating, you will now be able to name it. The custom name field will be located at the top right hand corner of the page and labeled “Sequence Name”.

Naming Automations


In Progress Automations

Automation History

You can view the entire history for a specific automation. To do this, start from the “All Automations” page, find the automation you would like to view the history of, then click the “History Logs” button located in the actions tab. This button is the second from the left, right next to the “In Progress” button.
Automation History


Duplicate Automation

Duplicating an existing automation is very easy. Starting from the “All Automations” page, click the “Duplicate” button which is located in the actions tab. This button is the second from the right, next to the “Delete” button. Once you click duplicate, you will be prompted to name the new automation. After naming your copied automation, click “Duplicate”, then you will be directed to where you can edit your new duplicated automation.
Duplicate Automation


Delete Automation

If you would like to delete an automation, start from the “All Automations” page, and click the “Delete” button that is located in the actions tab. This button is on the far right. After clicking the “Delete” button, you will be prompted to confirm you would like to delete that automation.
Delete Automation


Government Compliance

Various governing bodies around the world have restrictions on automation related to phone calls, emails, text messages and unsolicited faxes. By using LeadGenerated you assume responsibility for being in compliance with these rules and regulations. Failure to do so can result in legal ramifications that are your responsibility to resolve.