Add Email Account

Lead Generated sends emails for a variety events throughout our system. By default the emails come from [email protected]. We understand that this probably not desirable in many cases so we have provided you the ability to add your own email accounts to our system. Some of the common cases where you may want to send emails from your email instead of the Lead Generated default email are:

  • Delivering leads to you or your clients
  • Review requests
  • Questionnaire emails

Adding an Email Account

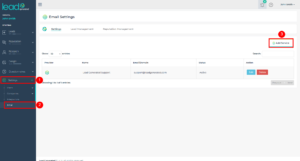
To add an email account expand settings from the left side navigation.

Select Email

From the top right corner click the “Add Email Account” button.

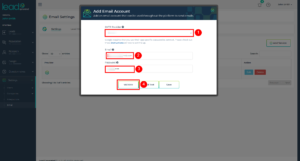
Select your email provider from the drop down list. If you do not see your email provider on the drop down list, select “Other”. When using the “Other” option you may need to contact your host to get the SMTP settings associated with your email account. Check out our SMTP settings article for the SMTP settings for some of the most popular website hosts. When using Gmail there are some additional steps required. This guide will walk you through the settings necessary for Gmail.

After completing the email settings click the “Validate” button to ensure we are able to access the email account with your settings.

Assuming your connection is successful you should see a message like this:

After a successful validation message it is a good idea to send a test email by clicking the “Send Test” button.

In the popup menu enter an email address where you can receive our test email message. If you did not receive the email test, please check your spam email. The test email should be from the email address you just added to our system.

After receiving the test email message you can now save the email address to our system.

Once the email address is saved to our system you can start send emails from our system for Lead Emails, Review requests and Questionnaires.

Check out these articles for more information about sending emails for the associated modules.

Email Settings Lead Management Module

Email Settings Reputation Management Module

Email Settings Questionnaire Module

Questionnaire Email Settings

The questionnaire module makes it easy to gather information from our clients or prospective clients. First, we build our questionnaire using the Lead Generated form builder. Next, we send an email that contains a link to our questionnaire. When the user clicks on the link they are taken to the questionnaire that gathers the requested information and saves it safely in our system. By default, this questionnaire comes from [email protected], which we realize may not be ideal in all situations. You are free to customize this to your own email account and have those requests come from an email address that your client will recognize. The first step is to add an email account to Lead Generated.

After successfully adding an email account to Lead Generated you can assign the email account to be used for the questionnaire delivery on a questionnaire level. This assignment can happen from the edit questionnaire page.

Assign Email Account

There are two prerequisites before assigning an email account to a questionnaire. First, you must have already added the email account to Lead Generated. Second, you must have an existing questionnaire. To map an email account to a questionnaire follow these steps:

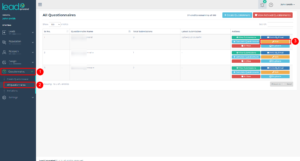
  1. Expand Questionnaires from the left navigation.
  2. Select All Questionnaires.
  3. Select Edit next to the questionnaire for which you would like to update the sending email account.
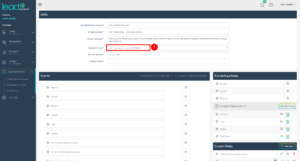
  4. Select the new email account from the “Sender Email” drop-down box.
  5. Click the submit button to save the new email settings for the questionnaire.

Client Onboarding Overview

Video Overview

The Client on-boarding or questionnaire module allows you to collect information from your clients in a professional organized way.  Requests are sent to the client by email and stored in our system on the client’s user dashboard under the questionnaires tab. Using the form builder you have the freedom to build the questionnaire with all the information you decide is important.

Why Use This Module?

  • Very professional start to a new client. This let’s them know from the start that you have done this enough times that you wanted a system to help with the process.
  • Keep everything organized in one place. Adds to the client profile for you and your entire team. These questionnaires can always be called upon later when you details on the specifics of a clients business. As your list of clients continues to grow you will need a system to keep their info straight.
  • Never ask the same question twice.
  • Never forget to ask a question.
  • Unlimited questionnaires for your clients.

Create a new questionnaire

  1. On the left menu, expand the “Client On-boarding” item and then choose “create questionnaire”.
  2. Questionnaire Name – an internal field that is just used for you to identify your questionnaire.
  3. Email Subject – sets the subject of the questionnaire invitation email sent to your client.
  4. Email Content – sets the email body message for the client invitation.
  5. Sender Email – set the email address the invitation for the questionnaire was sent from.
  6. Sender Name – sets the name of the person sending the invitation to the client.
  7. Create the form by adding fields from the right side to the left side. Check out the form builder documentation area for in-depth instructions on how the form builder works.
  8. Click save to save your new form.

Send Questionnaire invitation to a client

  1. On the left menu, expand the “Client On-boarding” item and choose “All Questionnaires”.
  2. Select the invite by email button next to the questionnaire you would like to send to your client.
  3. Enter your client’s first name. If you have already created the client within Lead Generated it will pull up their name and auto-fill their email address. When they complete the questionnaire the questionnaire will automatically have the association with your client.  
  4. Enter the email address where you would like to send the questionnaire to.
  5. If you chose an existing client, the questionnaire will be available in the questionnaires tab of the associated user dashboard.

View Completed Submissions

  1. On the left menu, expand the “Client On-boarding” item and choose “All Questionnaires”.
  2. Select the view submissions button next to the questionnaire you would like to check the associated submissions.
  3. The next page will display a list of users that have completed the associated questionnaire. If you do not see the user you are looking for on this screen they have not completed the questionnaire you sent them.