Google Analytics Integration

The Google Analytics Integration to LeadGenerated was designed so that you are able to view all of your analytics data in one place directly associated with the company’s in the system. The reports produced by Google Analytics data contain valuable information and insight into user behavior so you can address business marketing concerns

You are able to see real-time data such as how many visitors are on your site and whether they are browsing from a computer or mobile device, traffic sources, site speed, and page indexing all in a single convenient dashboard. Connect any number of Google Analytics Accounts to LeadGenerated for added flexibility.

How to Connect A Google Account

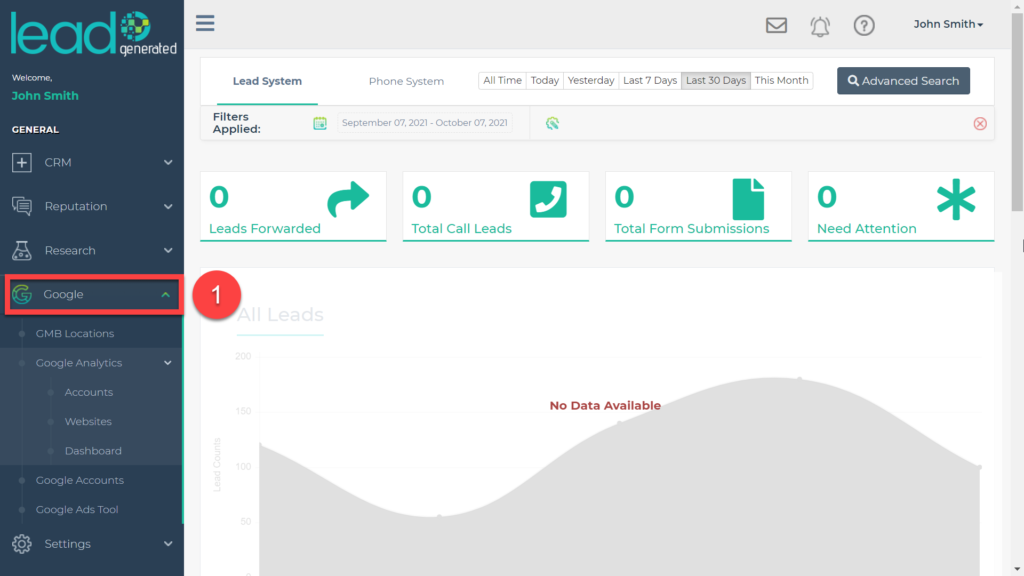
1. Expand the “Google” item from the left side navigation.

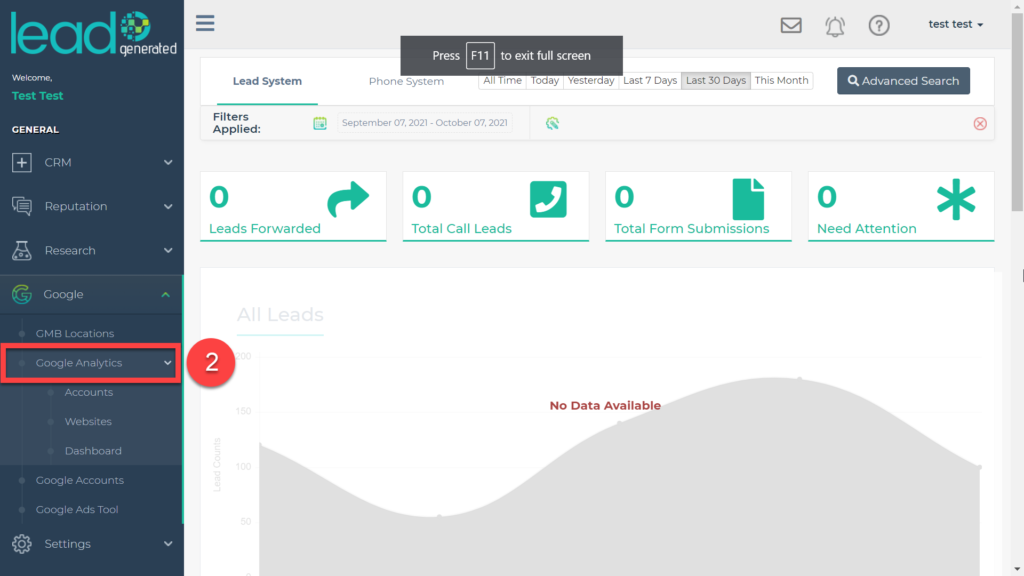
2. Expand the “Google Analytics” item from the left side navigation.

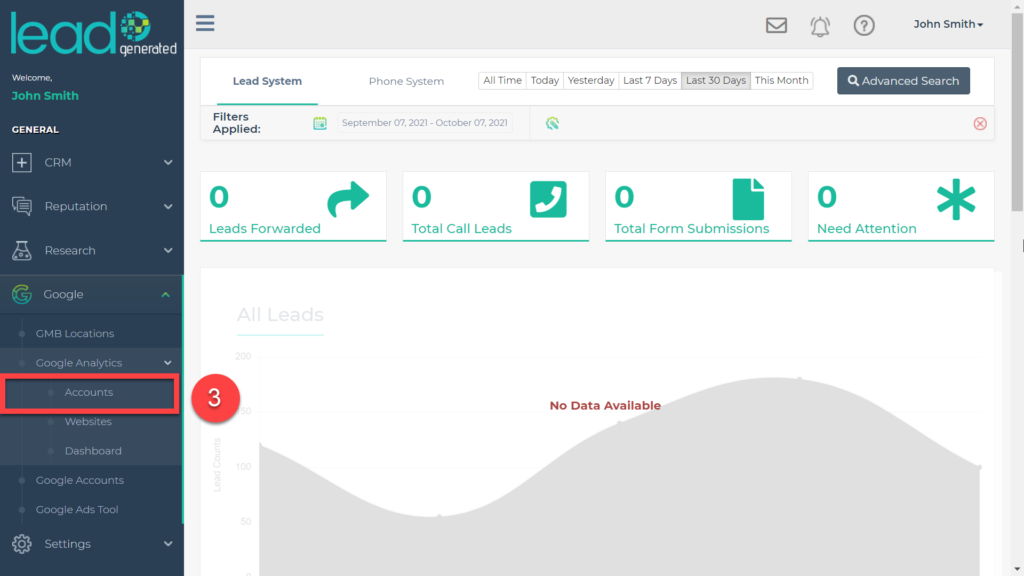
3. Select “Accounts”

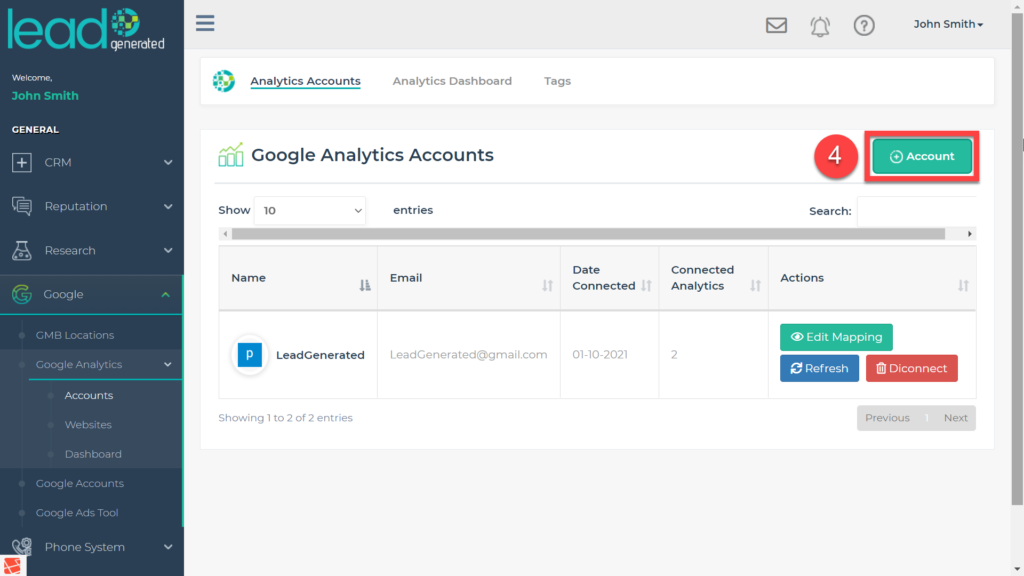
4. Click the add account button on the main screen

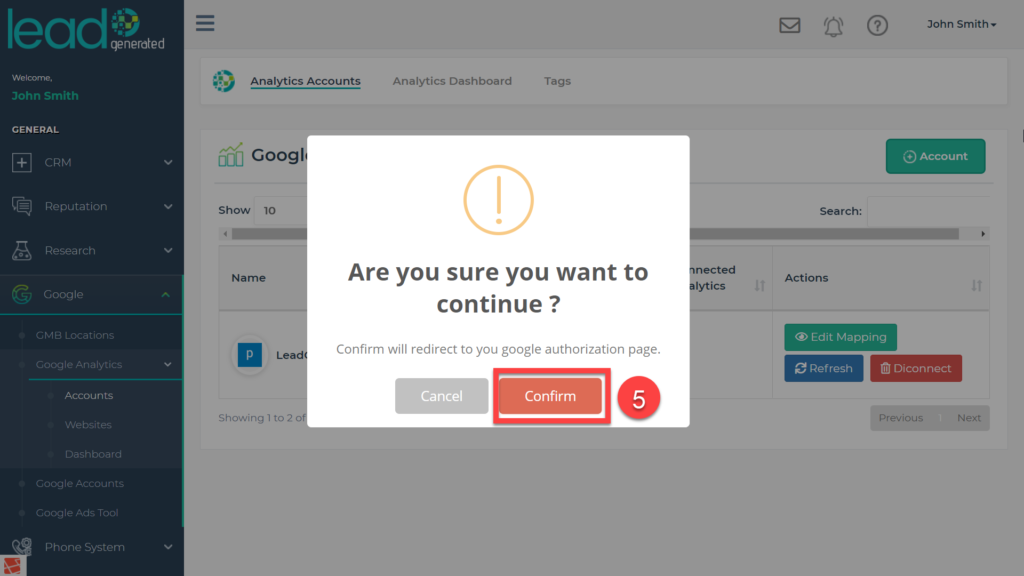
5. Select Confirm on the “Are you sure you want to continue” Screen

6. Sign-into the google account that is connected to analytics.

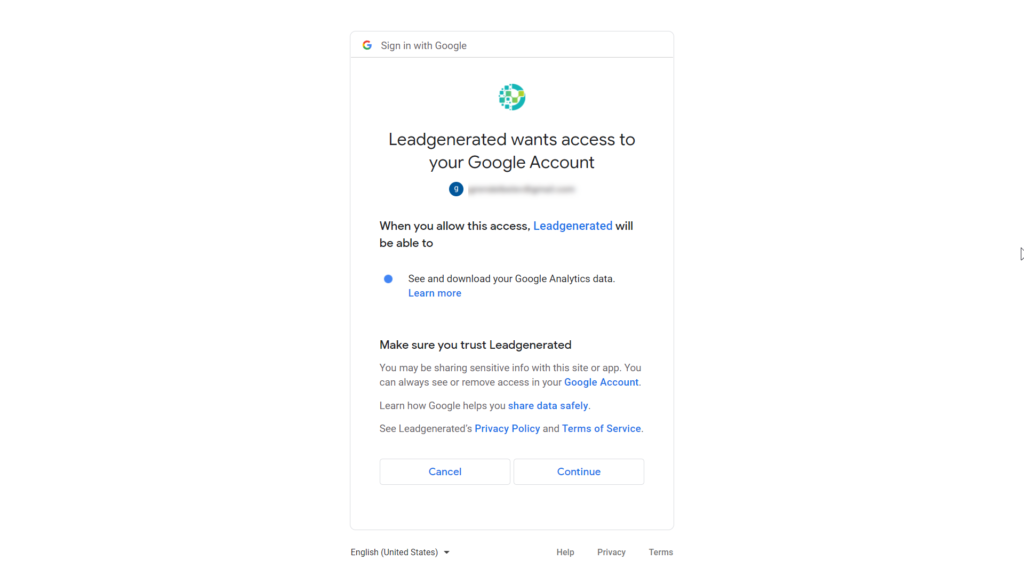
7. After sign in select continue on “LeadGenerated wants access to your google Account”

8. To add more accounts repeat steps 1-7.

How to Get to Google Account Mapping

1. Return to the google item on the left side navigation

2. Expand the “Google Analytics” item for the left side navigation

3. Select accounts

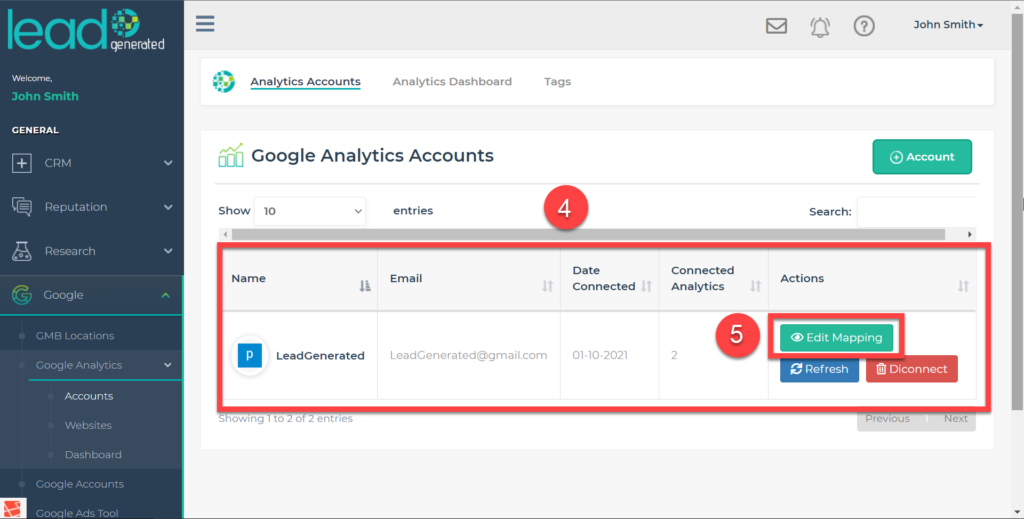
4. Locate your account on the main screen

5. Navigate to actions right of the account name and select edit mapping.

How to View Google Analytics Account Data

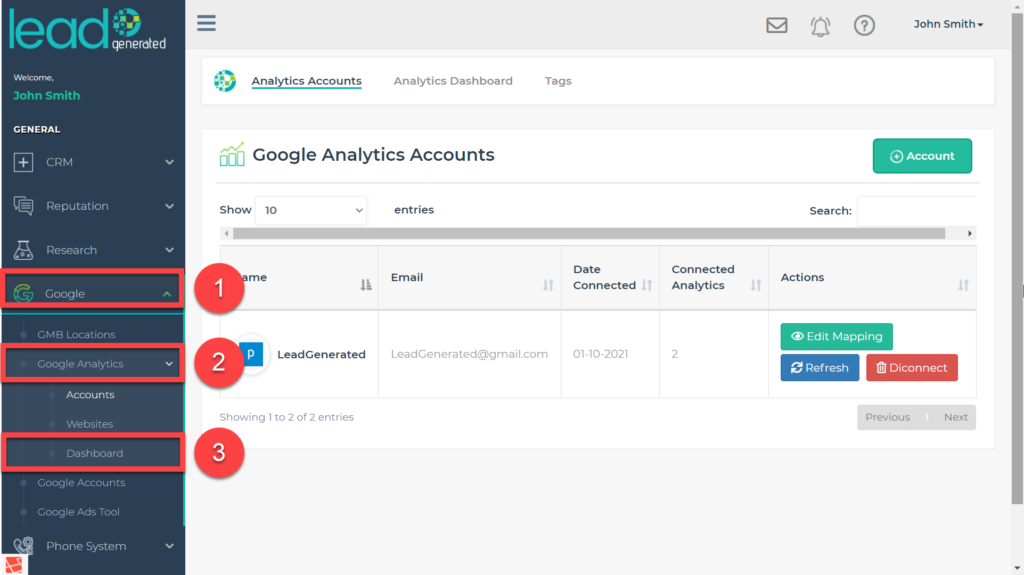
1. Expand the “Google” item from the left side navigation

2. Expand Google Analytics

3. Select Dashboard.

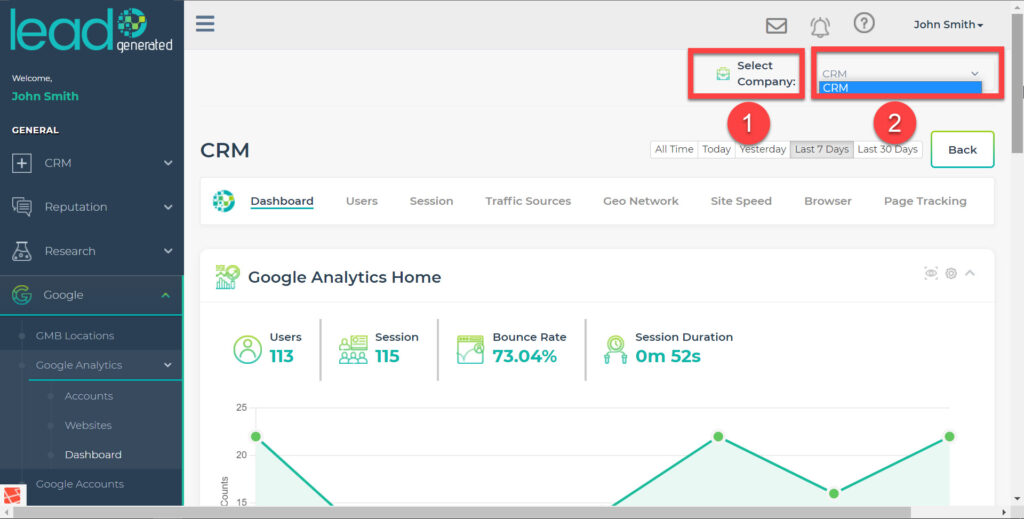
To view company specific Google analytics results:

1. Navigate to “Select Company” in the upper right hand corner of the dashboard screen

2. Select from the drop down the company you want to see analytics results for.

How to Disconnect a Google Account From LeadGenerated’s Google Analytics Integration:

1. Expand the “Google” item from the left side navigation.

2. Expand the “Google Analytics” item from the left side navigation.

3. Select “Accounts”

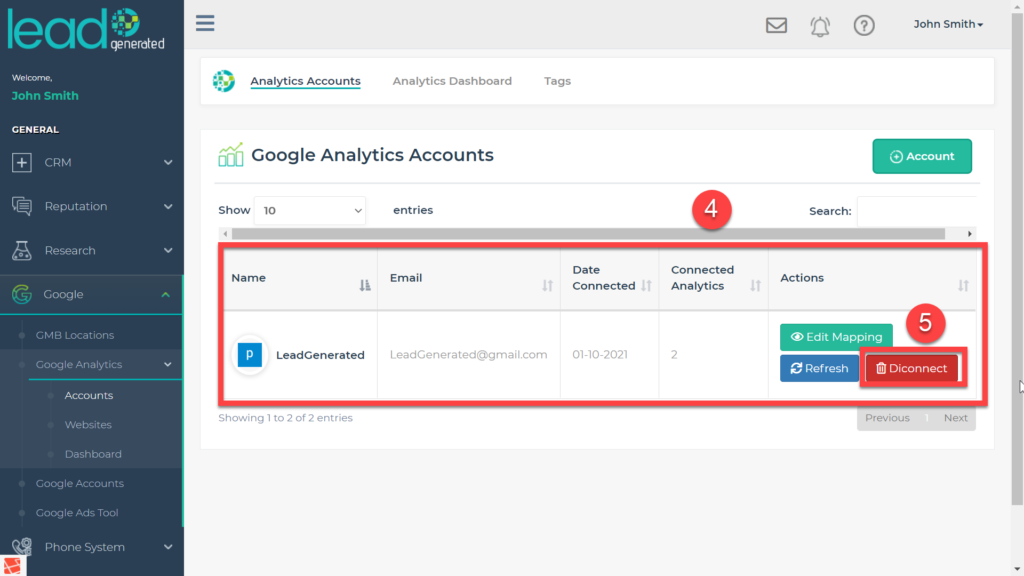
4. Locate the Google Account you would like to remove

5. Navigate to the “Actions” Column for the google account and select “Disconnect”

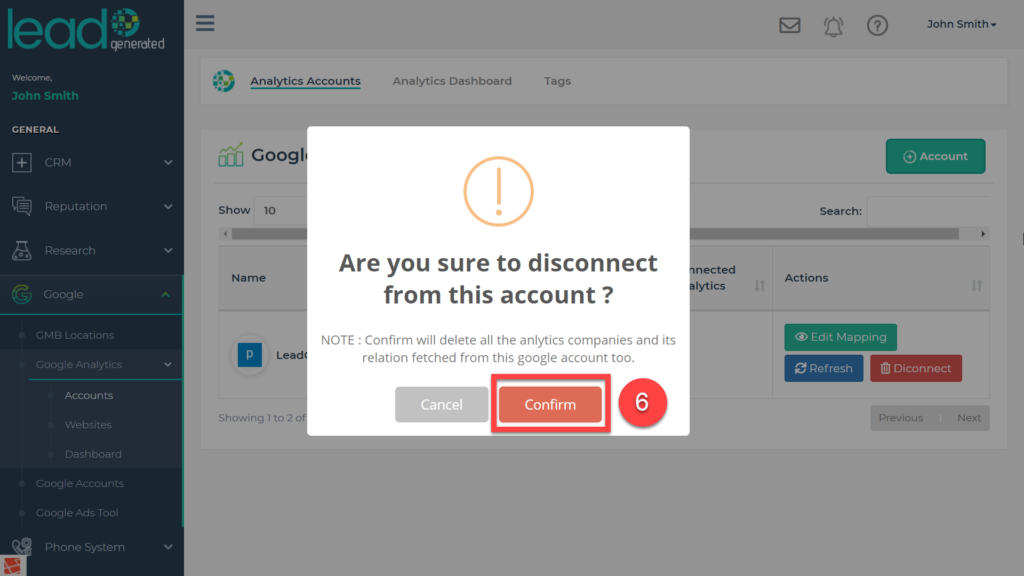
6. Select “Confirm” from the “are you sure you want to disconnect from this account” prompt.

Saving Custom Filters

In this article, I’ll show you how to save filters in Lead Generated, so that you can save time and also export custom tables.

Step 1: Open the Columns Window via the blue “columns” button.

Step 2: Check the boxes next to the columns you’d like to save in that filtered table view.

Step 3: Click “Save” when all desired columns have been checked.

Step 4: Click the “Advanced Search” button

Step 5: In the upper right corner, in the “Filters” section, click the “Save” icon

Step 6: Name Your Custom Filter

Step 7: Reference Your Saved Custom Filter via the Gear Icon

Step 8: Select the “Saved Filters” Tab

Step 9: Select Your Custom Filter from the List

Compare Heat Maps

Looking to compare heat maps side by side, maybe to show a client how you’ve improved their Google My Business Listing’s rankings over time?

In this video, I show just that.

To view your previously run heat maps side by side, there’s 4 main steps:

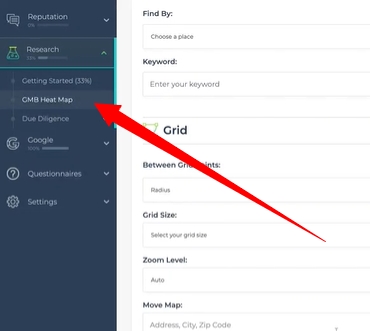
Step 1: Go to the “GMB Heat Map” Module

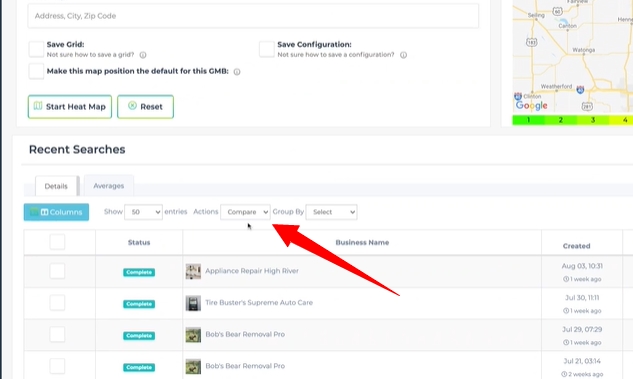
Step 2: Scroll Down to “Recent Searches”

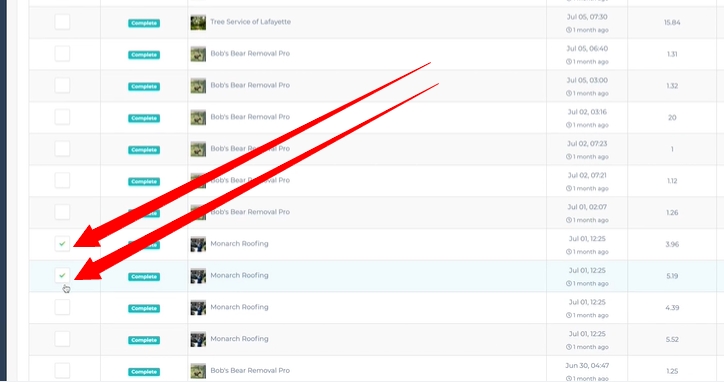
Step 3: Select the Heat Maps that You’d Like to Compare

Step 4: Under “Recent Searches”, Select “Compare” using the “Actions” Dropdown

Gmail and G Suite Settings

This guide will help you connect your Gmail or G Suite email accounts to Lead Generated within our SMTP settings area. Depending on the specific account settings within your Gmail or G Suite account one or both of these steps may be necessary. To learn more about SMTP settings please read the associated support guide.

Reputation Management SMTP

  1. Expand Reputation Management from the left side navigation.
  2. Click Email.
  3. Select the SMTP Settings tab.

Allow Less Secure Apps

Here is an article from Gmail that explains more about the process.

While logged into your account this link should take you to the area to adjust the settings.

Google App Password

As an extra level of security Google has a feature that you can use with its products (such as Gmail) called app passwords or app-specific passwords.  The way this works is you can create a unique password for each application (in this case Lead Generated), this will not affect the main password for your account. You then use this password just like you would your normal password within the chosen application. In a sense, it is like an alternative password that will only apply to one application.

For more information about how to set this up please check out this support article from Gmail: App Passwords.

Restore an archived user

Did you accidentally archive an user or want to restart business with an old client you had archived? Fear not! You can restore users following these simple steps.

Steps

  1. On the left menu, click on “Users”, then “All Users”.
  2. On the top right of the screen, click on “View Archived Users”.
  3. Find the user you wish to restore then click on the “Restore” button.
  4. A popup window will show up to confirm this action.
  5. Click on the “Confirm” button.

Video Tutorial

Need more details or just want to see how it’s done? Watch the video below.

Spam Filters

The spam filters help you manage the form submissions that are sent to your various lead generation properties. They are turned on by default so it is important to check your spam area to make sure no real leads are accidentally being categorized as spam. To access the filtered leads or spam filters expand the leads item from the left navigation and choose spam. To edit the spam filters choose the edit spam filters button from the top right corner.

Watch this video for a more in-depth overview of spam filters.

Heat Map Search Fields

Lorem ipsum dolor sit amet, consectetur adipiscing elit, sed do eiusmod tempor incididunt ut labore et dolore magna aliqua. Ut enim ad minim veniam, quis nostrud exercitation ullamco laboris nisi ut aliquip ex ea commodo consequat. Duis aute irure dolor in reprehenderit in voluptate velit esse cillum dolore eu fugiat nulla pariatur. Excepteur sint occaecat cupidatat non proident, sunt in culpa qui officia deserunt mollit anim id est laborum.

GMB Management Overview

Lorem ipsum dolor sit amet, consectetur adipiscing elit, sed do eiusmod tempor incididunt ut labore et dolore magna aliqua. Ut enim ad minim veniam, quis nostrud exercitation ullamco laboris nisi ut aliquip ex ea commodo consequat. Duis aute irure dolor in reprehenderit in voluptate velit esse cillum dolore eu fugiat nulla pariatur. Excepteur sint occaecat cupidatat non proident, sunt in culpa qui officia deserunt mollit anim id est laborum.